
In this tutorial we continue the “managing voices” series for Amazon Alexa Skill developers using Voiceflow.
In Part 1, we covered how to use variables to more efficiently manage voice configurations. We used variables to manage “voice formulas” consisting of SSML Alexa Polly synthetic voice and prosody tags, and reusing those variables throughout a skill. This can really benefit larger skills with many speak-steps and consisting of multiple characters.
In Part 2 we continue the theme of working with Alexa Polly synthetic voices (text-to-speech). We will review techniques which enable users to pick voices and save them as preferences when using your custom Alexa skills.
Techniques and Benefits
We will build a demo skill and review a variety of techniques.
Use Voiceflow’s built-in “sessions” variable to identify first time users versus return visitors.
This enables providing welcome messages just for first-time users, and guiding them through a process for them to choose a voice they like best.
Use Amazon Polly SSML voice tags to provide a variety of user voice options.
This enables individual users to pick a preferred voice when using a custom skill. The benefit of this is that they may increase more frequent reuse of the skill. In this tutorial three voice options will be configured.
Include a genderless / gender-neutral voice option.
This tutorial includes an Alexa Polly voice configured with SSML Prosody tags to approximate a gender-neutral voice. This provides users an additional voice option in addition to male-sounding and female-sounding voices.
Leverage Voiceflow’s Project (global) variables, which are associated with user Account IDs.
This provides persistence, as they will save the user’s voice preference for future sessions.
Configure a “Preferences” intent (or command) to enable the user to change the voice whenever they wish, whether during the first session or future sessions.
This enables users to change their preferred voices, particularly when there are multiple users in a household or business using the same skill and same Amazon account.
Manage voice SSML configurations and character names in a single location in the skill.
A Set block will be used to assign all voice SSML configurations to variables.
The benefit is to reduce the risk of typos with SSML syntax, as it is configured and assigned to variables only once, rather than having SSML voice tags repetitively scattered throughout a large skill. A second benefit is that it is easy to edit and update a voice’s SSML configuration when iterating based on feedback.
Use a sub-flow to manage setting the user’s preferences.
This helps keep the project organized. In addition to voice options, a preferences sub-flow can be used to manage other types of user preferences, ranging from nicknames and other persona characteristics, sound effect options, favorite colors and so on.
The drawback, however, is that asking users to choose a voice during their first session adds some friction. Thus, an important design consideration is whether it makes sense adding a preferences feature for your particular skill.
In either case, you are encouraged to follow along in this tutorial so that you may have these techniques as options in your toolbox.
Resources
This Amazon reference document provides the syntax for the Speech Synthesis Markup Language (SSML) tags.
Speech Synthesis Markup Language (SSML) Reference
Demonstration Skill and Use Cases
Our demo skill will have two flows and three use cases.
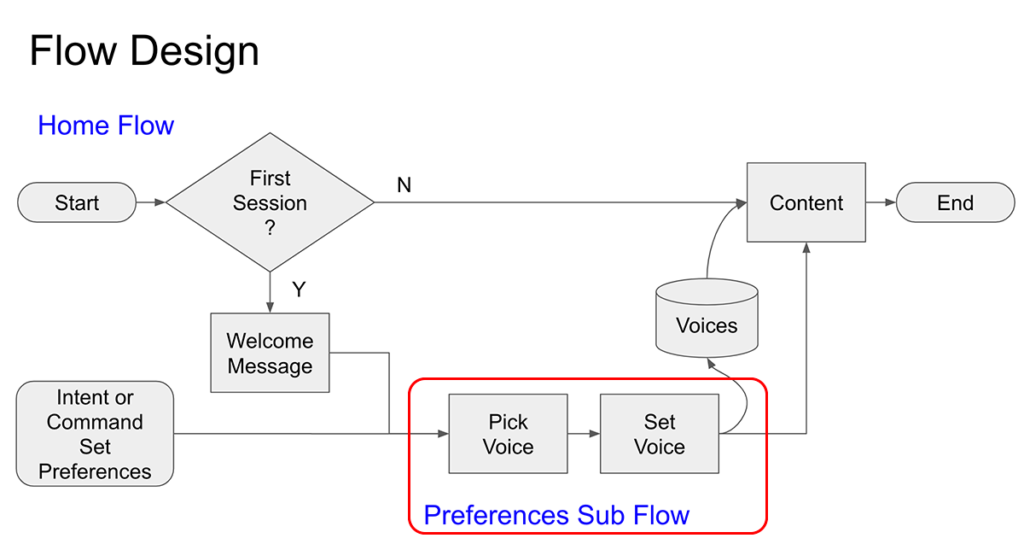
The first use case is for a new user. if it is their first session, they will hear a “first time user” welcome message. The skill will then flow into the Preferences Sub Flow. Here, the new user will pick a voice, and the system will save it. The skill will then apply the voice to content recited by Alexa, both for the rest of the session and return visits.
The second use case is for a returning user. Because it is not their first session, the skill flows directly to the content, as they don’t necessarily need to hear the new user welcome message a second time, and they’ve already picked their preferred voice.
The third use case is either a new or returning user, who wish to change their voice preference, which had been set earlier. In this case, they can say “Alexa, set preferences,” and the skill will route them into the Preferences Sub Flow. Once they have picked a new voice, the skill would then return to the main content.
The tests we will perform towards the end of this tutorial will run through each of the use cases.
Here is how our demo skill will look on the Voiceflow project canvas.
Home flow:
Preferences sub-flow:
During this tutorial we will configure each block and then upload to Alexa for testing.
If you wish, you can either drag all of the blocks onto the canvas right away and hook them up, or add them one at a time as we proceed through the tutorial.
Demonstration Voices and Test Content
For this tutorial we will configure three Alexa Polly voices. The test content used in the skill comes from Herman Melville’s novel Moby Dick. SSML breaks (pauses) have been added to enhance how it sounds.
Call me Ishmael. <break time="300ms"/> Some years ago <break time="300ms"/>
never mind how long precisely <break time="300ms"/> having little or no
money in my purse, and nothing particular to interest me on shore, I thought
I would sail about a little <break time="100ms"/> and see the watery part of
the world.
Below are the SSML tag configurations and corresponding sound samples we will use in the tutorial:
Logan (A male-sounding voice)
<voice name="Matthew"><lang xml:lang="en-US"><prosody pitch="+0%"
rate="110%" volume="+0dB">Olivia (A female-sounding voice)
<voice name="Salli"><lang xml:lang="en-US"><prosody pitch="+0%"
rate="120%" volume="+0dB">Jordan (a genderless / gender-neutral sounding voice)
<voice name="Joanna"><lang xml:lang="en-US"><prosody pitch="-27%"
rate="95%" volume="+0dB">Closing SSML tags
</prosody></lang></voice>In these configurations, the lang tag is included to help with pronunciation should you distribute the skill among a variety of English-speaking regions.
In addition, prosody for pitch, rate and volume are included. In many cases, the values may be neutral, however during testing and the iterative process you may need to fine tune the voices.
Additional SSML tags to consider are “emphasis” and “whispered”. Emphasis changes several prosody properties, and whispered is a special effect that can be dramatic. If you are not familiar with these, give them a try and see how the work.
Task Summary
Part 1 – Initiate a Demo Skill and Home Flow
Task 1: Create a project
Task 2: Add variables
Task 3: Configure a Set: Voices block
Task 4: Configure an IF: sessions > 1 block
Part 2 – Configure a Combine: First Session Block
Task 1: Configure a Set: Initialize Variables block
Task 2: Configure a Speak: First Visit block
Task 3: Configure a Flow: Preferences block
Part 3 – Configure the Preferences Flow
Task 1: Configure a Speak: Voice Options block
Task 2: Configure an Interaction: Voice Choice block
Task 3: Configure a Speak: Else Voice Choice block
Task 4: Configure an If: Voice Choice block
Task 5: Configure three Set: Voices blocks
Task 6: Configure a Speak: Confirmation block
Part 4 – Complete the Home Flow
Task 1: Configure a Speak: Chapter 1 block (test content)
Task 2: Configure an Interaction: Continue YN block
Task 3: Configure a Speak: Else Repeat YN block
Task 4: Configure a Flow: Stop block
Part 5 – Update the Stop Flow
Task 1: Update the Speak: Ended block
Part 6 – Add a Preferences Intent
Task 1: Configure an Intent: Preferences block
Part 7 – Three Tests
Task 1: Upload to Alexa and test the first session
Task 2: Test the second session for persistence
Task 3: Test the preferences intent and change the voice
Part 1 – Initiate a Demo Skill and Home Flow
This set of tasks walks you through initiating a demo skill and configuring a set of variables which will be used to store the SSML tags for three Alexa Polly voices. We will also include corresponding variables for storing three character names, as well as a variable for storing the SSML closing tags.
Task 1: Create a project
Let’s begin by creating a project. For our demo we named the project “manage voices” and are using the EN-US region. However use whatever name you prefer and the region which works best for you.
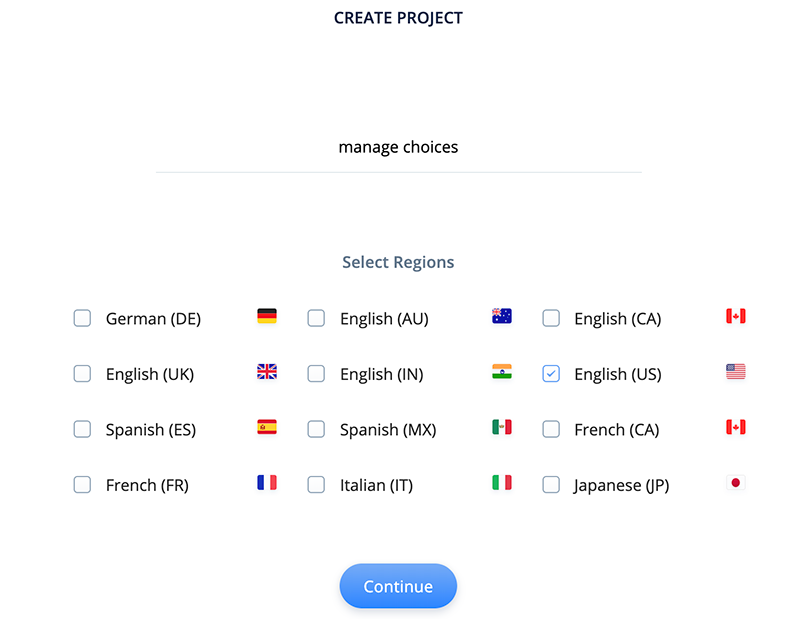
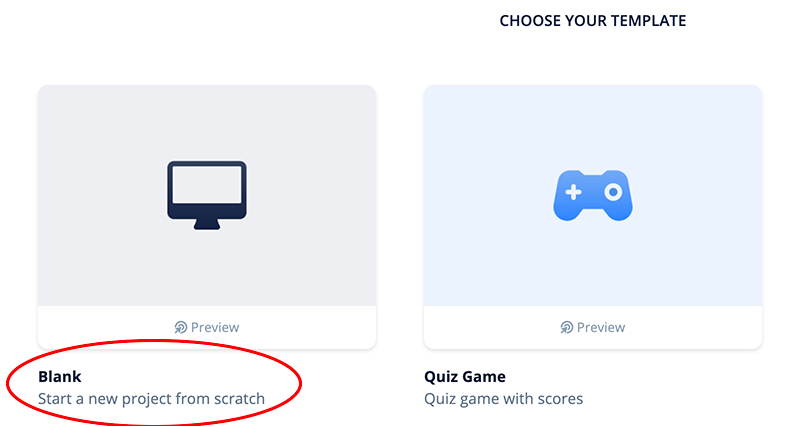
Select the blank template.
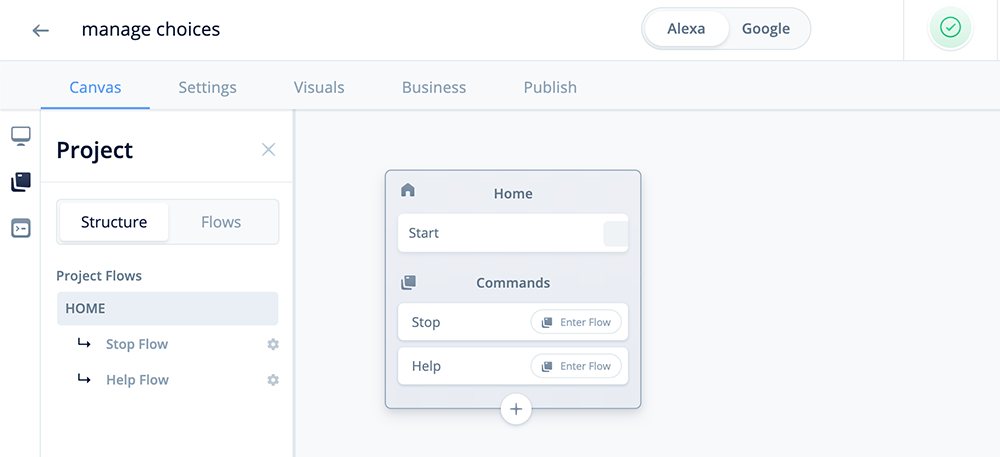
When the project first opens, it will look like this:
Task 2: Add variables
In this task we will be configuring variables which will store all the SSML tag values related to the voice options.
Click on the variables icon in the left hand pane and add the following Project variables:
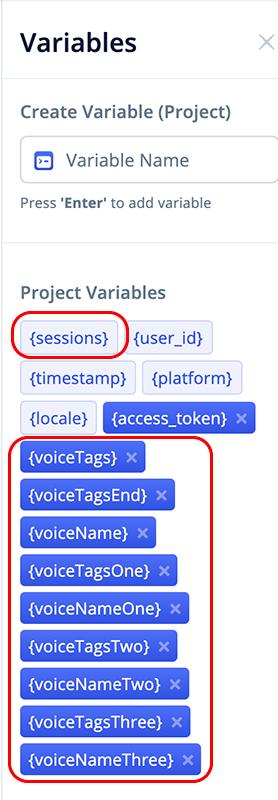
The {voiceTags} and {voiceTagsEnd} will store the opening and closing SSML tags for the user’s selected voice, and will be used throughout the skill.
voiceTags
voiceTagsEnd
The {voiceName} variable will store the user’s selected character name. It will correspond with the {voiceTags} variable.
voiceName{voiceTagsOne} through {voiceTagsThree} will contain the static SSML voice tags and associated lang and prosody SSML tags for each voice option. Likewise, {voiceNameOne} through {voiceNameThree} will store the names for each voice.
The first pair will be for voice character “Logan.” The second pair will be for “Olivia,” and the third pair for “Jordan.”
When the user selects their preferred voice, these will be assigned to the {voiceTags} and {voiceName} variables.
voiceTagsOne
voiceNameOne
voiceTagsTwo
voiceNameTwo
voiceTagsThree
voiceNameThree
We will also be utilizing the Voiceflow {sessions} variable to identify first time users versus returning users.
Task 3: Configure a Set: Voices block
In this task we are assigning the SSML “voice formulas” for the three voice options, as well as the nicknames we are assigning them. We will also assign the SSML closing tags for the voices in a variable as well.
This SET block will be the central point where we store SSML tags for the voices. If a change to a voice is needed, the change can be made inside this block and will update how the skill recites text via the variables.
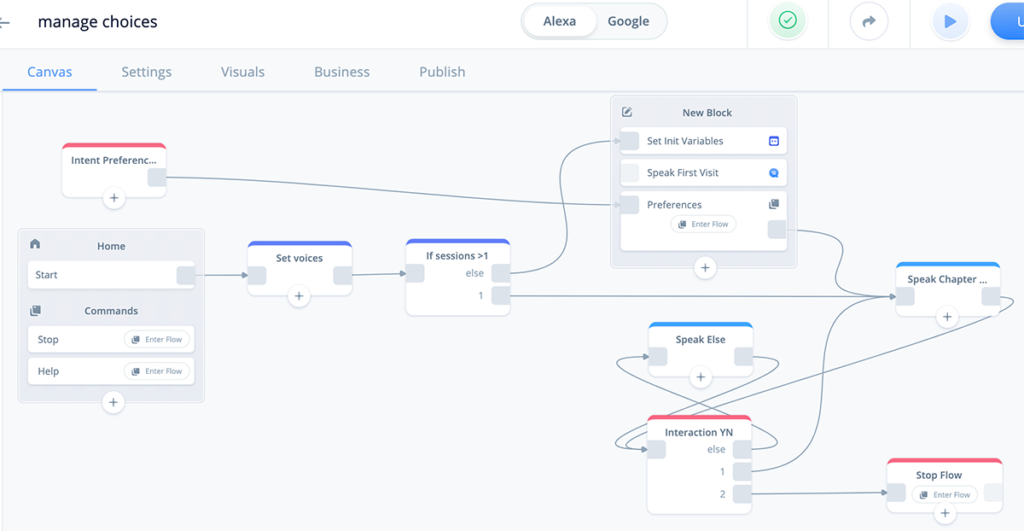
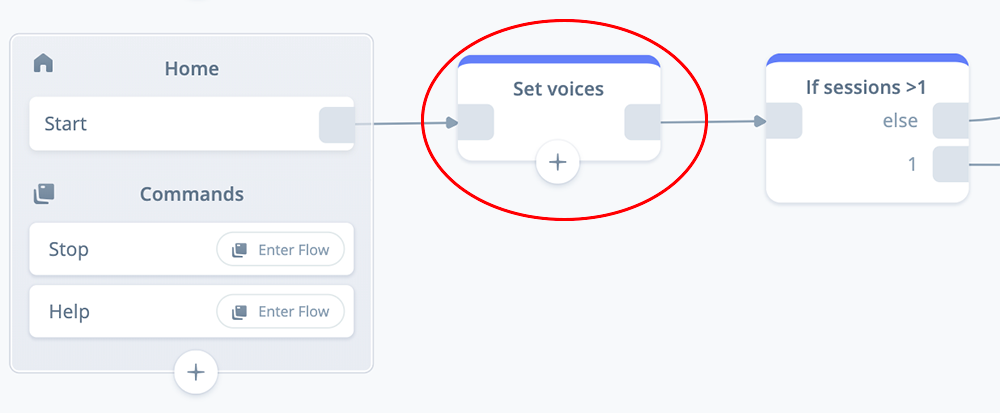
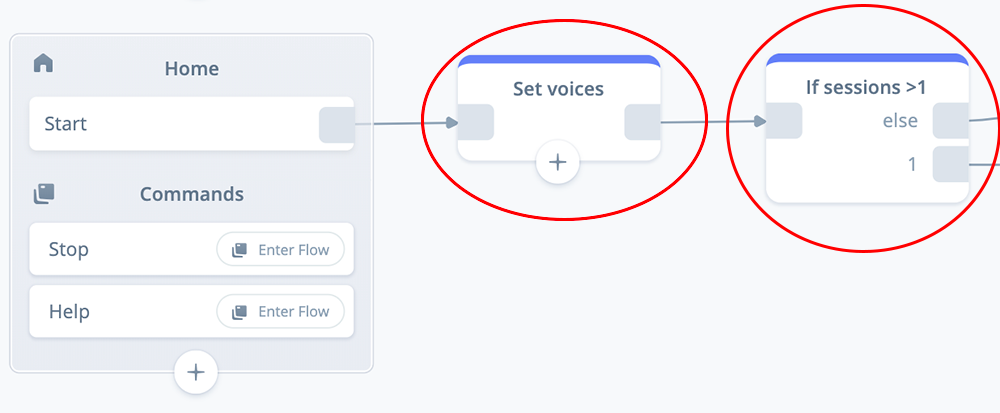
Add a Set block to the canvas as shown below. Name it “Set voices”, and connect it to the start block.
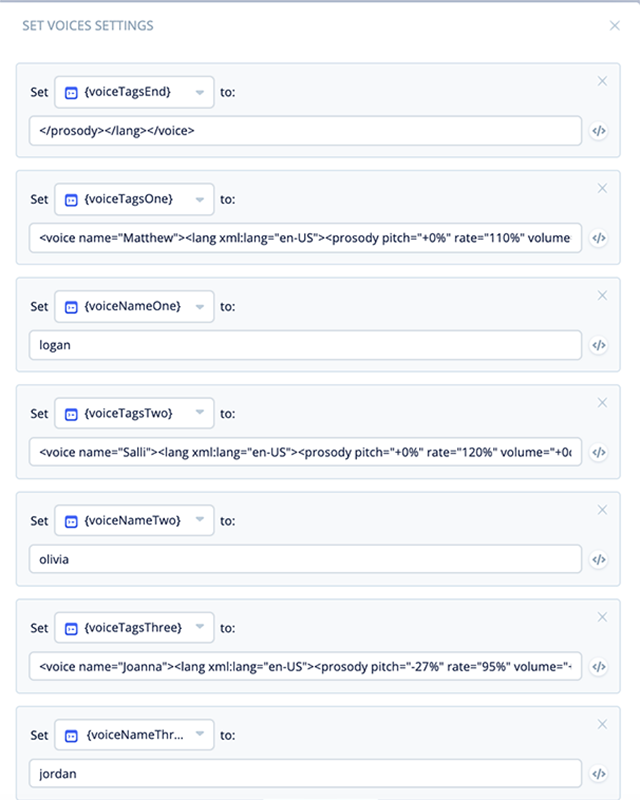
Open and expand the block. In the first variable set, select variable {voiceTagsEnd}, and assign the following SSML tags:
</prosody></lang></voice>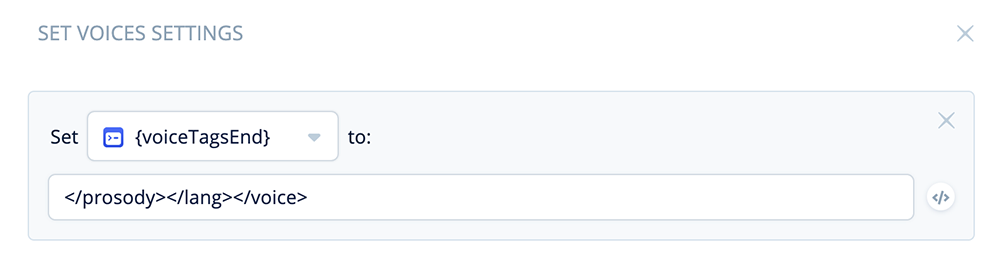
Add more variable sets and assign values for {voiceTagsOne} and {voiceNameOne}:
<voice name="Matthew"><lang xml:lang="en-US"><prosody pitch="+0%"
rate="110%" volume="+0dB">

logan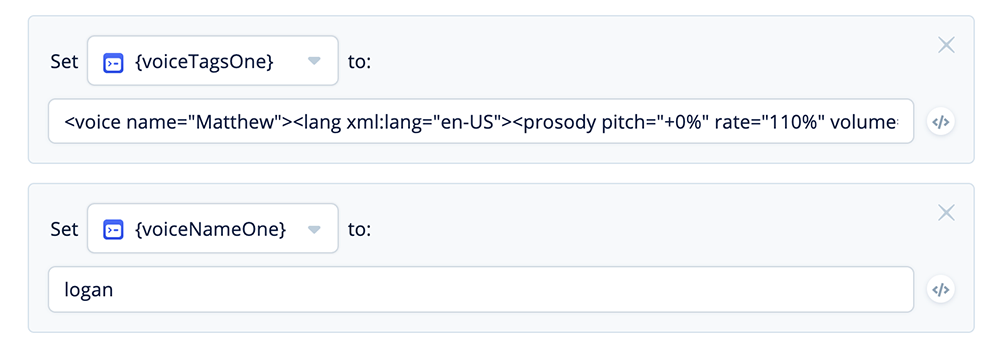
Add more variable sets and assign values for {voiceTagsTwo} and {voiceNameTwo}:
<voice name="Salli"><lang xml:lang="en-US"><prosody pitch="+0%"
rate="120%" volume="+0dB">

olivia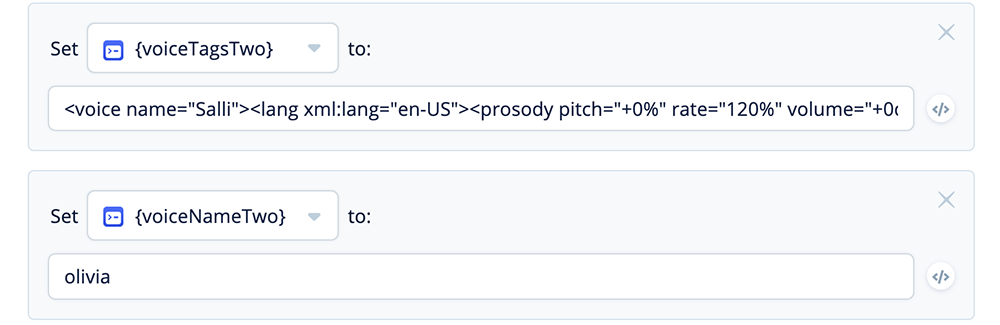
Add one more variable set and assign values for {voiceTagsThree} and {voiceNameThree}:
<voice name="Joanna"><lang xml:lang="en-US"><prosody pitch="-27%"
rate="95%" volume="+0dB">

jordan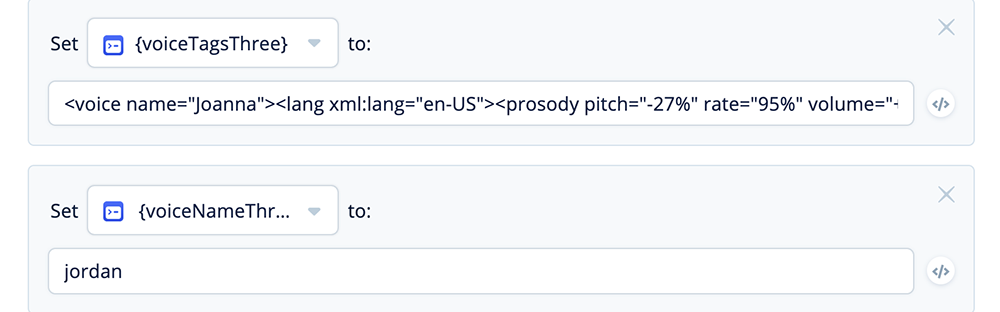
A total of seven variables have been configured, as shown below:
Task 4: Configure an IF: sessions > 1 block
An IF block will be used to determine if a user is accessing the skill for the first time, or is a return visitor. We will take advantage of Voiceflow’s built-in {sessions} variable.
If the variable is = 1, it is a first time user. If the variable is > 1, then they are a returning user.
We will use these conditions to determine whether the user should be routed to a first-time-user welcome message, and the Preferences flow for picking a voice. These are bypassed for returning visitors.
Add an IF block the Home flow canvas, as shown below. Rename the block “IF sessions >1”, and connect it to the SET voices block.
Open the IF block and assign the following condition to Port 1:
If {sessions} > 1.

If the {sessions} variable is >1, the flow will follow the “1” output port (returning user).
If the {sessions} variable is = 1 (first time user), the flow will follow the “else” port (first time visitor).
Part 2 – Configure a Combine: First Session Block
In this section we configure three additional blocks on the “Home” flow. These three blocks can be organized into a larger COMBINE block for our demo skill.
PRO TIP: For larger skills with initializations, consider putting blocks that perform these types of functions into their own “Initialization” flow. This will keep things organized and reduce clutter in the Home flow.
Once the three blocks are configured, they can be stacked into a COMBINE block as shown below:
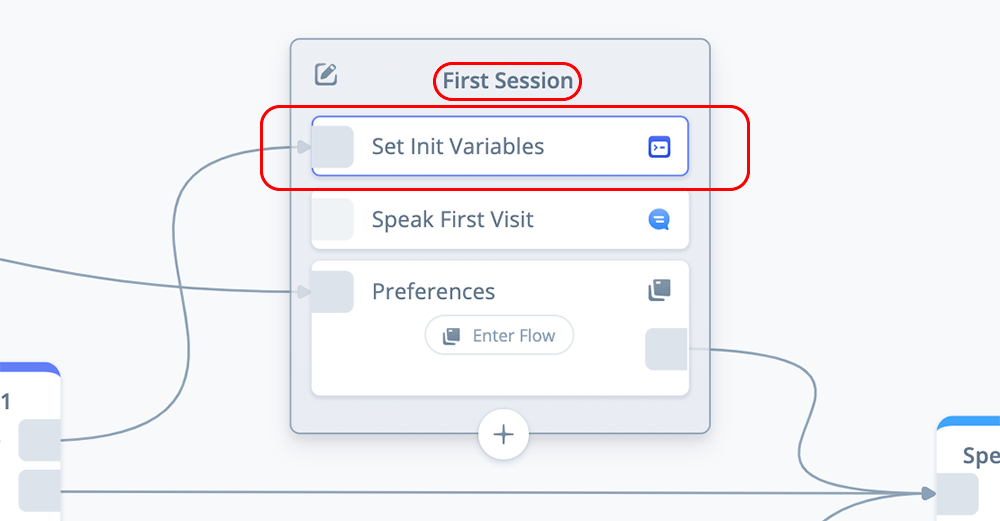
Task 1: Configure a Set: Initialize Variables block
For first time users, this skill is designed to play a Welcome message, and then ask for their voice preference. However we want to initialize the voice variables {VoiceTags} and {VoiceName} for two reasons.
First, so that we have a custom voice for the Welcome message.
Second, to pre-populate the variables before there is any interaction with the user. This helps avoid errors should a user stop the skill before the preferences flow is complete.
Add a SET block to the canvas, and name it “Set Init Variables.”
Open the block and make the following two assignments:
Set {voiceTags} to {voiceTagsTwo}
Set {voiceName} to {voiceNameTwo}

The above will assign the SSML voice tags and character name for Olivia. However any one of the voices can be used.
Task 2: Configure a Speak: First Visit block
This SPEAK block is the welcome message for first time visitors.
Add a SPEAK block to the canvas, and name it “Speak First Visit.”
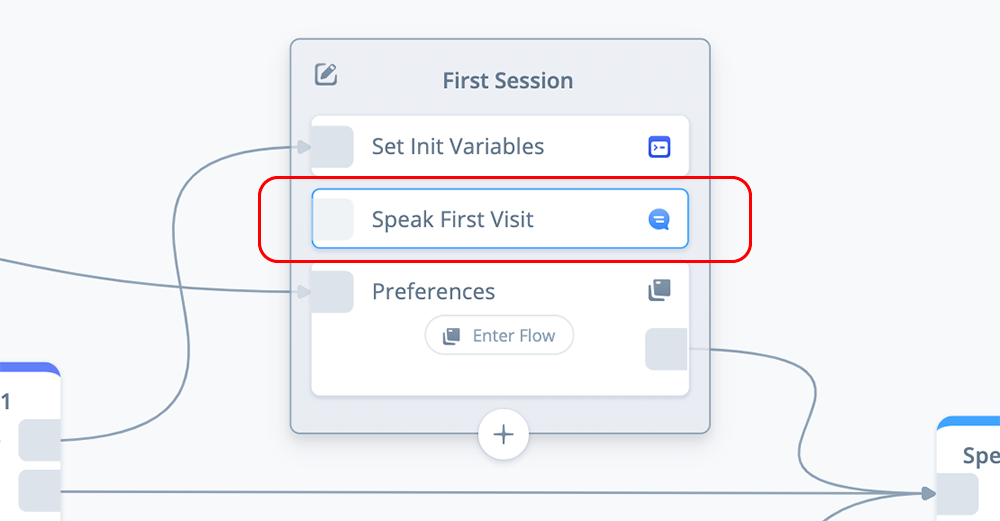
Open the block, and add the following variables and text:
{voiceTags}Hello, I am {voiceName}. Welcome to the Manage Choices Skill!
Because this is your first visit, let's set up your voice preference.
This will be saved for future visits. {voiceTagsEnd}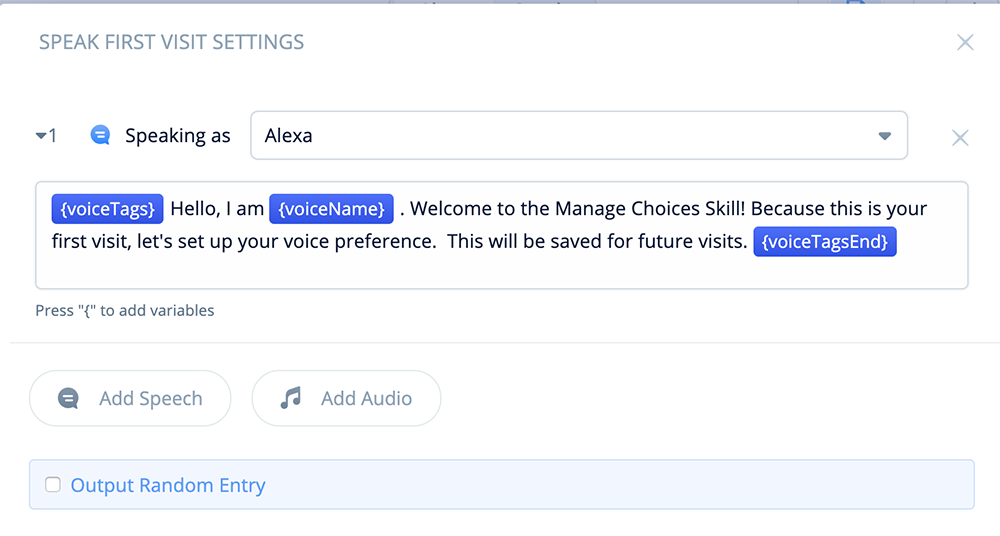
Note: Be sure that the voice pulldown for the Speech-step is set the the default value, “Alexa.” If you pick a different one, it may interfere with the SSML tags in the variables.
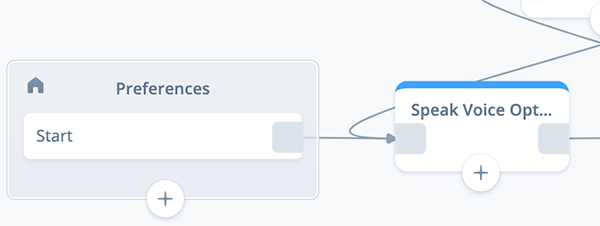
Task 3: Configure a Flow: Preferences block
A FLOW, named Preferences, is going to be used to manage the process for setting user voice preferences.
Add a FLOW block to the canvas.
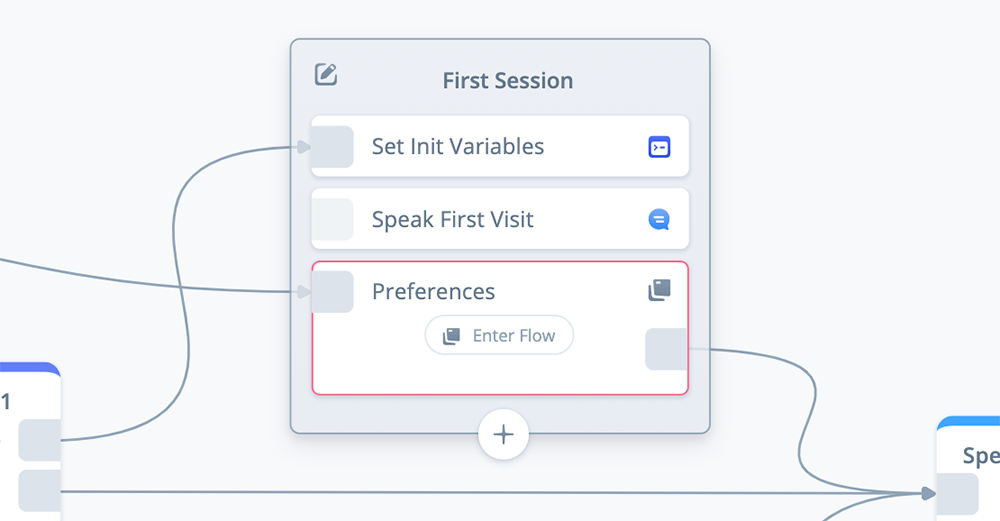
Initially the FLOW block will not be named. Once the Preferences flow is initiated, you will be able to name the flow, and this will also automatically rename the block.
Now that the block is in place, in the next section, we are going to enter and configure the Preferences flow.
Part 3 – Configure the Preferences Flow
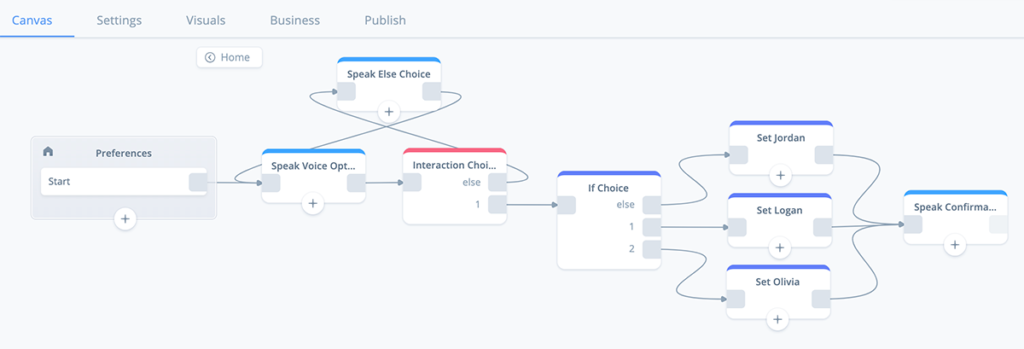
This set of tasks walks you through creation of a Preferences flow. This flow will be used for guiding users to select a preferred voice option, and storing it in Project (global) variables for future use.
The completed flow will look like this:
After initiating the flow, you can add all the blocks up front, or add them as you follow along in this tutorial.
To begin, click on the “Enter Flow” button inside the FLOW block you created in the previous task.
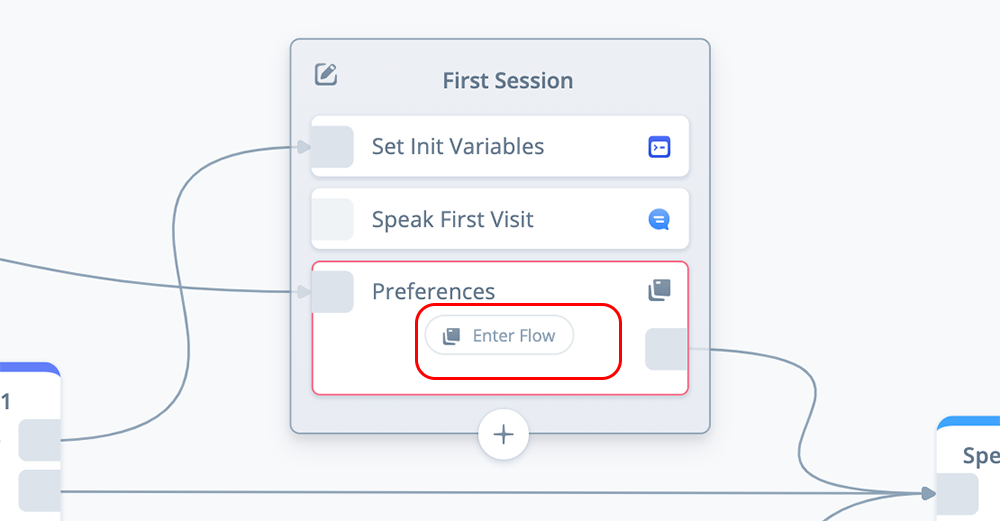
During this process, you will be asked to name the flow. Name it “Preferences.” After naming the flow, you will be in a new sub-flow canvas with its own START block.
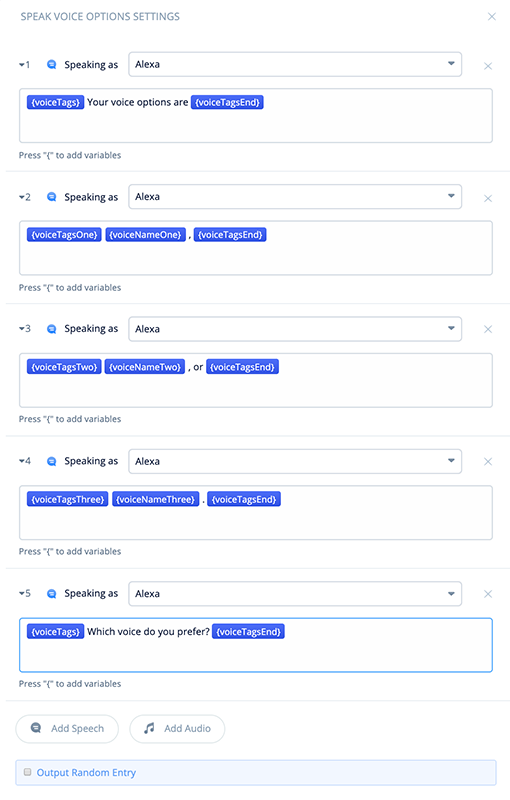
Task 1: Configure a Speak: Voice Options block
For this task we will add and configure a SPEAK block which will offer the user the various voice options. This will include identifying the character names, Logan, Olivia and Jordan, using their voices. The variables we configured earlier will be used to accomplish this.
Add a SPEAK block to the new Preferences flow canvas. Name it “Speak Voice Options” and connect it to the START block.
For this tutorial, we are going to create individual Speech-steps within the SPEAK block for each voice. This will provide clarity for the tutorial, as there are many variables which we want to pay attention to. However for your own skills these could also all be combined into a single speak-step.
Speech-Step 1
In Speech-step 1, add the following text and variables:
{voiceTags}Your voice options are {voiceTagsEnd}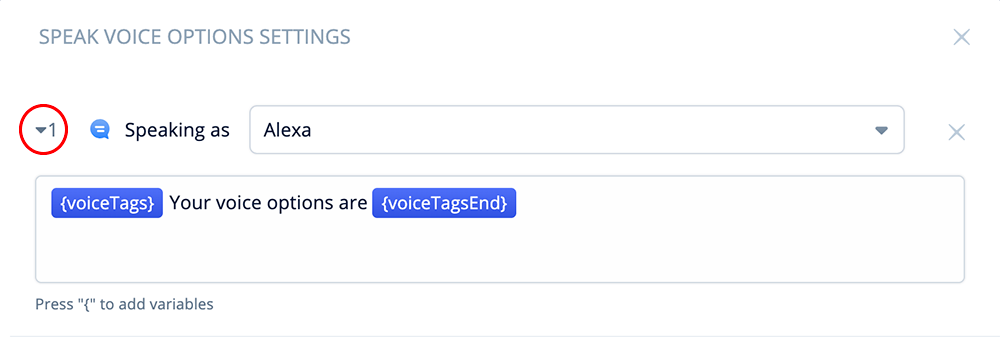
The above sentence will use the initialized voice when reciting the text. For this tutorial, we are using Olivia’s voice as the default.
Speech-Steps 2, 3 and 4
In Speech-steps 2, 3 and 4, add the following:
{voiceTagsOne}{voiceNameOne}, {voiceTagsEnd}
{voiceTagsTwo}{voiceNameTwo}, or {voiceTagsEnd}
{voiceTagsThree}{voiceNameThree}. {voiceTagsEnd}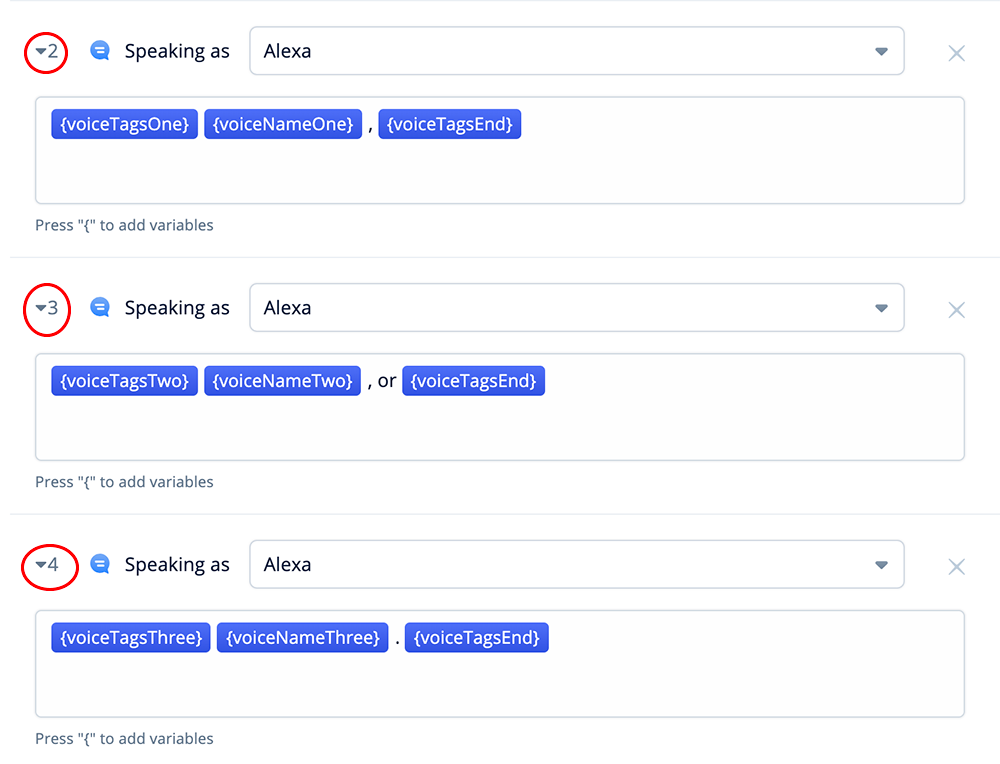
The above steps introduces each voice name, including how the voice sounds.
The name Logan, which is stored in variable {voiceNameOne}, will be introduced using Logan’s voice. Logan’s voice configuration is the SSML tags stored in {voiceTagsOne} and {voiceTagsEnd}.
Likewise, the other two steps are for Olivia and Jordan in steps three and four.
Speech-Step 5
In Speech-step 5, add the following:
{voiceTags}Which voice do you prefer? {voiceTagsEnd}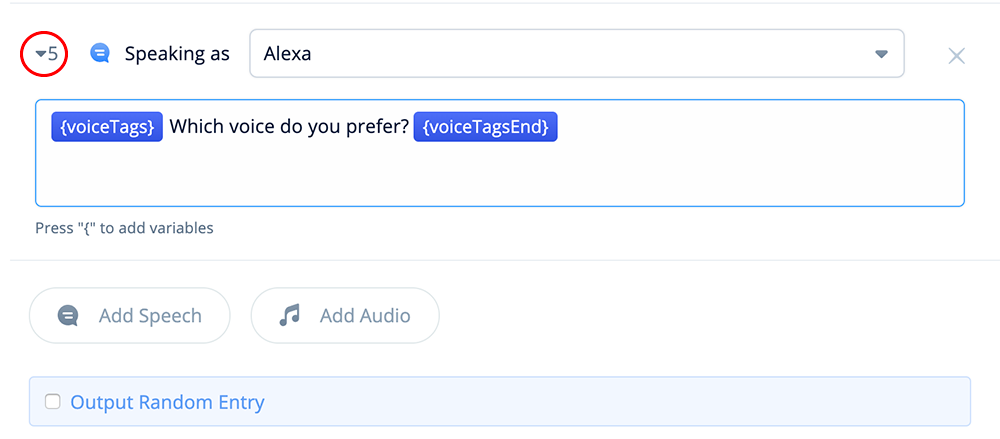
The above will prompt the user to make a selection using the initialized voice (Olivia).
Once all five Speech-steps are completed, the block should look similar to below:
Task 2: Configure an Interaction: Voice Choice block
We will be using an INTERACTION block to capture the user’s voice choice.
The configuration will include a custom slot with the three voice name options, an intent with a set of example intents, and a choice which will include mapping the selected voice to the {voiceName} variable.
Add an Interaction Block
Add an INTERACTION block to the canvas and connect it to the previous SPEAK block as shown below.
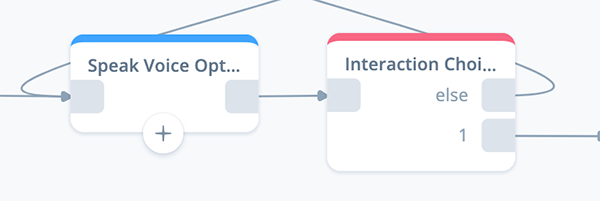
Open the block and name it “Interaction Choice.”
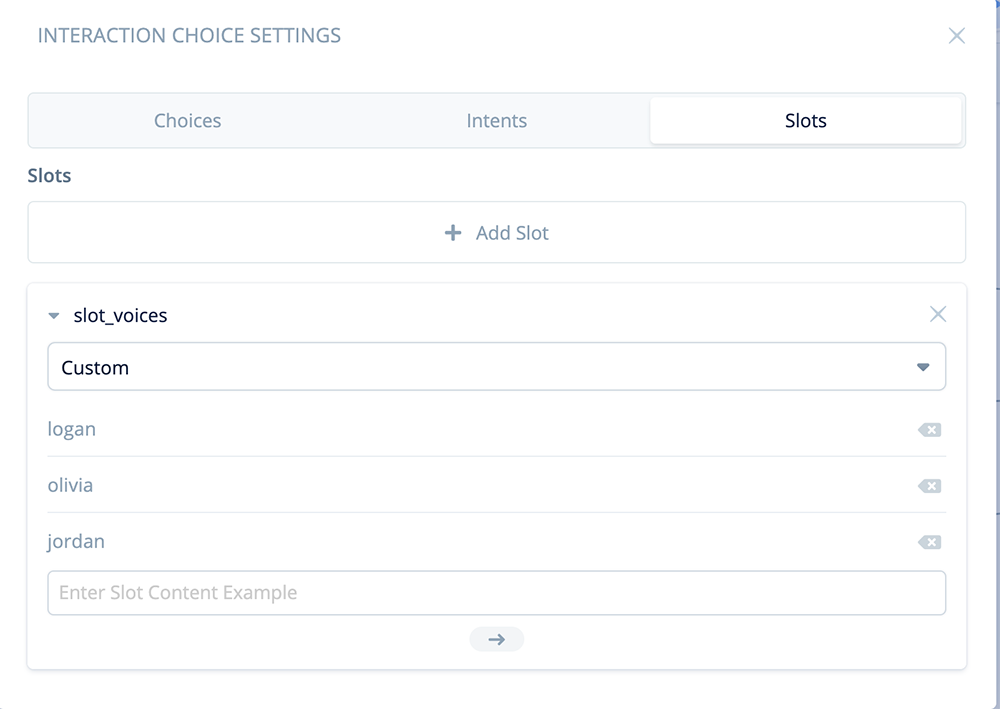
Slots tab
Click on the “Slots” tab, and add a Custom slot.
Rename the slot “slot_voices” and add the three voice names as slot content values: logan, olivia and jordan.
Intents tab
Click on the “Intents” tab, and then click “+ Add Intent.”
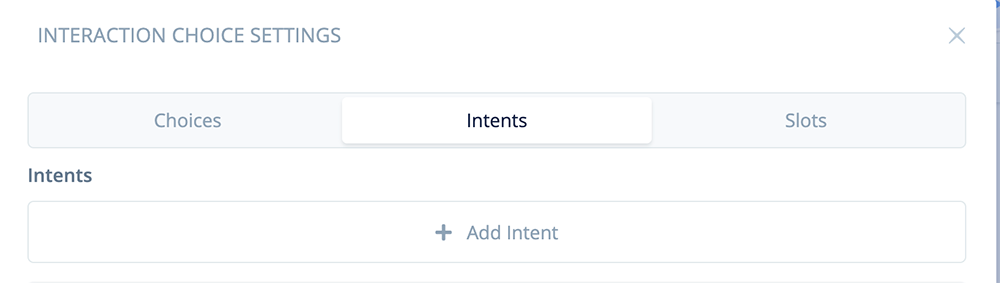
Rename the new intent “intent_voices,” and add some example intents.
These intents should include slot “[slot_voices]”. Here are some examples. For production skills, you most likely will add more.
I like [slot_voices]
[slot_voices] works
[slot_voices] please
[slot_voices]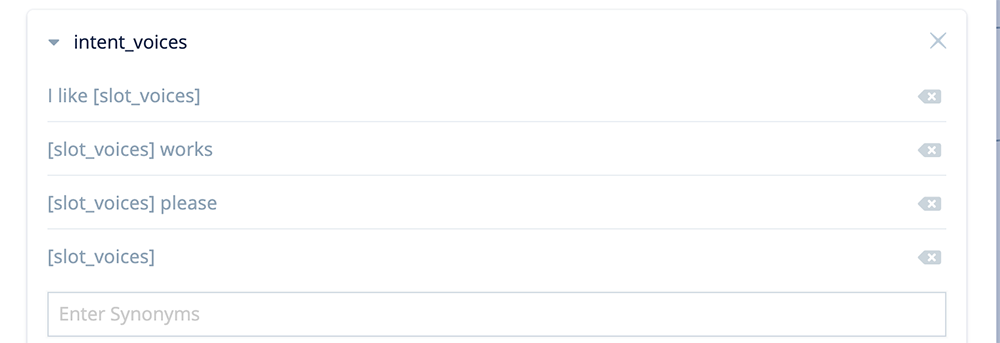
These examples will capture user utterances such as “I like Olivia,”, “Logan works,” “Jordan please,” or simply “Logan.”
Choices Tab
Click the “Choices” tab. Under Choices, for “1”, use the pulldown to select “intent_voices.”
Next, under Slot Mapping, use the pulldowns to select slot “[slot_voices]” on the left side, and variable {voiceName} on the right side.
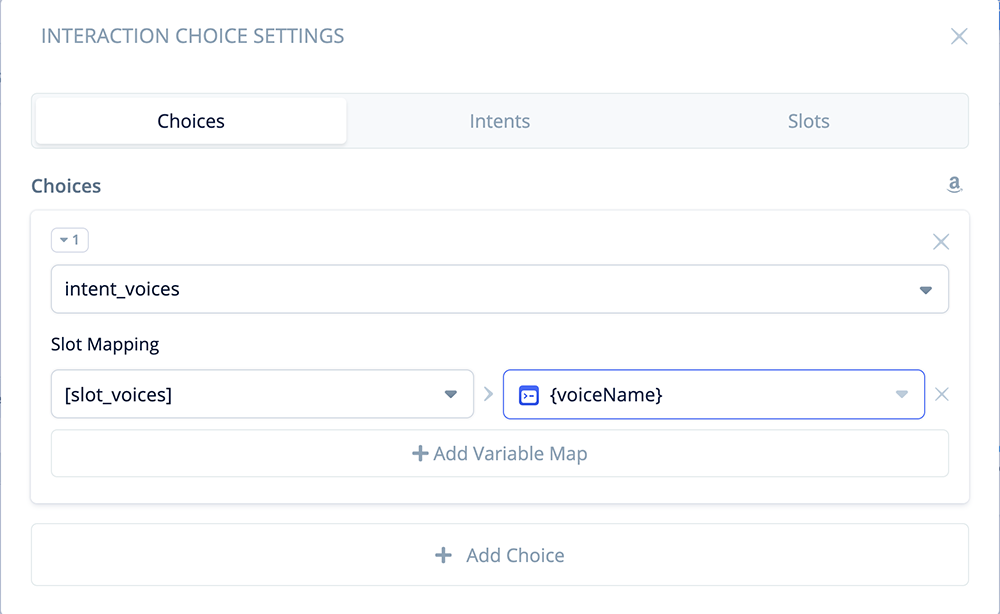
This will result in the user’s choice (Logan, Olivia or Jordan) being mapped into variable {voiceName}.
f you wish, you can also add a custom re-prompt to handle the situation when a user does not provide a reply and is silent (not shown).
Interaction Block Completed
The block will have two exit ports.
Port 1 is for a successful interaction, and the other is an “else” port for when an unexpected reply is provided by the user. Both of these scenarios are handled in the next two tasks.
Task 3: Configure a Speak: Else Voice Choice block
In this task we configure a SPEAK block to handle an unexpected user reply. The flow routes from the “else” port of the INTERACTION block.
Add a SPEAK block to the canvas. Name it “Speak Else Choice,” and add the connections as shown below:
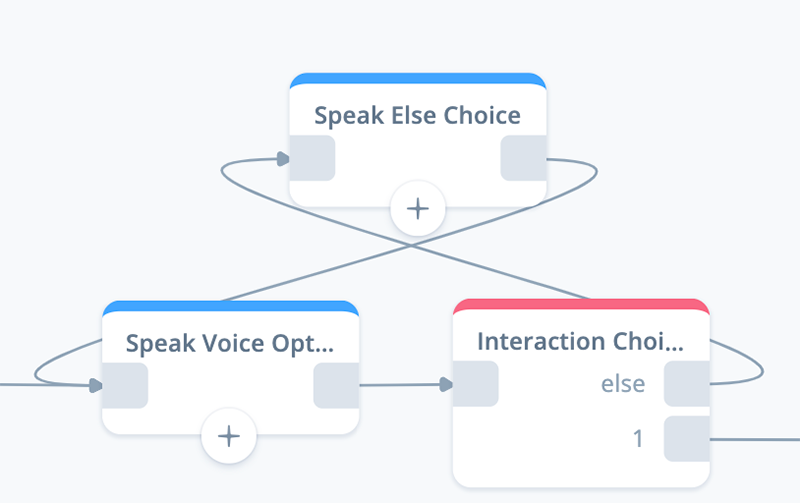
In the above connections, we are taking advantage of the “Speak Voice Options” block to repeat the voice options.
pen the block and add the following text and variables:
{voiceTags}I'm sorry, I didn't quite catch that. {voiceTagsEnd}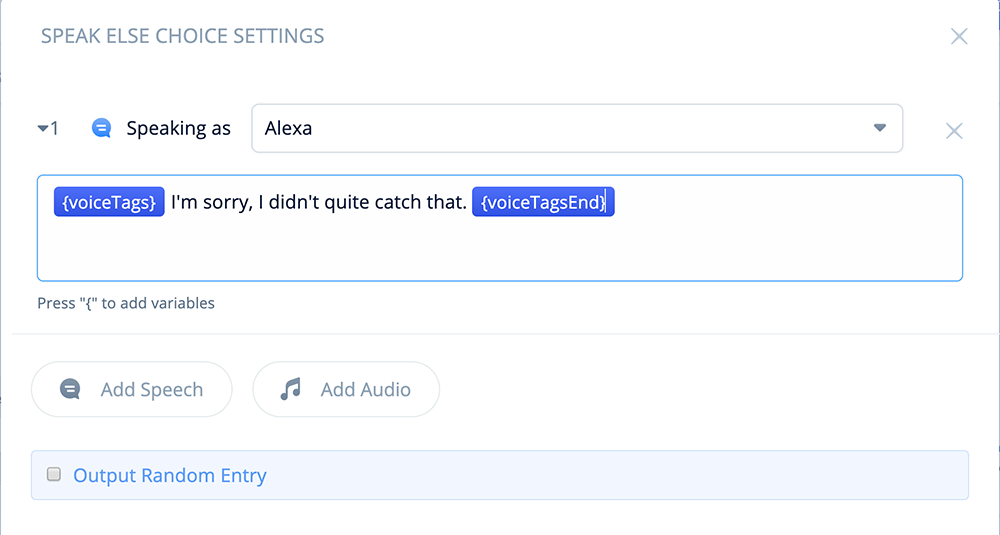
Task 4: Configure an If: Voice Choice block
In this task we configure an IF block to handle a succesful user reply (I.e. the user responds with “logan,” “olivia” or “jordan”). The skill flow routes from the port 1 of the INTERACTION block.
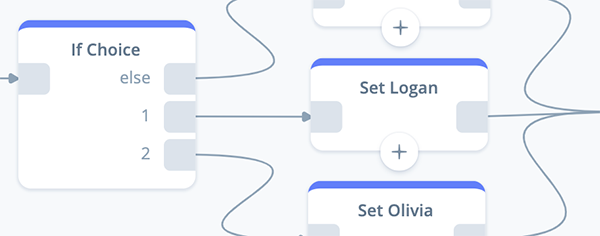
Add an IF block to the canvas. Name it “If Choice,” and add the connections as shown below:
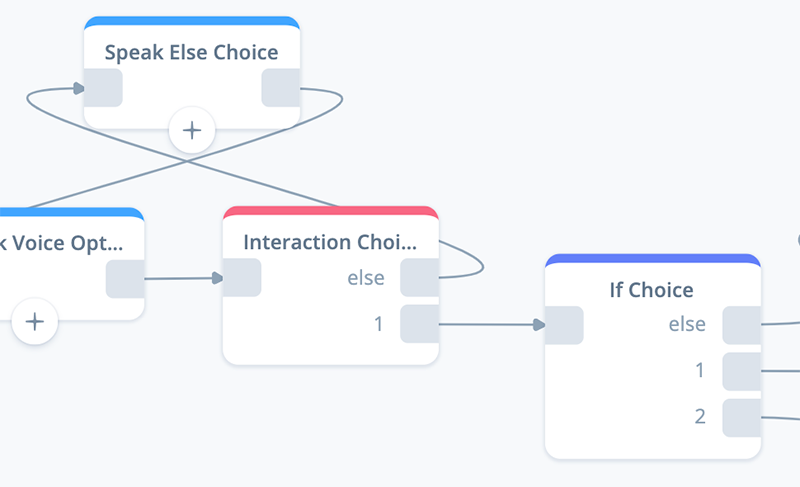
As we configure this IF block, three outbound ports will result. Ports 1, 2 and “else.”
Port 1 will be for user choice “logan.”
Port 2 will be for user choice “olivia.”
If the choice is neither of these, then it will be assumed the user’s choice is “jordan,” and this will be handled by the “else” port.
If User Choice = Logan (Port 1)
Let’s begin by configuring Port 1. We will be evaluating which of the three name variable matches the user’s voice, which is stored in {voiceName}.
Open the block and add the following condition:
If voiceName = voiceNameOne
Use the variable pulldowns on both sides of the condition during the configuration.
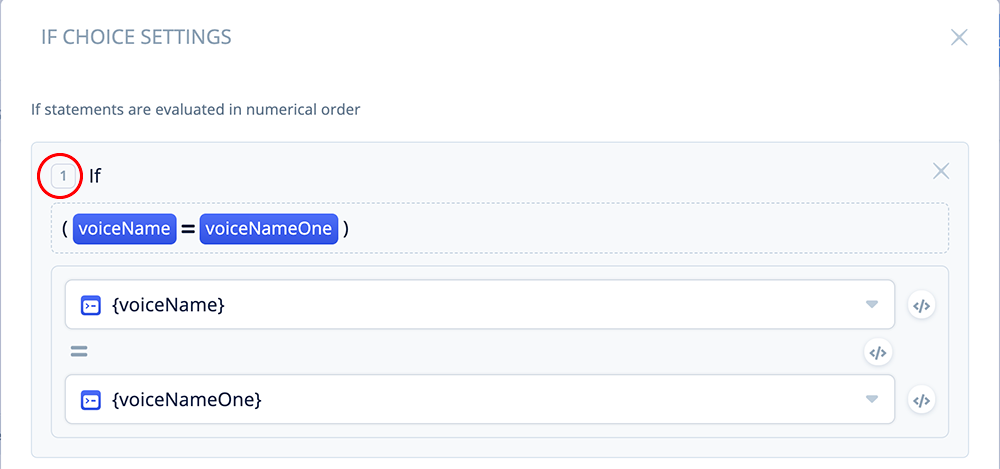
This IF condition will evaluate as true if the user chose “logan”, because it will match the value we set earlier in {voiceNameOne}. When this occurs, the skill will flow out of Port 1 of the IF block.
If User Choice = Olivia (Port 2)
Configure Port 2 in a similar manner:
If voiceName = voiceNameTwo
This IF condition will evaluate as true if the user chose “olivia”, because it will match the value we set earlier in {voiceNameTwo}. When this occurs, the skill will flow out of Port 2 of the IF block.
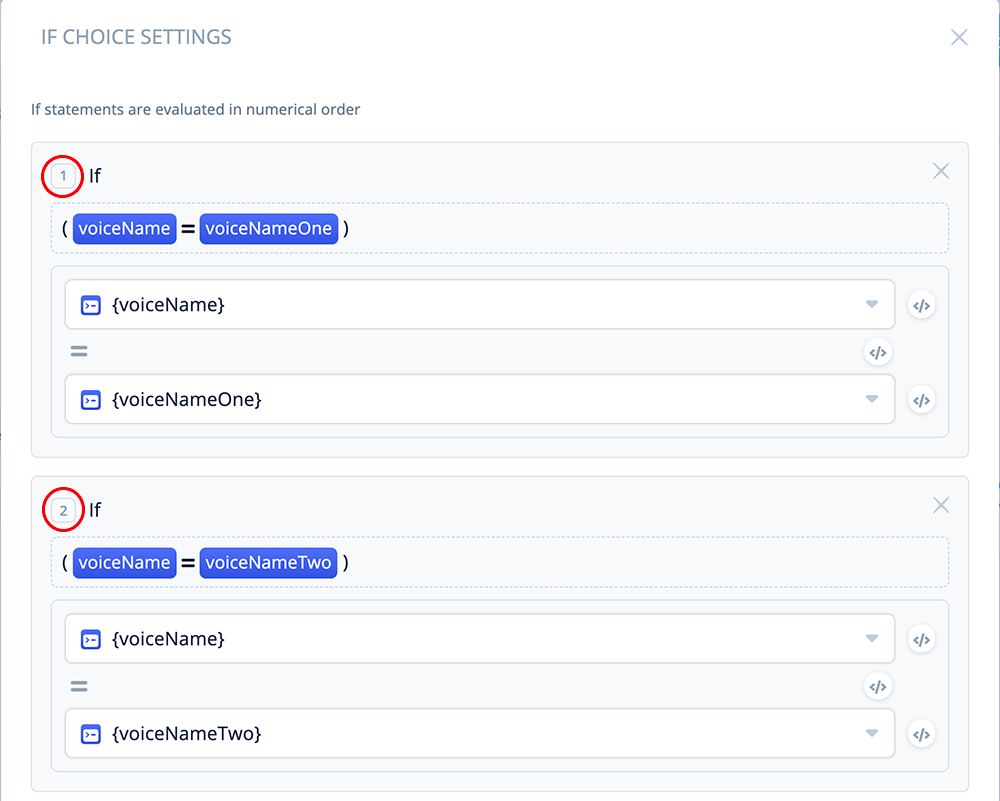
Else If User Choice = Jordan (Else Port)
If neither of the above evaluate to true, the assumption is that the user must have successfully chose “jordan,” as it is the only other viable option in a successful interaction. In this case, the skill will flow out of the “else” port of the IF block.
Once the IF block is configured as shown above, the block can be closed.
Task 5: Configure three Set: Voices blocks
At this point in the Preferences flow, the user has successfully chosen a voice option, and the INTERACTION block has assigned their choice to variable {voiceName}.
The preceding IF block will then route the skill’s flow based on the user’s choice so that we can assign the corresponding variable with the SSML voice tags.
Add 3 SET blocks
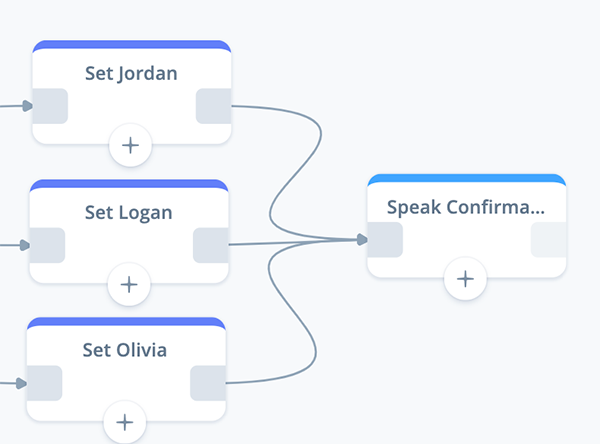
For this task, begin by adding three SET blocks to the canvas as shown below. Name the “Set Jordan,” “Set Logan,” and “Set Olivia.” Connect them to the preceding IF block.
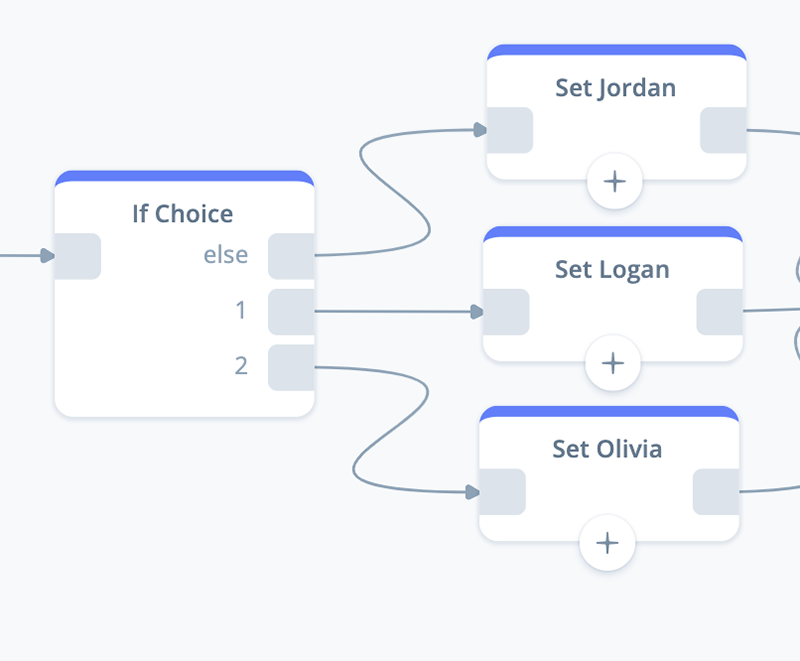
NOTE: Normally for production skills you might consider using more abstract names for these blocks. The reason is because one or more character names, such as Logan, Olivia, or Jordan, could change during the skill development process. However for this tutorial let’s name the blocks after the characters.
Jordan SET block
Working from the top down, let’s proceed with configuring the “Set Jordan” block. Remember, this block is connected to the “else” port of the preceding IF block.
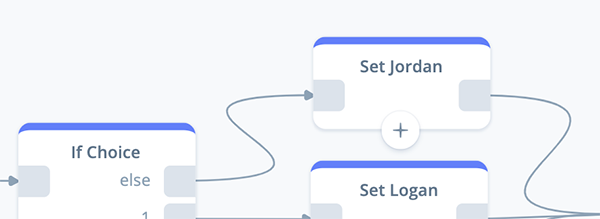
Open the block and add the following variable assignment:
Set {voiceTags} to {voiceTagsThree}
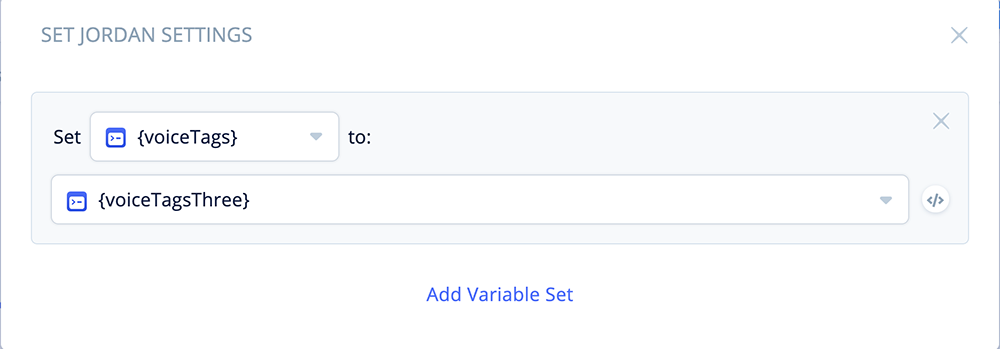
Variable {voiceTagsThree} stores the SSML voice tags for Jordan. The above will assign the SSML tags to the {voiceTags} variable, which will be used throughout the rest of the skill.
Logan SET block
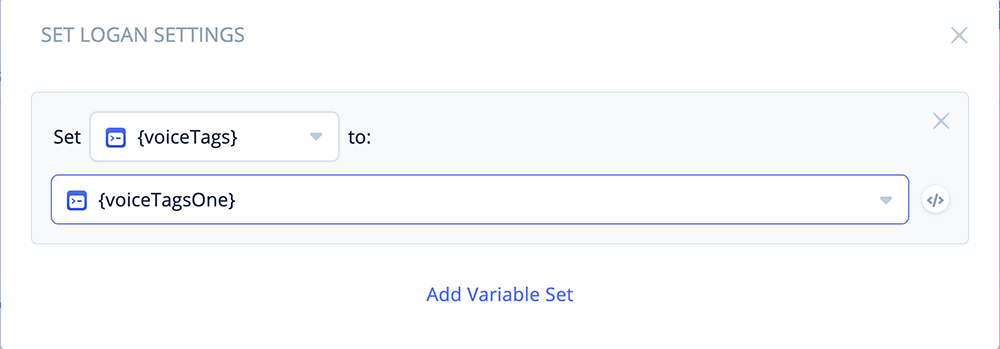
Next, configure the “Set Logan” block.
Open the block and add the following variable assignment:
Set {voiceTags} to {voiceTagsOne}
Olivia SET block
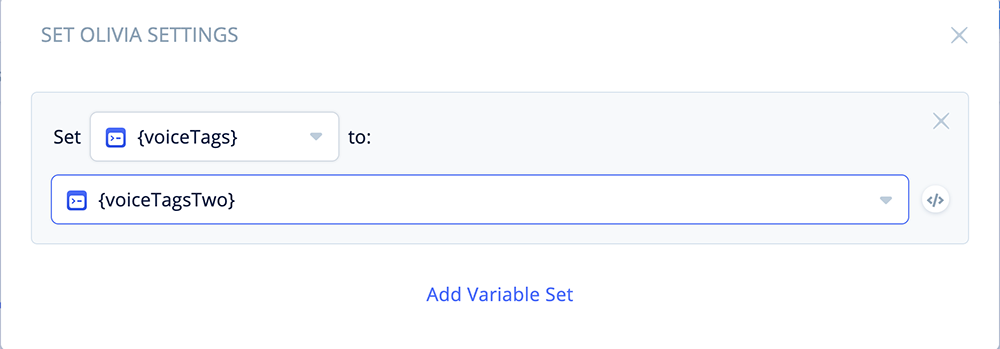
Third, configure the “Set Olivia” block.
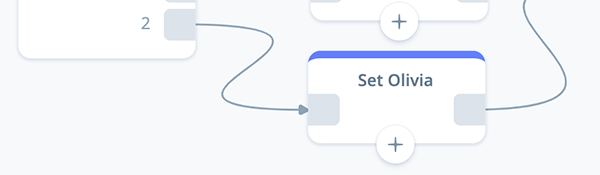
Open the block and add the following variable assignment:
Set {voiceTags} to {voiceTagsTwo}
Three SET blocks complete
Once the three SET blocks are configured, connect them to the IF block as shown below:
Task 6: Configure a Speak: Confirmation block
This SPEAK block confirms to the user that their preference has been set and saved. It includes an optional sound effect for an audio conversation (also known as an “earcon”).
Add a SPEAK block to the canvas, rename it “Speak Confirmation,” and connect it to the three previous SET blocks as shown below.
First Speech-Step
Open and expand the block. In the first Speech-step, add the following sound effect from the Amazon Sound Library. In this case, we are using an audio SSML tag, and will use a speech-type step (rather than an Audio step).
<audio src='soundbank://soundlibrary/ui/gameshow/
amzn_ui_sfx_gameshow_player1_01'/>
Source:
Alexa Skills Kit Sound Library – Game Show Sounds
Sound file: Player1 (1)
Second Speech-Step
Add a second Speech-step, and then add the following text and variables:
{voiceTags}Thank you. Your voice preference has been set to {voiceName}.
{voiceTagsEnd}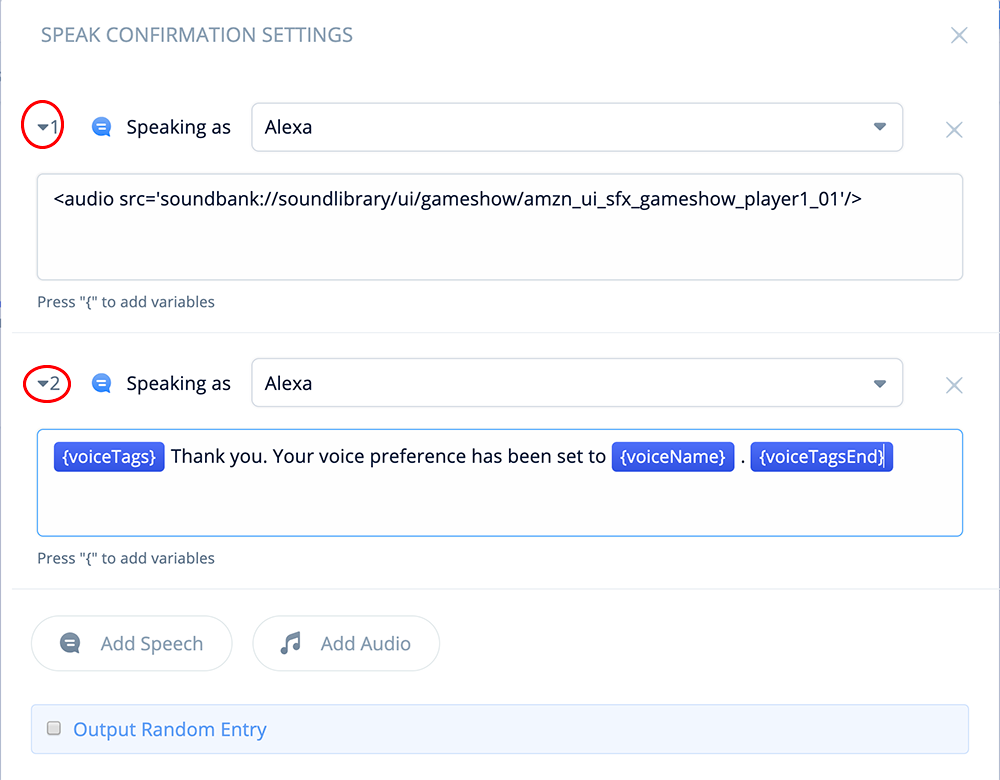
Once this SPEAK block is completed, the Preferences Flow is now complete.
If everything looks good, return to the Home Flow to continue the next part of the tutorial.
Part 4 – Complete the Home Flow
Now that we have completed the Preferences Flow, we will continue building the Home Flow. We will be adding the blocks as shown in the red square below:
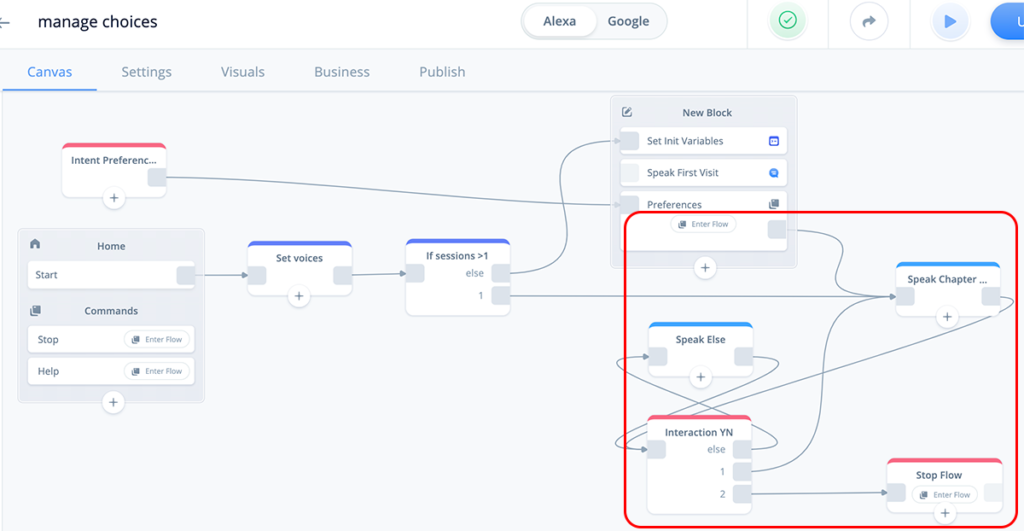
Task 1: Configure a Speak: Chapter 1 block (test content)
This next SPEAK block will contain some text to test with.
Add a SPEAK block to the Home project canvas as shown, and connect it to the Preferences flow exit port, and also the If Sessions > 1 block’s port 1.
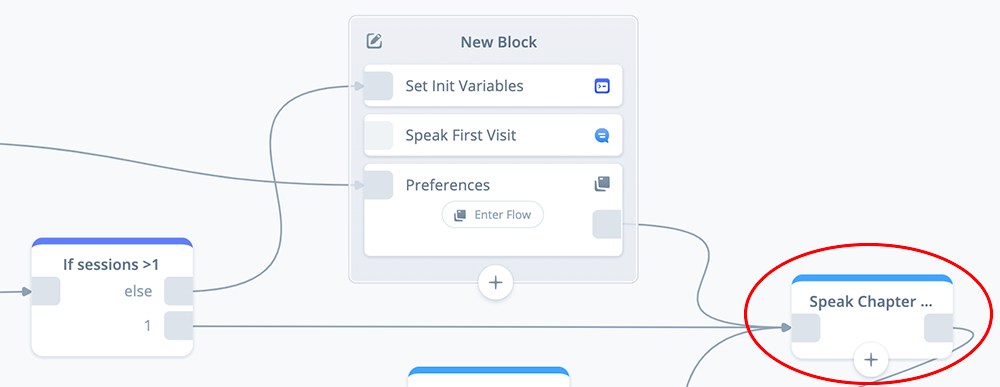
For first time users, the skill will flow from the Preferences flow into the SPEAK block. For returning visitors, the skill will bypass the preferences flow, and go directly into this SPEAK block.
Speech-Step 1
In Speech-step 1, add the following text, variables and SSML break tags.
{voiceTags}Call me Ishmael. <break time="300ms"/> Some years ago
 <break time="300ms"/> never mind how long precisely <break time="300ms"/>
having little or no money in my purse, and nothing particular to interest me
on shore, I thought I would sail about a little <break time="100ms"/>
 and see the watery part of the world. {voiceTagsEnd}
Speech-Step 2
In Speech-step 2, add the following user prompt.
{voiceTags}Would you like to listen to Chapter One again? {voiceTagsEnd}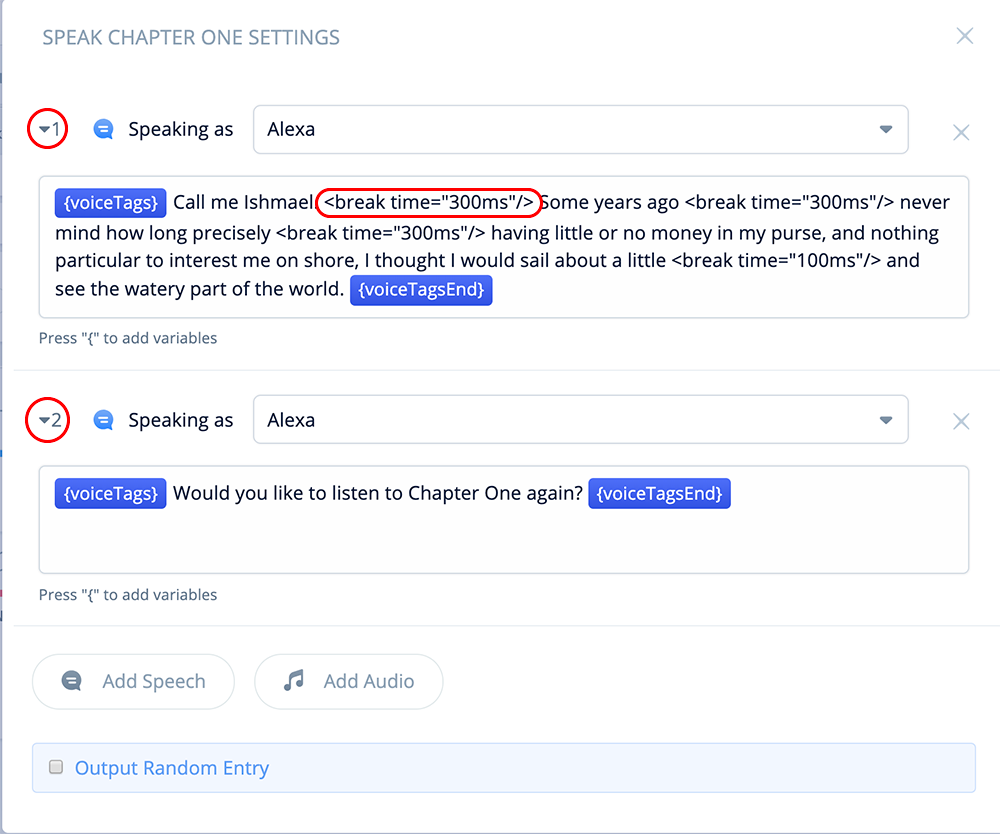
The variable {voiceTags} contains the SSML voice tags for the user’s selected voice, and {voiceTagsEnd} contains the corresponding closing tags.
During testing, your demo skill should use the selected voice to recite the text, as well as prompt whether you would like to repeat listening to the text.
Refining test-to-speech
In the above chunk of text, the SSML break tags help manage the cadence when Alexa recites the text.
Keep in mind a that synthetic voice can still stumble a bit on intonation and pronunciation with any given piece of text. You many need to do additional refinements such as use phoneme and other SSML tags to refine how the text-to-speech sounds.
Task 2: Configure an Interaction: Repeat YN block
To prompt the user whether they would like to listen to the text again, add an INTERACTION block.
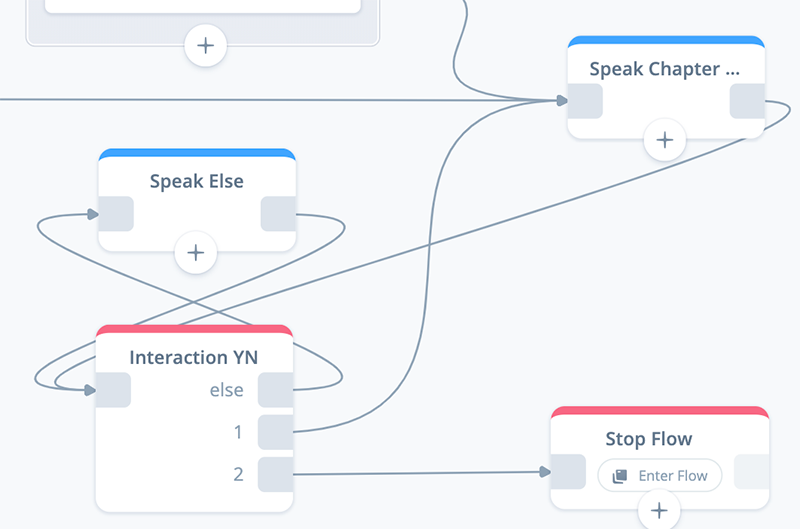
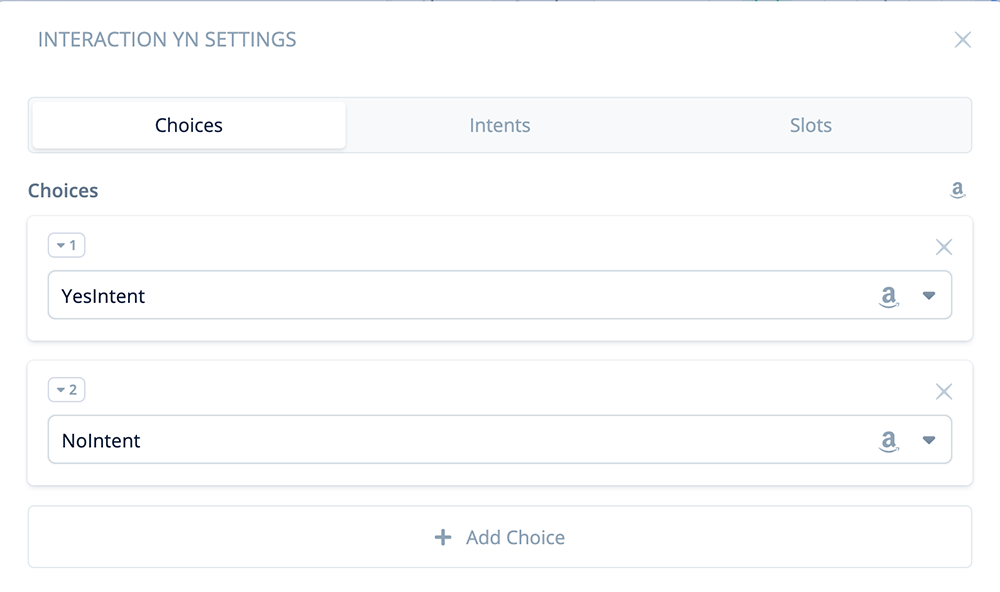
Open the block. In the “Choices” tab, add the Amazon Yes Intent for Port 1, and the Amazon No Intent for Port 2.
If you wish, you can also add a custom re-prompt to handle the situation when a user does not provide a reply and is silent (not shown).
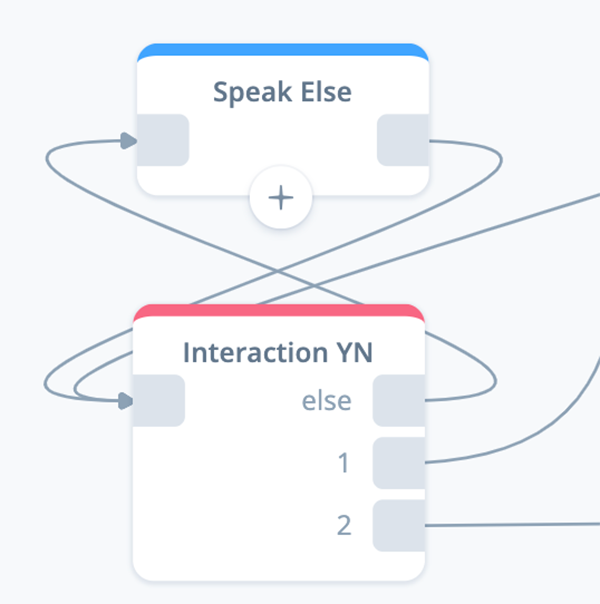
Task 3: Configure a Speak: Else Continue YN block
Add a SPEAK block to the project canvas, name it “Speak Else,” and connect to the previous Interaction YN block. This will handle the error if the user provides an unexpected reply.
Open the block and add the following text, variables and SSML Break tags:
{voiceTags}I'm sorry I didn't quite catch that. <break time="200ms"/>
You can say yes, or no. Would you like to listen to Chapter One again?
{voiceTagsEnd}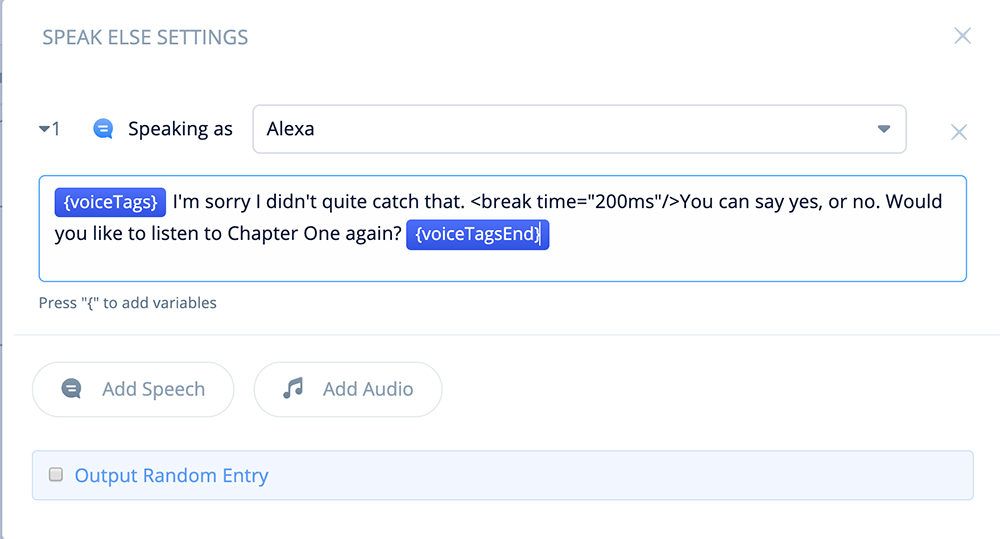
Task 4: Configure a Flow: Stop block
In this task we add a Flow block that leads to the Stop flow.
Add a Flow block to the canvas and connect it to exit port 2 of the Interaction YN block. Also confirm the other connections for the Interaction block are in place.
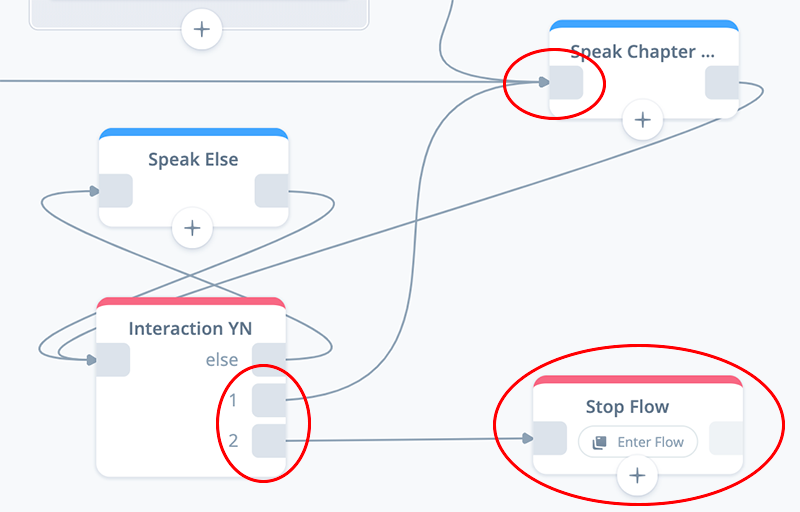
At first, the flow will not be named. Select the existing “Stop Flow”. This will both name the block “Stop Flow”, and take you to the Stop Flow canvas.
Remain in the Stop Flow, as we will configure one of the blocks in the Stop flow in the next step.
Part 5 – Update the Stop Flow
The next task is to update the SPEAK block in the Stop flow with the voice variables.
Task 1: Update the Speak: Ended block
The Stop flow has a SPEAK block named “Ended” when a project is initially created in Voiceflow.
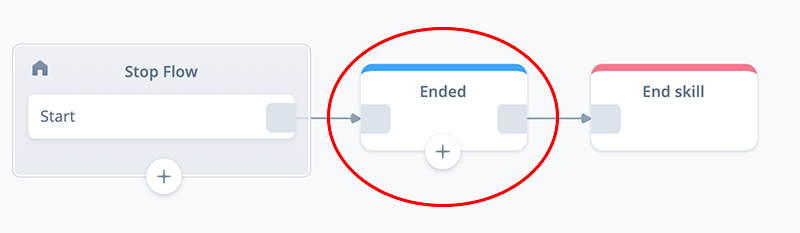
While in the Stop flow, open the block and replace the contents of the first step with the following text and variables.
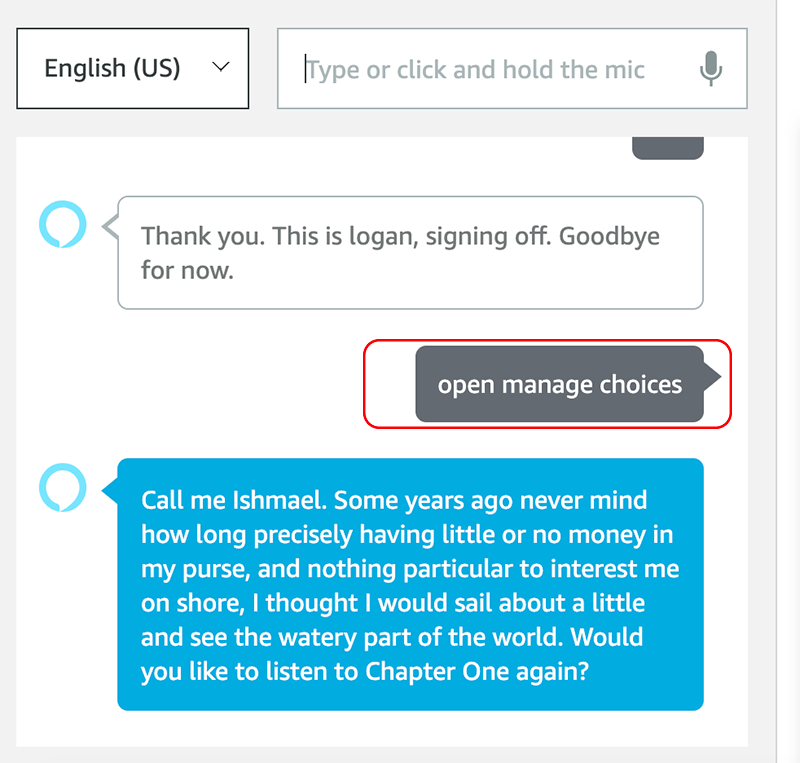
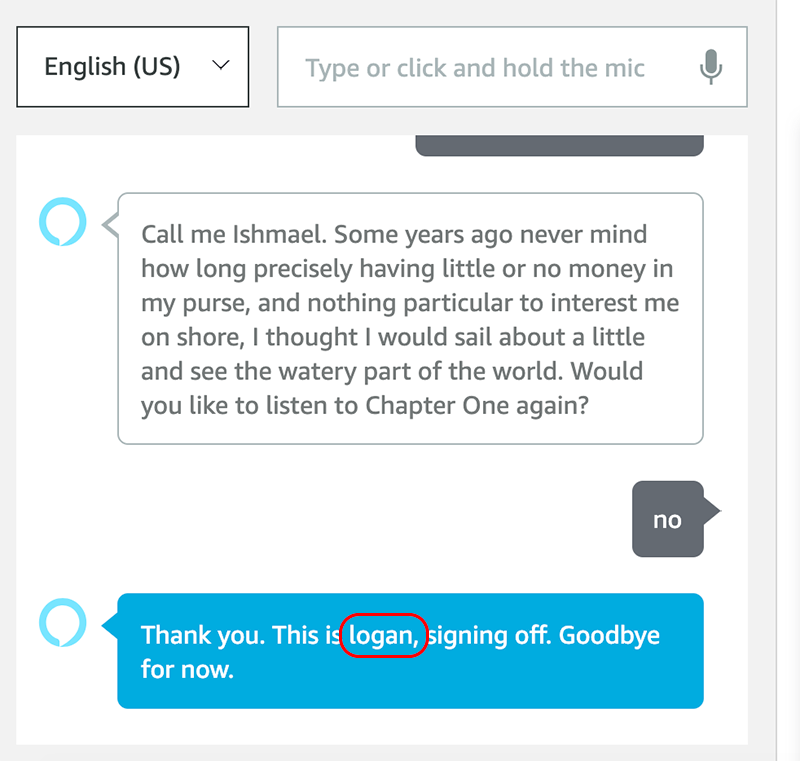
{voiceTags}Thank you. This is {voiceName}, signing off. Goodbye for now.
{voiceTagsEnd}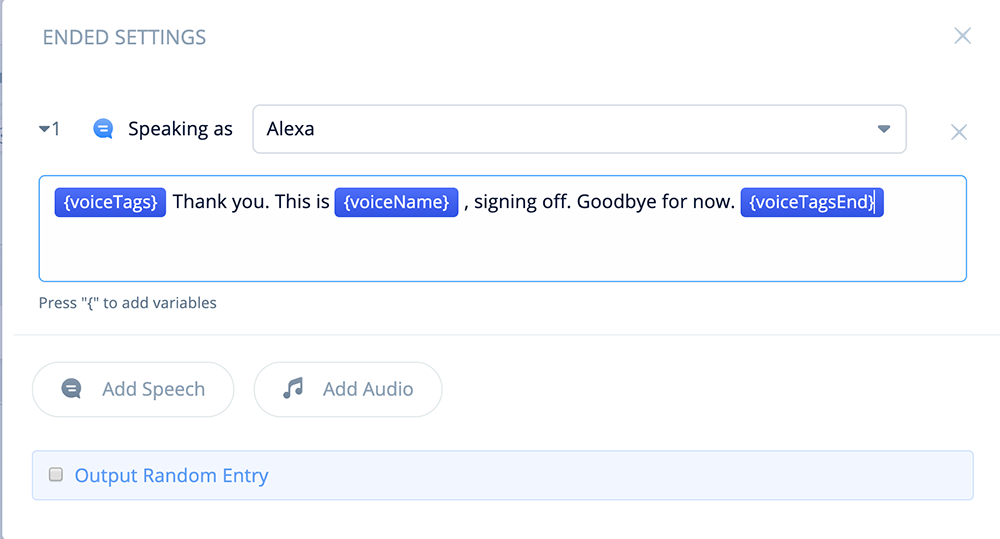
When the skill ends, this message will be recited using the user’s selected voice option. The {voiceName} variable is also included to help confirm the voice’s name during testing.
Part 6 – Add a Preferences Intent
After initially picking a voice, the user needs a way to update their voice choice if they wish. Also, for households and businesses with multiple users, individuals may wish to change the voice to suit their personal preferences.
To provide this option, either a command or an intent can be used. In both cases, these can be invoked either at an interaction point or by interrupting and saying “Alexa, preferences.”
COMMAND versus INTENT blocks
In Voiceflow, a COMMAND block will return the user to where they are currently in the skill, after the command flow has been completed. This enables the user to continue from wherever they are in the skill after the change is made.
The COMMAND block itself would include a preferences intent, and be directly linked to the Preferences flow we created earlier. Here is what the COMMAND block would look like on the project canvas.
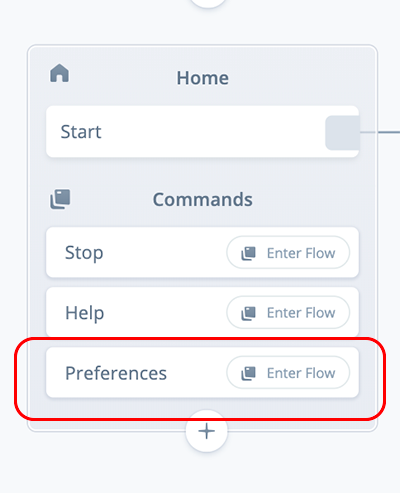
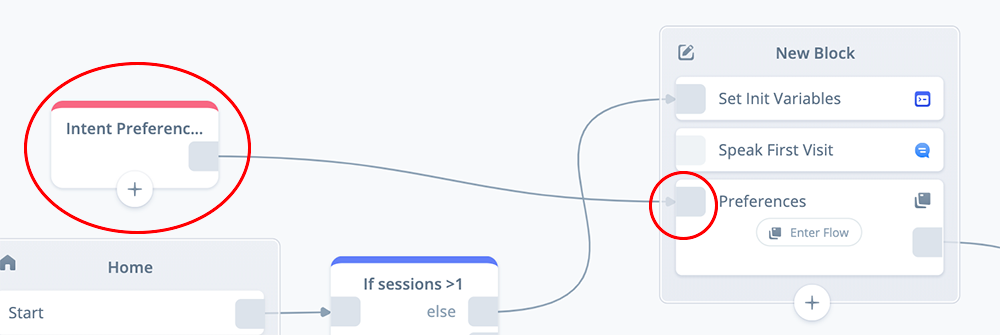
Alternatively, an INTENT block will route the skill’s flow to a specific continuation point. The INTENT block would also use a Preferences intent, and be directly linked to the Preferences flow as well. However the INTENT block has an exit port, which is then connected to another block. Here is what it looks like on our project canvas.
Both the COMMAND and INTENT blocks are configured in a similar manner. Which one you use will depend on your particular project’s design. For this tutorial we will configure an INTENT block in order to access the Preferences flow.
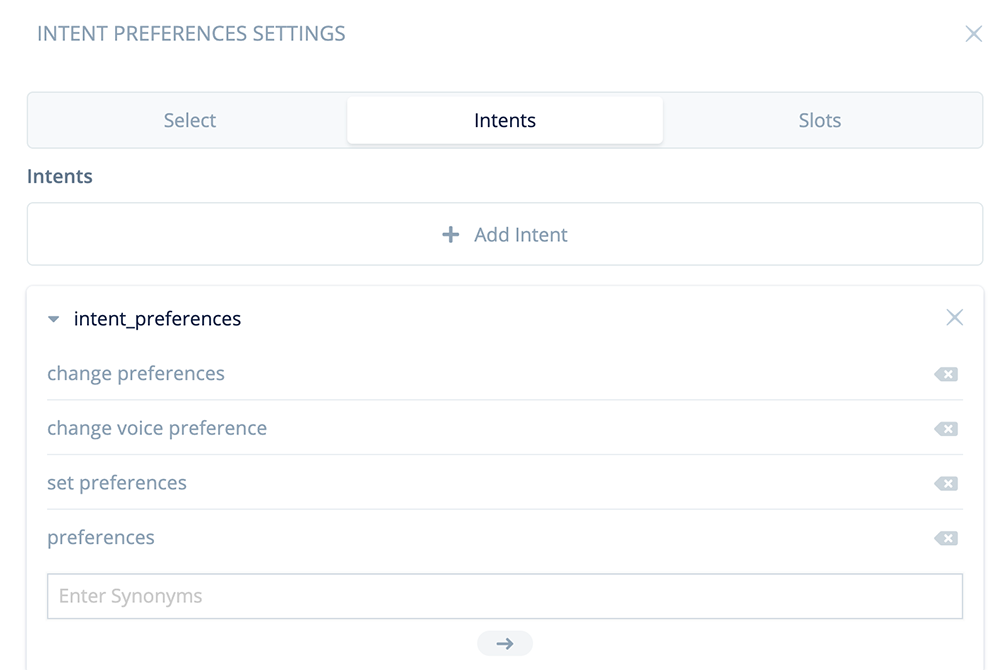
Task 1: Configure an Intent: Preferences block
Add an INTENT block to the project canvas as shown below:
Open the block and select the “Intents” tab.
Add intent examples for invoking preferences. Here are the ones we are using for the demo skill, however for your skills you may wish to add more.
change preferences
change voice preference
set preferences
preferences
Rename the intent to “intent_preferences.”
Next, click on the “Select” tab. Use the dropdown to select “intent_preferences.”
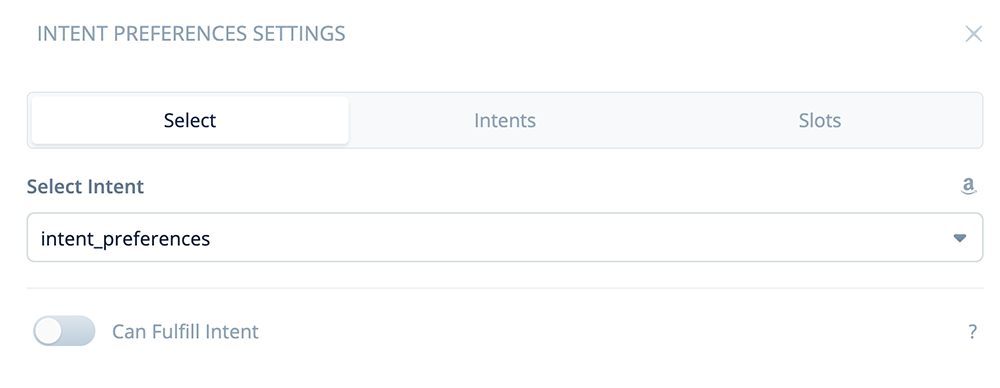
Once the above is complete, close the block.
At this point, your project is complete and ready for testing:
Part 7 – Three Tests
For this tutorial, testing involves running the skill several times, listening to the prompts, selecting voice options, and listening to confirm the voice has been updated.
Here are the three tests we will perform.
Task 1: Upload to Alexa and test the first session
Task 2: Test the second session for persistence
Task 3: Test the preferences intent and change the voice
Task 1: Upload to Alexa and test the first session
Upload your test skill to Alexa and run it using the Alexa Developer Console (ADC) test feature (you can also test on an Echo device).
The first time you use the skill, the {sessions} variable will equal “1.” In this case, the first visit message will play using the voice we named “Olivia.” The skill will also guide you through the Preferences flow.
During this part of the test, you should hear Olivia’s name and voice. If you run the test using the ADC, you should also see the character names (circled in red, below).
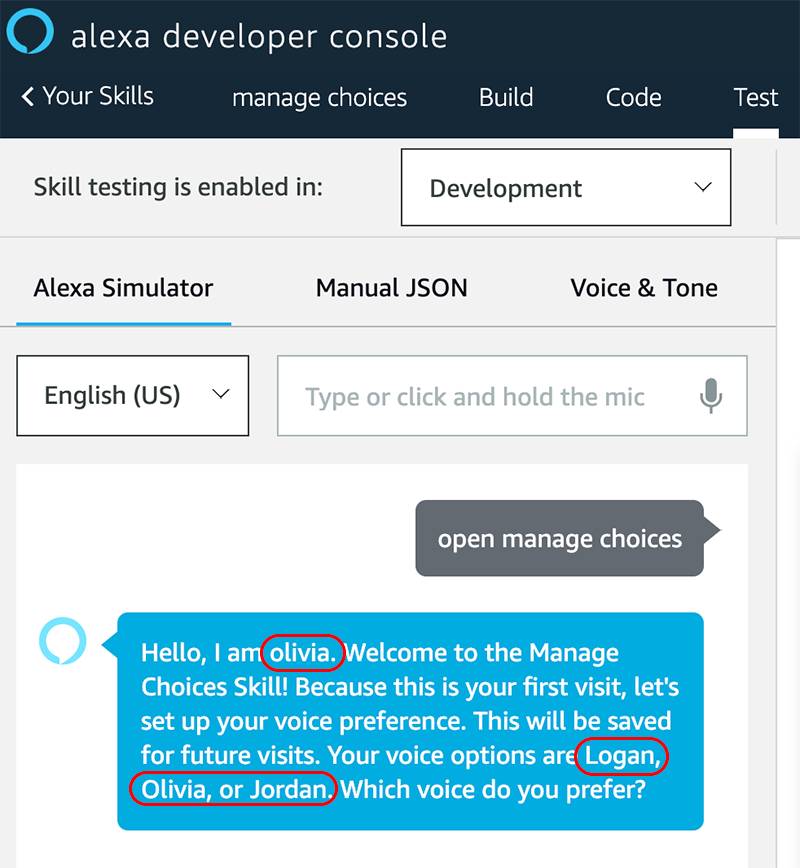
After being asked “Which voice do you prefer,” ask for one of the three names. For this demo, let’s select Jordan.
The audio confirmation should play, and Alexa should continue to recite the text using Jordan’s voice.
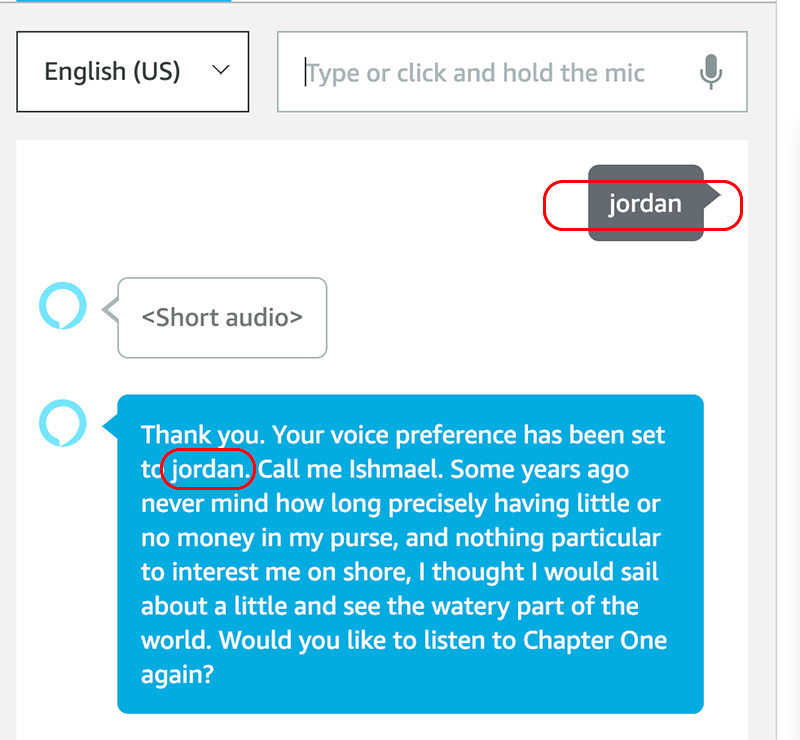
The demo skill then asks if you would like to listen to the content again. For this test, let’s answer “no.”
The skill continues to the Stop flow. As you remember we included reciting the current character’s name, Jordan, and we can confirm it was used.
When you test your demo skill, if the voices used and the character names are correct and as you expect them to be, this first test has passed. Congratulations!
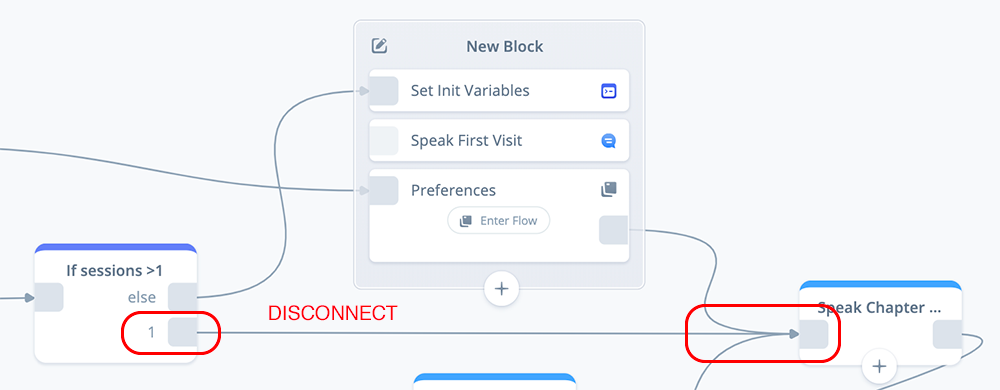
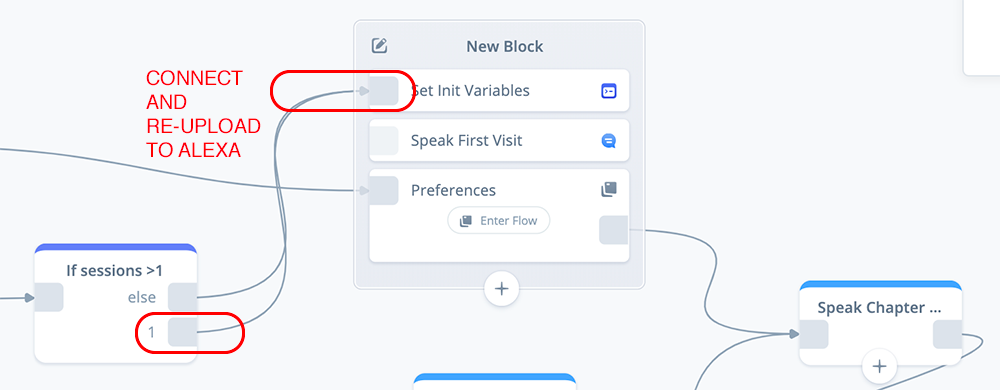
Repeating first session tests
Let’s suppose you wish to repeat testing the first session. The problem is the {sessions] variable is now greater than one. There are several workarounds you can do.
One way is to temporarily disconnect things in the “IF sessions > 1” block, and reconnect port 1 directly to the SET Init Variables block, as shown below.
A second way is to add an INTENT block, with an intent named “restart,” and route it to flow to the SET Init variables as well. In this case, you can ask for the skill to re-start to test the first session scenario.
Task 2: Test the second session for persistence
For this test, run the skill a second time. The objective is to confirm that the user’s voice choice and voice name are updated in the global variables and are used.
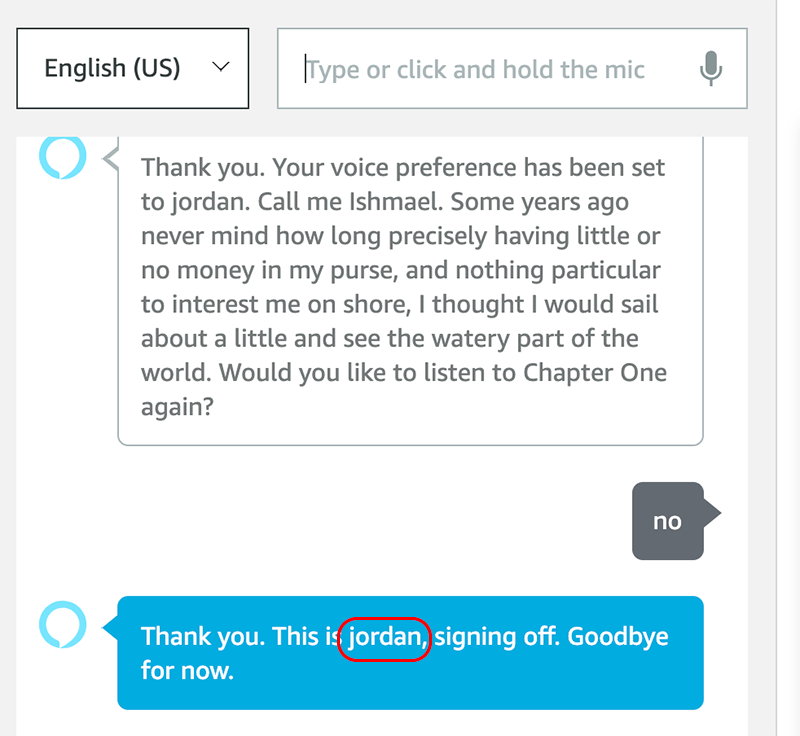
While running the test, listen for Jordan’s voice. In the ADC we see the following results.
If you see the above results, and hear Jordan’s voice, congratulations, the test was successful!
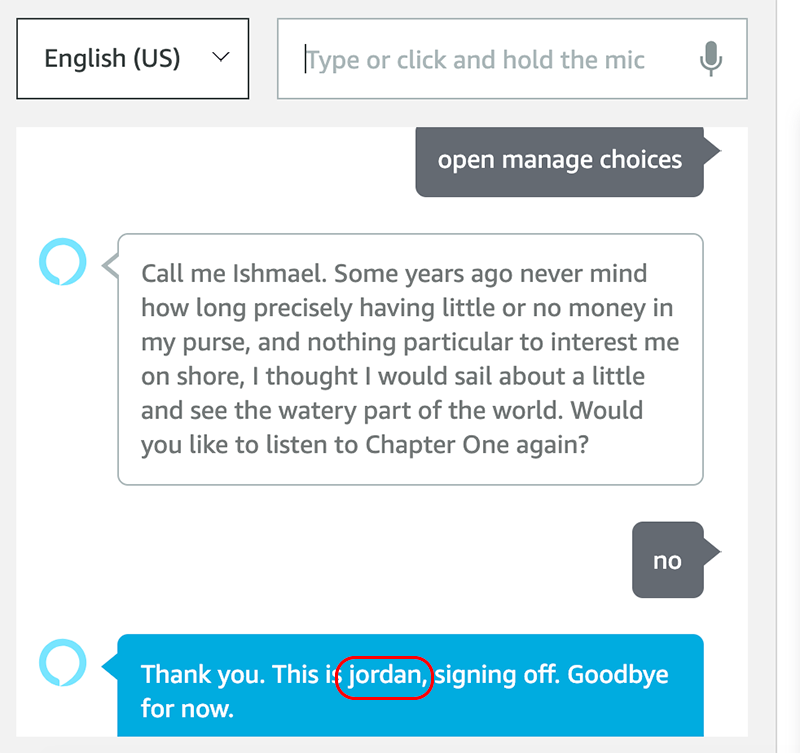
Task 3: Test the preferences intent and change the voice
In this test, we launch the skill again, but this time we ask Alexa to change our preferences. This can occur at two points.
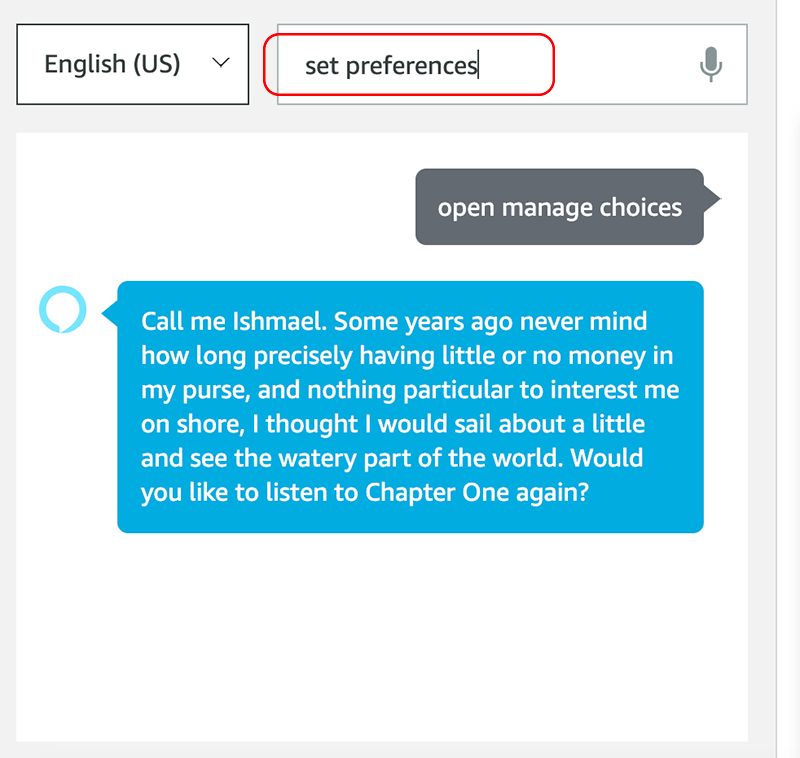
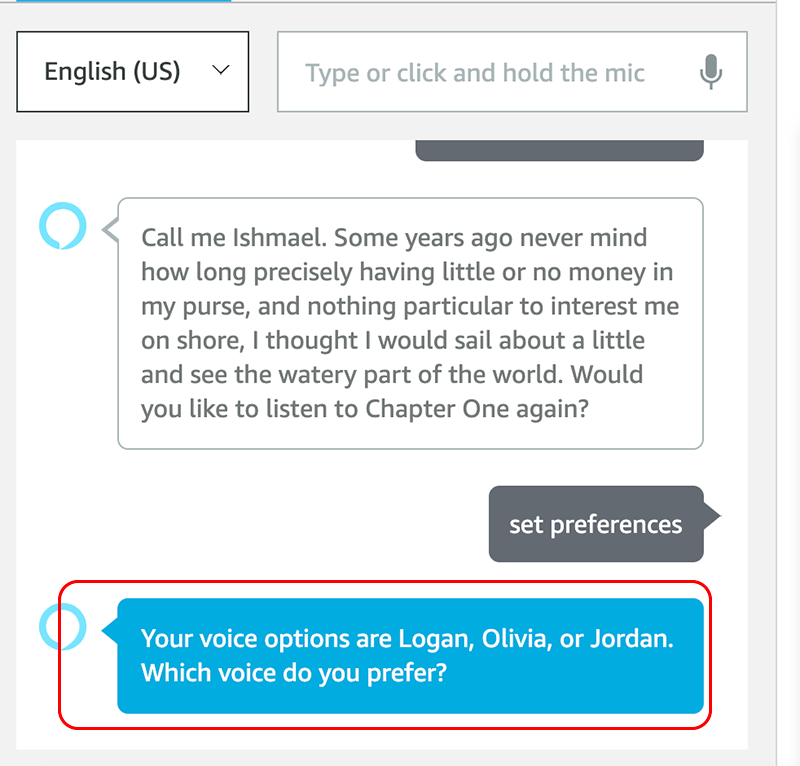
First, after the content finishes playing, the user is prompted if they would like to listen to Chapter 1 again. At this point, say “set preferences.” This should then take the user through the Preferences flow again, and enable the user to pick a second choice.
Second, while the content is playing, interrupt by using the wake word and the intent: “Alexa, set preferences.” This also should take the user through the Preferences flow.
Below we test the first scenario, and ask to change the voice to Logan:
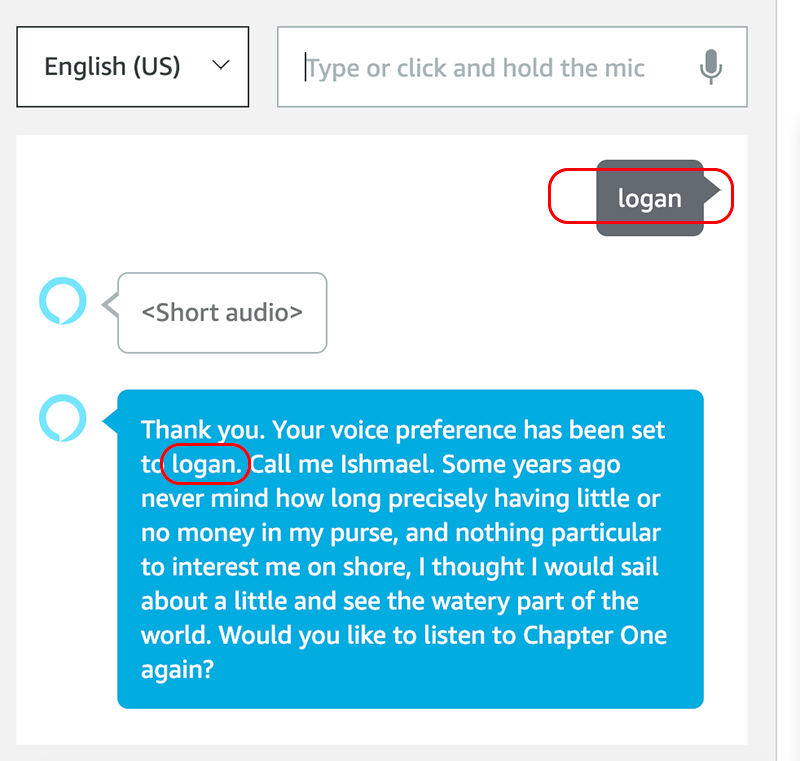

In the above screenshots, we can see the voice has updated, and we should hear the voice change from Jordan to Logan.
Now that the voice has been updated to Logan, we can re-run the skill and confirm that the updated choice has persisted.
If you hear Jordan’s voice, and see the above results in the ADC, congratulations, your testing has been successful!
Conclusion
This tutorial provided techniques for saving user preferences for voices.
As with all Alexa skills, design and iterative testing are paramount, and your design decisions will depend on many factors. One of these is whether adding voice preferences makes sense for your skill.
Enabling user preferences can be a really nice feature for skills that are designed to be used frequently. User preferences, whether for voice options, as well as other types of personalization, can provide an enhanced user experiences, increase engagement, and encourage frequent use. The tradeoff is that friction is added to the beginning of the skill for first time users, and this is an important consideration as well.
Thank you for reading, and happy skill building!
What may be covered in future posts / updates.
Designing genderless / gender-neutral synthetic voices for Amazon Alexa.
How to design and manage synthetic voices to reflect emotional states.
Credits
Header photo by Brooke Cagle on Unsplash