

This tutorial is the first in a series about techniques for managing voices for characters in Alexa skills built using Voiceflow.
This post in the Alexa Blogs provides some context about options for voices when designing and developing skills:
“To Record, or Not to Record”
“When it comes to audio you have to make a design decision: do you use Alexa’s voice (i.e. the text-to-speech engine) or do you record custom audio for every response your skill will have? Or, will you do something in the middle, such as using other generated voices (e.g. from Amazon Polly) or only use custom audio for parts of the game?”
Alexa Blogs: Best Practices for Building Voice-First Games for Alexa
Andrea Muttoni, August 30, 2018
This tutorial describes a technique for implementing the “middle option,” which is using a combination of Alexa Polly voices and a variety of SSML tags to refine how they sound when reciting text.
With a skill building tool such as Voiceflow, it is easy to prototype and begin testing a skill. You can quickly test how well the words flow together in an interaction among multiple characters and how user prompts will sound to the ear.
One option for configuring Polly voices
Polly voices is an Amazon Alexa feature that makes it possible to implement a variety of different voices in your skills. Voiceflow has a nice feature, where you can use drop downs to pick distinct Polly voices for characters within a skill.
Using the Polly voice drop-downs built into the Speak blocks is awesome if you have just one or two characters, or if it is a smaller skill.
But what if the skill you are working on is large and complex? Perhaps you are working on a skill with many levels, numerous main characters, and many side-characters, and now you wish to change how some of these voices sound?
This tutorial provides a second technique for organizing your characters voices using variables. We will also cover how to manage the character’s proper names as well. The benefit is this can help you more easily and efficiently manage your character’s voices, particularly when it comes time to make changes.
Level: Intermediate
This tutorial assumes you are familiar with the basics of creating Alexa skills using Voiceflow. f you are not familiar with Voiceflow and are just getting started with building skills, we recommend reviewing the next section first.
Prerequisite Resources for Beginners
If you haven’t developed an Amazon Alexa skill before, or haven’t used Voiceflow, the following are recommended as prerequisites:
- Set up an Amazon Developer account. It is free:
Amazon Alexa Developer Home Page
2. Set up a Voiceflow Account. They offer a generous free tier from which you can design, develop and publish Amazon Alexa skills:
3. Try some of the Voiceflow University tutorials and practice making a skill or two. There is an introductory video series, along with extensive reference documentation.
Voiceflow Basics Tutorial Series
4. Join the Voiceflow User’s Group on Facebook. The community is very supportive should you have questions or issues when building skills, as well as a lot of tips, techniques and camaraderie.
Resources
SSML Reference Document
An important document is Amazon’s official reference for SSML tags, as it lists the available SSML tags and provides the syntax when building Alexa skills.
Speech Synthesis Markup Language (SSML) Reference
The SSML tags we will be working with in this tutorial include the following:
- break (pauses)
- lang (manage pronunciation by geographical region)
- prosody (rate, pitch and volume)
- voice (Alexa Polly voices)
Additional SSML tags you may wish to review are the “emphasis” and “amazon:effect (whispered)” tags. We don’t cover these here in this tutorial, but they can be used to affect how a voice sounds.
Copy/Paste Worksheets
To make it easier to implement SSML in your skills, the following web pages can help:
SSML Copy and Paste Worksheet 1 for Basic SSML Tags
SSML Copy and Paste Worksheet 2 for Polly Voice and Language Tags and the Voice Tester Skill
The web page for the second worksheet provides instructions and links to an Alexa Voice Tester Skill, which can be used to quickly hear what the various Polly voices sound like. This skill was developed by Hearing Voices.
Demo/Test Skill
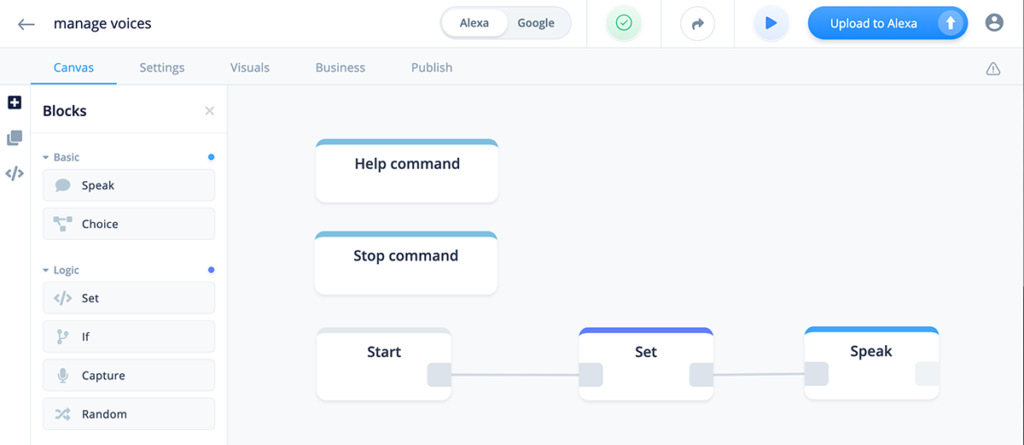
Here is how our completed demo skill will look on the Voiceflow project canvas:
Task Summary
This tutorial is organized into two parts.
Part 1 – Configure the Demo Skill and Test
Task 1: Create a project
Task 2: Add variables
Task 3: Implement a Set block
Task 4: Implement a Speak block
Task 5: Upload the skill to the Alexa Developer Console and test
Part 2 – Modify the Demo Skill and Test
Task 1: Review requested changes to the voices
Task 2: Implement the changes in the Set block
Task 3: Upload the modified skill to the ADC and test the changes
Part 1 – Configure the Demo Skill and Test
This set of tasks walks you through configuring a demo skill that uses three character voices, as well as Alexa’s native voice as a narrator.
The benefits will be to learn a technique that makes it easy to edit a voice, it’s associated prosody, and a character’s name. After Part 1 is complete, we will then practice making edits in Part 2 and re-test the changes.
Task 1: Create a project
While in your Voiceflow dashboard, let’s begin by creating a new project. Click the “New Project” button in the upper right corner to get started.
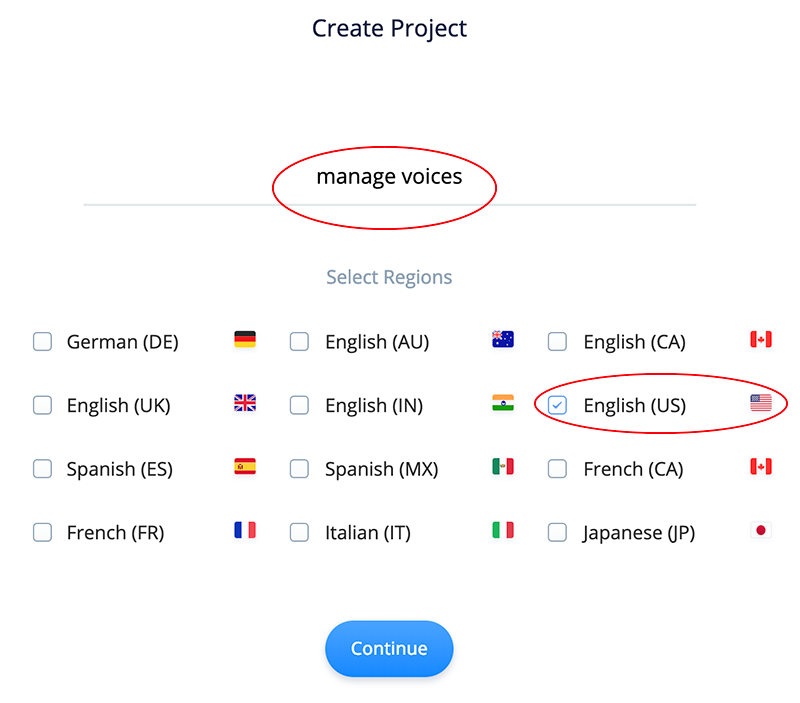
Start a new project. For this tutorial, we will use “manage voices” for the project/invocation name. Also verify your Language/Region setting. For this tutorial, the English (US) checkbox is checked, however feel free to use a different region depending on where you are located.
In the next screen, select the “Blank” template. We will build this skill from scratch.
When your new project opens, the canvas will look similar to this:
Task 2: Add variables
In this task we are going to add seven variables. For your skills, these types of variables can be either global or local, depending on your skill configuration. Often, these will be global variables, especially for larger skills which are using sub-flows.
For this tutorial, we will configure them as global variables.
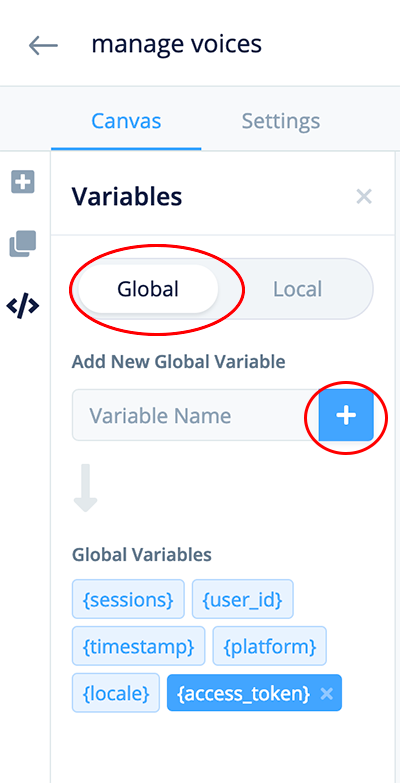
Voice Tag Variables
Let’s start with adding the following three global variables. These will be used to store SSML tags for the Polly voice and other supporting SSML prosody tags. You can copy and paste them from here:
voiceTagsOne
voiceTagsTwo
voiceTagsThree
Use whatever naming conventions work best for you in your projects.
Pro Tip: If you are co-designing and developing with a team it is a good idea to confirm agreed-upon naming conventions for your variables.
Pro Tip: Try to avoid building in Polly voice names into your variable names. For example, avoid using a variable name such as “voiceIvy” or “voiceBrianOne.” The reason is because Ivy may suddenly become Matthew, after feedback is received during beta testing or stakeholder demos.
These three new variables will be used to manage the voices for three different characters in our test skill. Later, in the Speak blocks, they will be placed at the beginning of the text to be recited by each character.
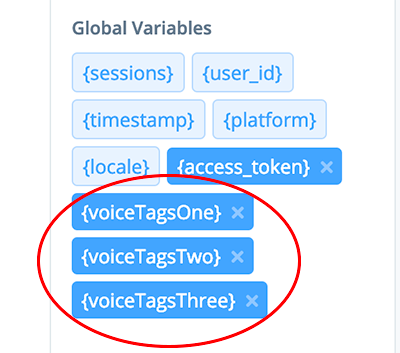
Voice End Tag Variable
Each set of opening voice and prosody SSML tags will have corresponding closing tags. Add the following global variable. We will use this to manage the closing tags. In the speak blocks, this will be placed at the end of the recited text.
voiceTagsEnd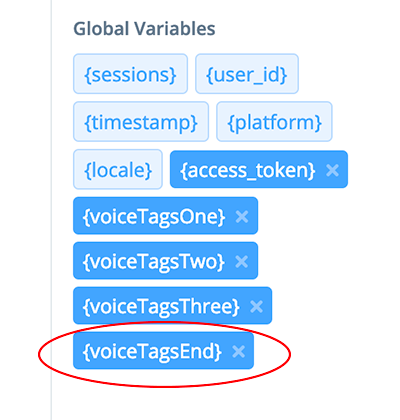
Voice Name Variables
This next set of three variables are used to store the names of characters associated with each of the three voices. For example, “Brianna, “Valerie” and “Tyler.” They can be used in a skill wherever the narrator or character recites the name of another character.
Variables for these might be optional, depending on your skill. However these are very handy for larger, multi-character skills. If there is a name change, the variable value can be changed, without having to find the name in each of the speak blocks.
Pro Tip: Do not use the Amazon-assigned names of the Polly voices for the character names in the skill when using Polly voices. For example, do not use Matthew, Ivy, Kendra, etc. Instead, use alternative character names. Otherwise your skill might not pass certification.
Add the following global variables:
voiceNameOne
voiceNameTwo
voiceNameThree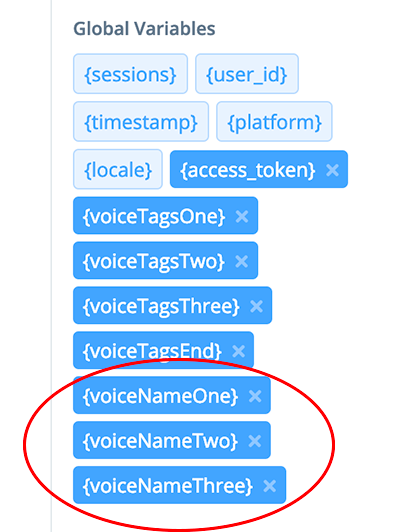
Congratulations, we have completed adding our variables!
Task 3: Implement a Set block
In this task, we are going to assign SSML tags to each of the variables we have created. To accomplish this, we are going to use a Set block.
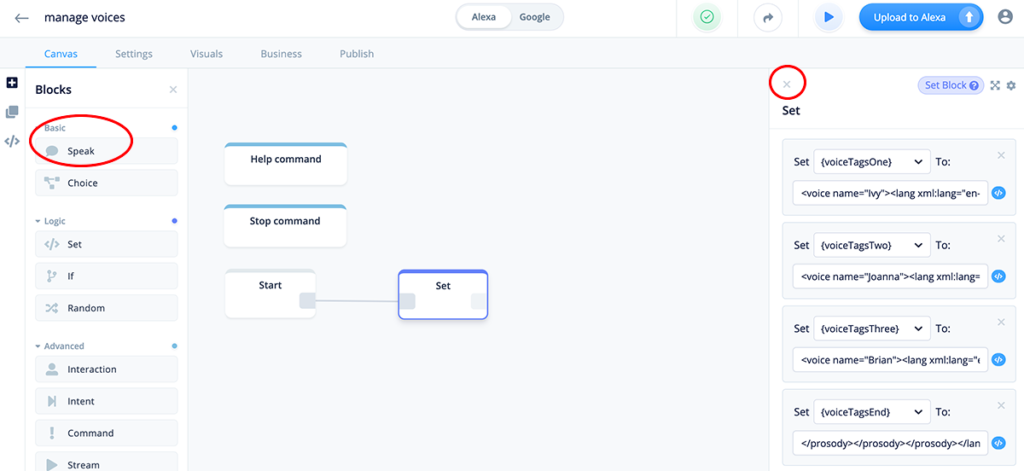
Add a Set block onto the canvas and place it to the right of the start block. Next, drag a connector line from the Start block to the Set block. Your canvas should look similar to this:
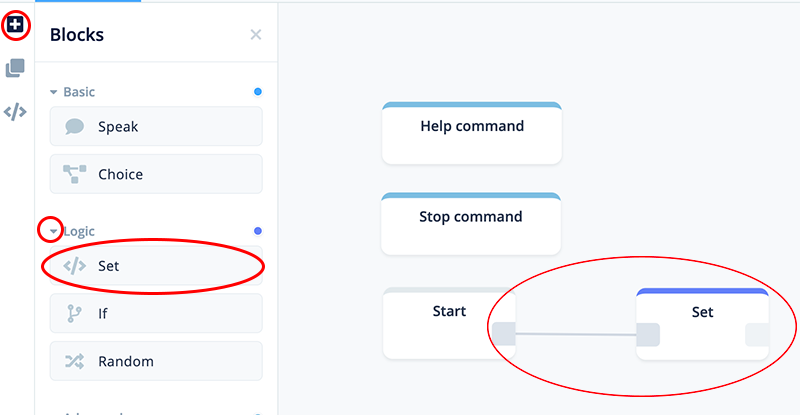
Open and expand the Set block. We are ready to start configuring the variables.
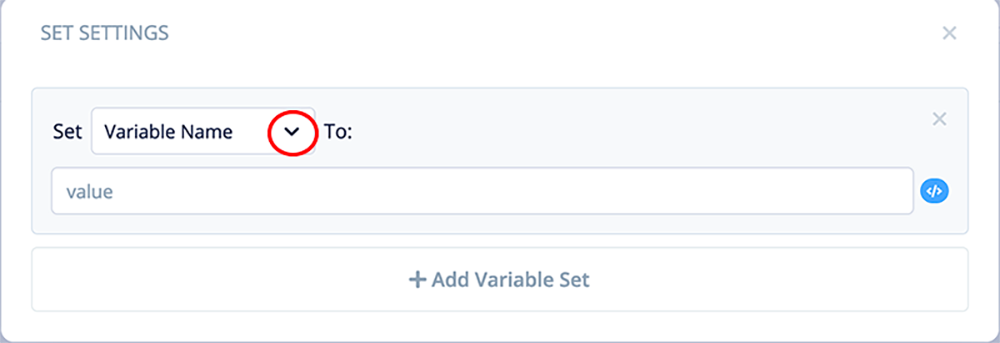
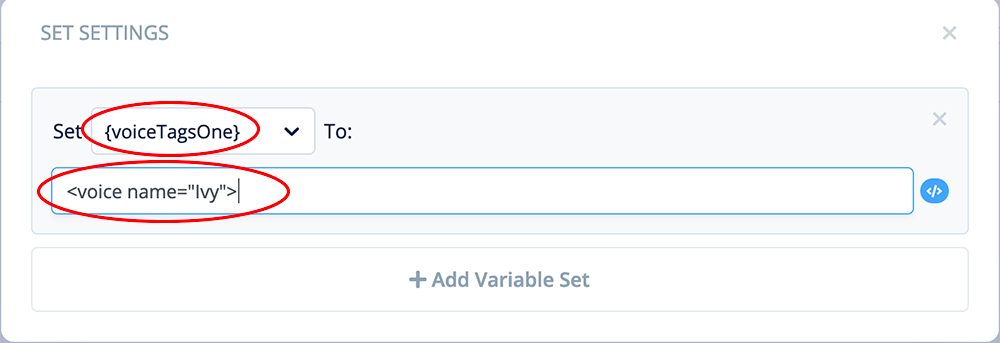
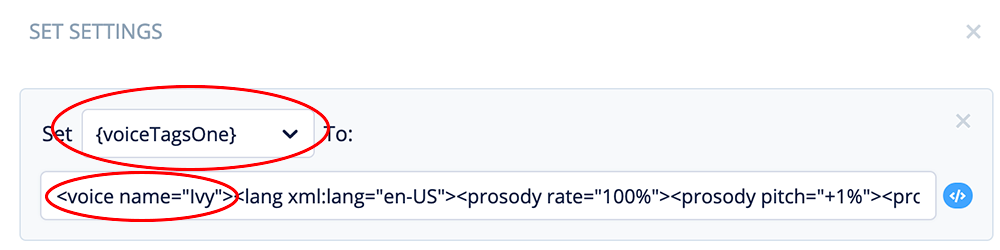
First character: Add a voice tag for variable voiceTagsOne
In this next step, we are going to use an SSML voice tag to assign an Amazon Polly voice to a variable.
Add the SSML tag for Polly voice “Ivy”. If you refer to the SSML reference document, you will notice the syntax is as follows:
<voice name="Ivy">Copy and paste the voice tag into the Set block as shown below:
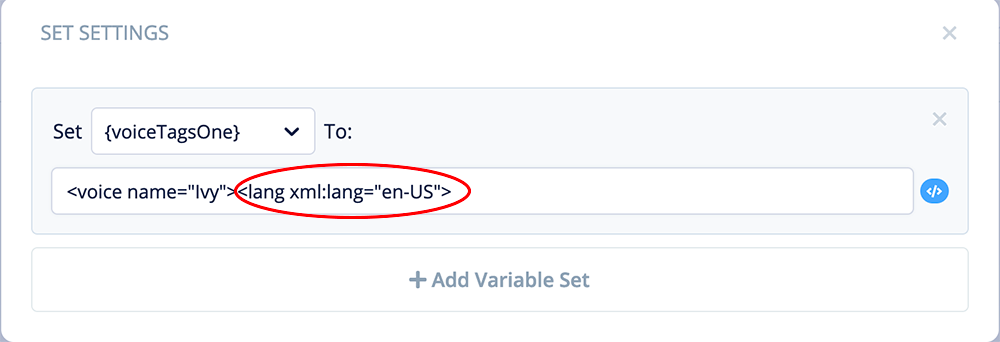
First character: Add a lang tag
Next, lets add an SSML “lang” tag.
These are kind of obscure if you haven’t worked with them before. If you are unfamiliar with them, we recommend reading both the “lang” and “voice” sections the SSML reference documentation. The SSML reference documentation has a variety of examples.
For our tutorial, we will add the lang tag to the voice variable. Because Ivy is an en-US voice, we will add a lang tag that matches, so that she will continue to pronounce words as intended when the skill is played in other English-speaking regions.
Add the following lang SSML tag for en-US:
<lang xml:lang="en-US">Copy and then paste it just after Ivy’s voice tag:
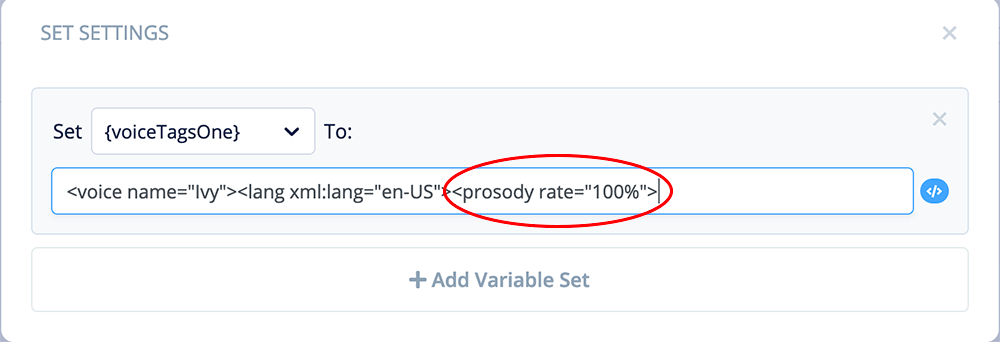
First character: Add a Prosody/Rate tag
Let’s add a prosody tag that manages the rate of speech. Initially, we will set the parameter to “100%”, which is the normal rate of speech for the voice, and is the same as if there were no tag at all.
The reason for including this tag, plus the next two tags, is flexibility. For this tutorial, they will be “neutral” values. However, once they are in place, the parameters can be easily adjusted to modify the rate of speech when needed.
According to the SSML Reference, there are two types of parameters that can be used for the prosody rate:
- Predefined values: x-slow, slow, medium, fast, x-fast.
- Relative percentage, to increase or decrease the rate. “100%” is the normal rate. Less than “100%” is a slower rate, and higher than “100%” is a faster rate.
Personally I prefer using percentages for the parameters, as it provides more refined control. However the other format (x-slow, slow, medium, etc.) works fine as well.
Add the following prosody tag for rate.
<prosody rate="100%">Copy and then paste it just after the lang tag:
First Character: Set Prosody Pitch
Now lets add a prosody tag that manages the voice’s pitch. We can set it to a neutral value, which is “+0%”. For this tutorial, I happened to set it to “+1%,” which is just slightly above neutral.
Again, according to the SSML Reference documentation, there are two types of parameters for prosody pitch:
- Predefined values: x-low, low, medium, high, x-high.
- Relative percentage, to increase or decrease the pitch. “+0%” is the normal pitch.
Less than “+0%” is a relatively lower pitch, and higher than “+0%” is a higher pitch. The Maximum pitch increase is “+50%”, and the lowest pitch is “-33.3%”.
Add the following prosody tag for pitch:
<prosody pitch="+1%">Copy and then paste it just after the prosody rate tag:

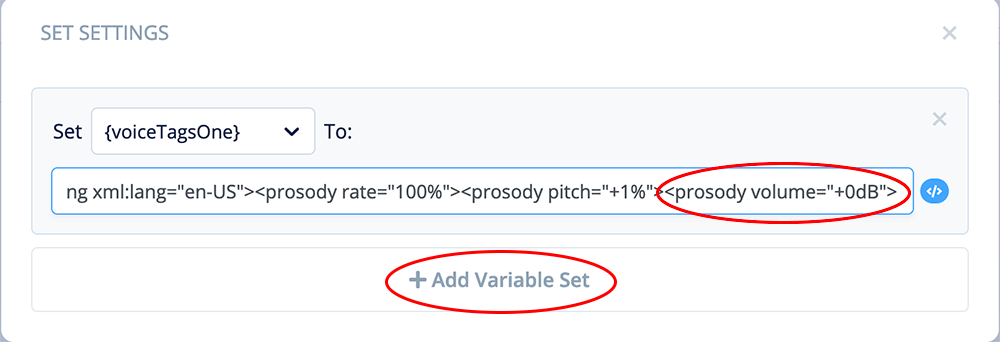
First Character: Set Prosody Volume
Next, let’s add a prosody tag that manages the voice’s volume. The reason this one is important is because there may be a need to adjust a Polly voice’s volume relative to the other voices.
According to the SSML Reference documentation, there are two types of parameters for prosody volume:
- Predefined values: silent, x-soft, medium, loud, x-loud.
- Relative dB (decibals), to increase or decrease the volume. “+0dB” is the normal volume.
- Less than “+0dB” is a lower volume, and higher than “+0dB” is a higher volume.
Add the following prosody tag for volume:
<prosody volume="+0dB">Copy and then paste it just after the prosody pitch tag:
The voice and prosody tags are now complete for the first character variable, voiceTagsOne.
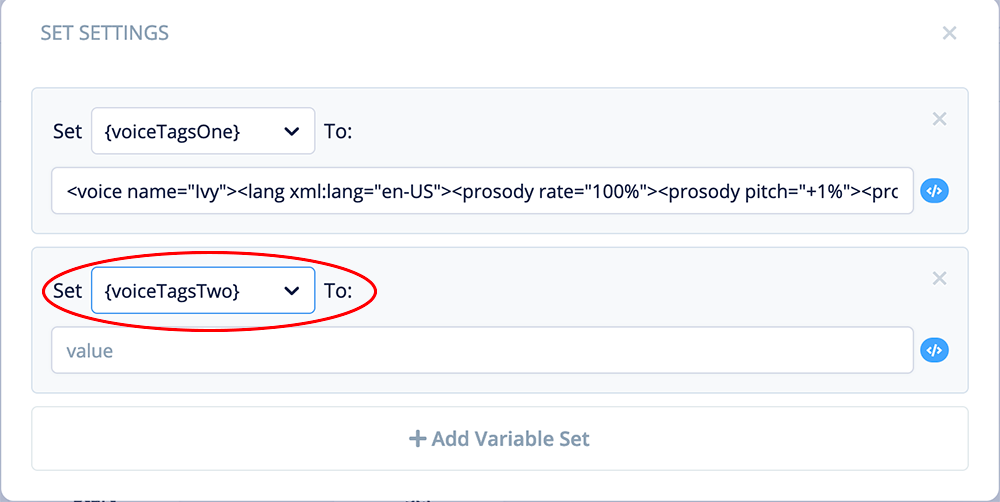
To proceed and work on the next voice, click “+Add Variable Set” in the Set box configuration.
Second character: Add SSML tags for variable voiceTagsTwo
Select variable {voiceTagsTwo} as shown below:
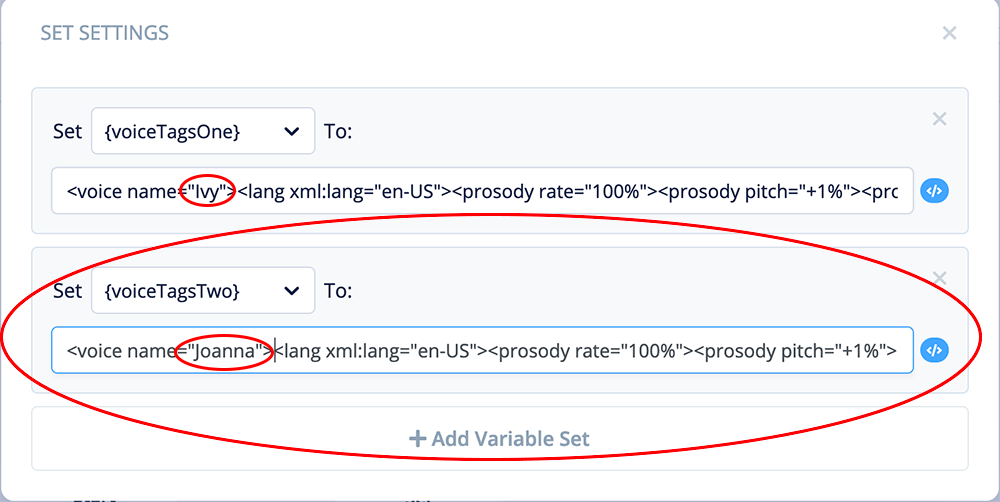
Rather than building out each individual voice tag, let’s copy and paste what we have for voiceTagsOne, and then edit it.
You can either copy from the Set block configuration, and then paste it into the field for voiceTagsTwo, or copy from here:
<voice name="Joanna"><lang xml:lang="en-US"><prosody rate="100%">
<prosody pitch="+1%"><prosody volume="+0dB">
if you copy and paste from the first variable name in the Set block, edit by changing the voice name from “Ivy” to “Joanna.”
The second voice variable is now complete. You can proceed to add the values for the third character in a similar manner for voiceTagsThree.
Third character: Add SSML tags for variable voiceTagsThree
Again, you can either copy from the Set block configuration, and then paste it into the field for voiceTagsTwo, or copy from here:
<voice name="Brian"><lang xml:lang="en-GB"><prosody rate="100%">
<prosody pitch="+1%"><prosody volume="+0dB">
After pasting the values, edit by changing the Polly voice to “Brian.” However in this case Brian is a British voice. Change the lang SSML parameter from “en-US” to “en-GB”, so that Brian will maintain his pronunciation for all English-speaking regions.
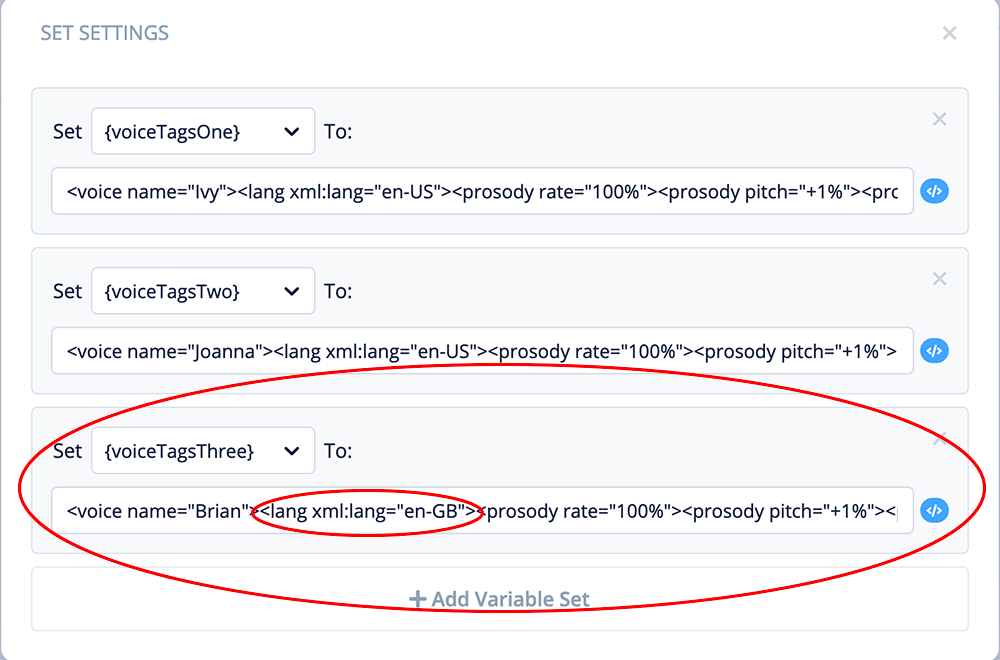
The third voice variable is now complete.
Add closing SSML tags for variable voiceTagEnd
This tag will be added to the end of the text being recited by the three Polly voice characters. A single tag can be shared by all of the voices if they are structured the same.
Closing prosody, lang and voice tags should be included to mirror the opening voice tags.
Add another variable set and select variable voiceTagsEnd. Add the following:
</prosody></prosody></prosody></lang></voice>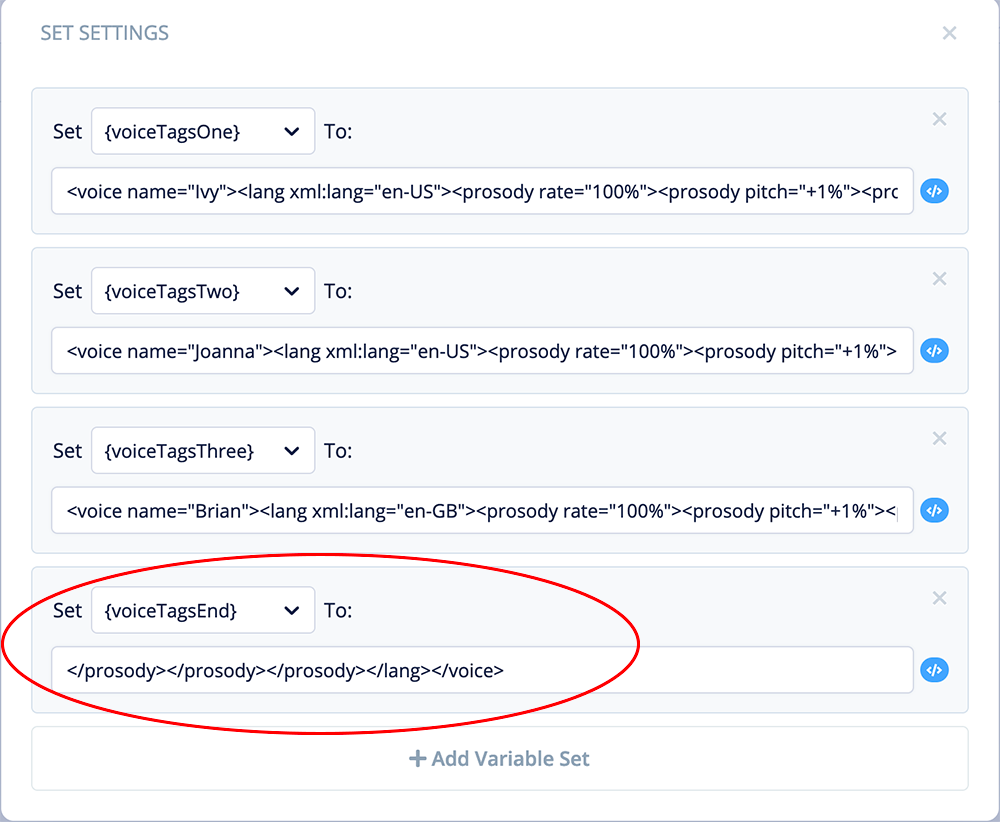
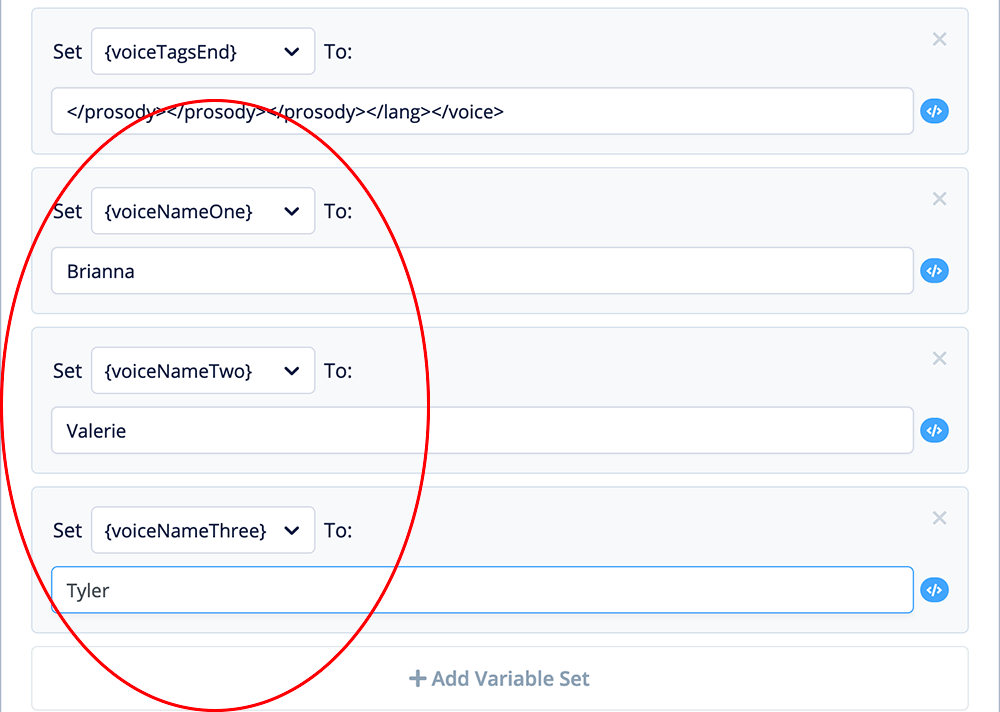
Add character names to the voice name variables
For the demo skill, add three more variable sets for the voice name variables, and assign the following names:
Brianna
Valerie
Tyler
These are the names of the characters in the skill.
After adding the three names, configuration of the Set block is now complete! After collapsing the Set block, your demo skill project canvas should now look similar to this:
In the next task, we will be working with a Speak block.
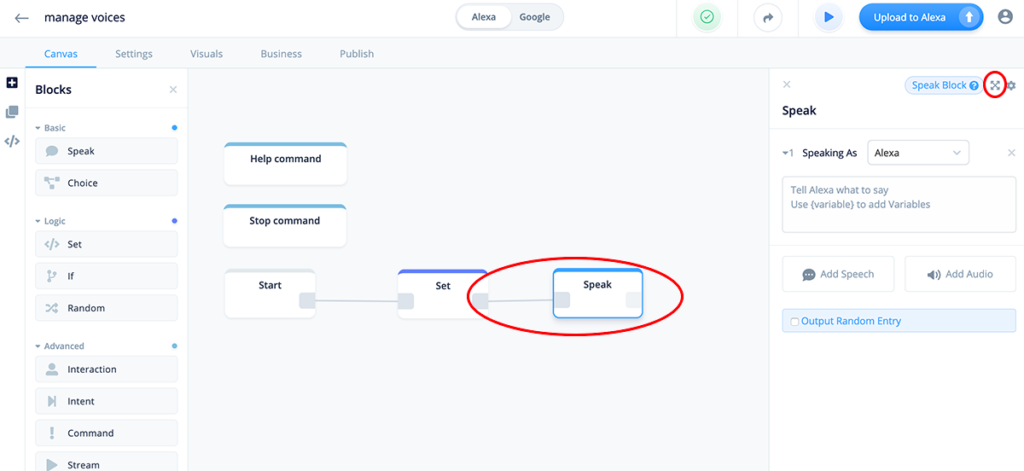
Task 4: Implement a Speak block
Now that we have configured a Set block to assign SSML tags and character names to a series of variables, it is now time to utilize them conversationally.
Our demo conversation will be in a series of steps within the Speak block. Each of our characters will speak, however Alexa will also narrate using her native voice. At the end of the mini-conversation, the user will be prompted with a question.
Let’s imagine we received a script for a scene from the writers. For our demo, it looks like this:
Demo Script
Level Six, Scene FourNarrator: Our intrepid heroes, Brianna, Valerie and Tyler, are trying to figure out how to escape the haunted house.
Brianna: I think we should try the door and use our skeleton key. What do you think, Valerie?
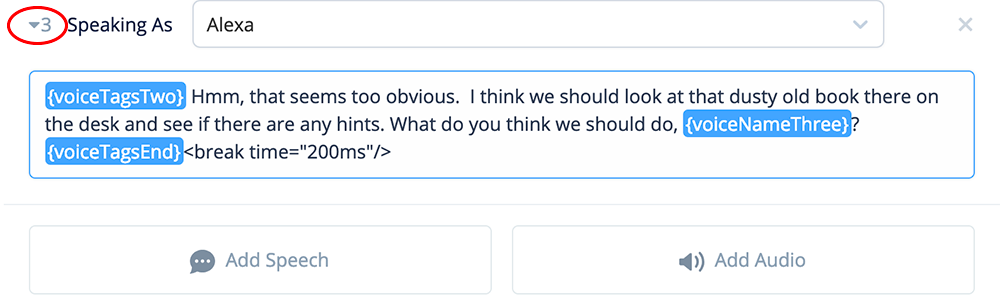
Valerie: Hmm, that seems too obvious. I think we should look at that dusty old book there on the desk and see if there are any hints. What do you think we should do, Tyler?
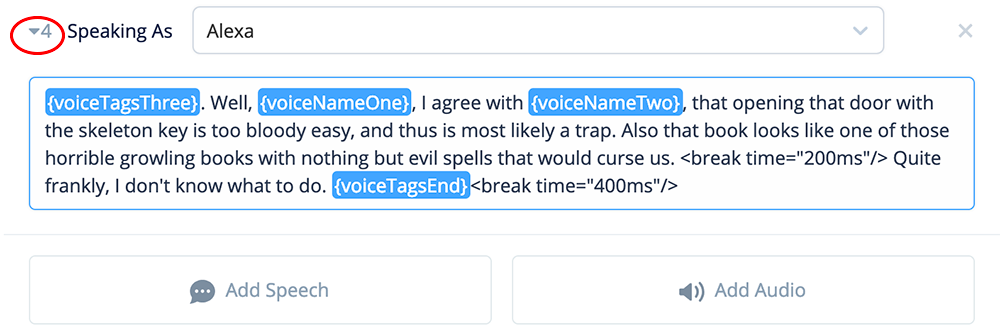
Tyler: Well, Brianna, I agree with Valerie, that opening that door with the skeleton key is too bloody easy, and thus is most likely a trap. Also that book looks like one of those horrible growling books with nothing but evil spells that would curse us. Quite frankly, I don’t know what to do.
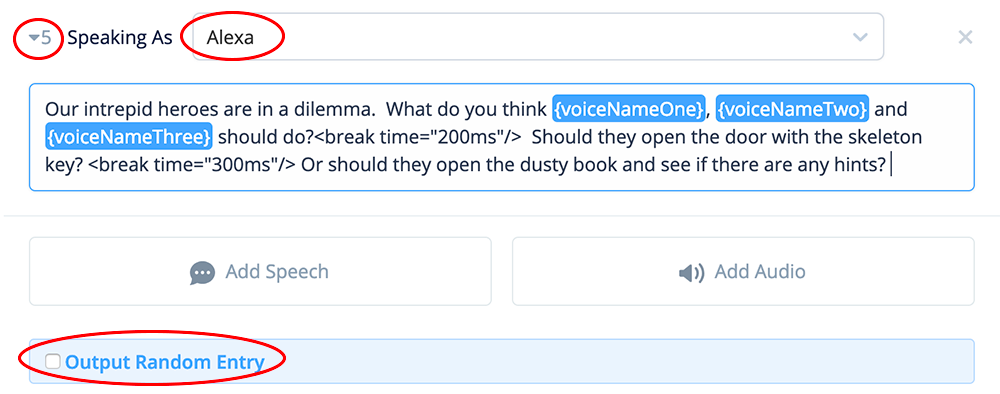
Narrator: Our intrepid heroes are in a dilemma. What do you think Brianna, Valerie and Tyler should do? Should they open the door with the skeleton key? (pause) Or should they open the dusty book and see if there are any hints?
Analyzing the above, we have five “steps” in the conversation before prompting the user.
The first step will be narrated using Alexa’s native voice. Then, each of the characters will speak. Finally, Alexa will summarize the situation and prompt the user for input.
Begin Speak Block Configuration
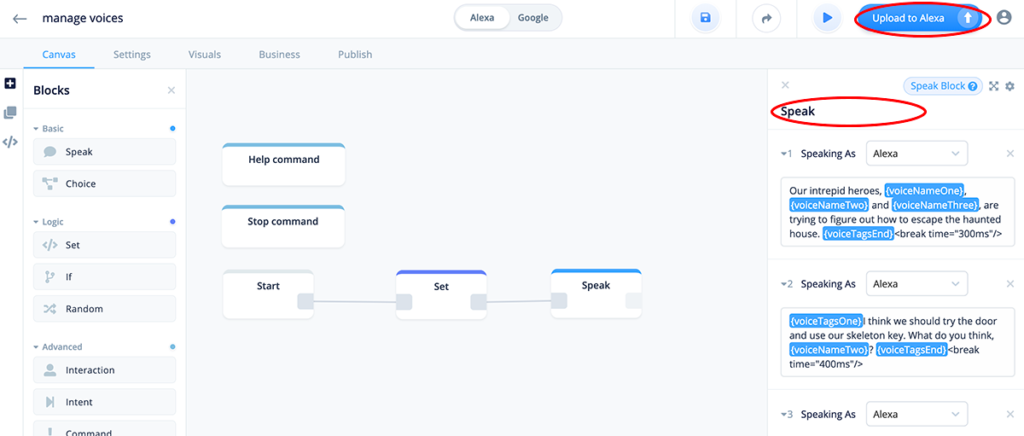
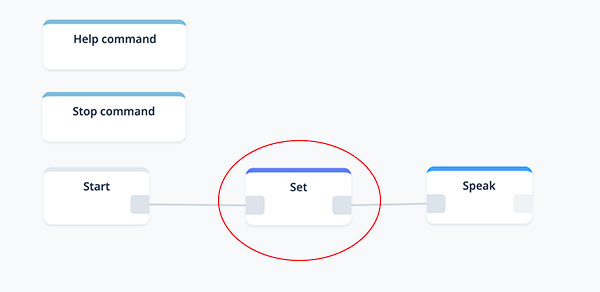
Add a Speak block to the canvas and connect it to the Set block as shown below and expand it.
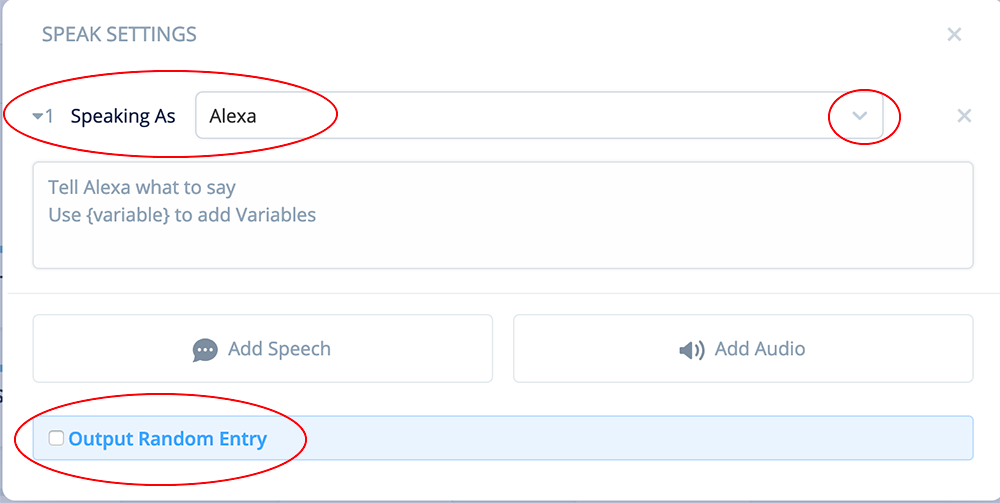
Configure Speak Block Step 1 (Alexa Narrator)
Because this first speak-step is the narrator, the skill will recite the lines using Alexa’s native voice. Also, be sure that “Output Random Entry” is not checked.
Optional: When using Alexa’s native voice, you can still use variables to manage prosody or other effects in a variable, in a similar manner as the ones we set up for our characters.
For example, you can include a variable named {voiceTagsAlexa}, and in the Set block assign it the prosody SSML tags. You would also set up a matching closing tag, such as {voiceTagsEndAlexa}. These variables would be similar to the other ones we are making for this tutorial, but they would not have the voice SSML tag.
These variables would then be added to the Speak blocks where Alexa’s native voice recites text. The benefit is being able to make quick global adjustments to Alexa’s native voice if needed.
Continuing with the tutorial, there are several ways to add the text.
One way is to copy and paste from a script or design document, similar to below.
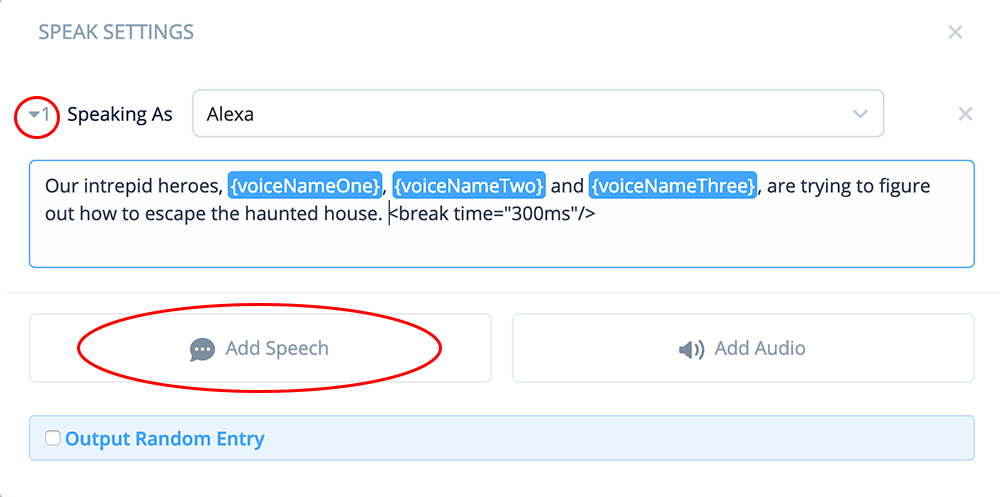
Our intrepid heroes, {voiceNameOne}, {voiceNameTwo} and
{voiceNameThree}, are trying to figure out how to escape the
haunted house. <break time="300ms"/>
In the above, the variable names are already added. A break is added as well, to create a natural pause.
Pro Tip: Be sure to add a space after the period in the last sentence of a speak block, or add a break. The reason is because Alexa will concatenate it with the next speak step, in the following manner:
“…haunted house.I think we should…”
When this occurs, Alexa will pronounce the period as a “dot.” While testing, if you hear Alexa unexpectedly say “dot”, usually this is the cause, and simply adding an extra space or a break resolves it.
A second way to add the text is to copy and paste the original script phrases, and then manually type in the variable names and edit.
Our intrepid heroes, Brianna, Valerie and Tyler, are trying to
figure out how to escape the haunted house.
When you start typing the “{” of a variable name, Voiceflow will initiate an option to auto-complete, and the variable will be highlighted in blue.
Either way works fine. Once you have added and edited your text in step 1 of the Speak block, it should look something like this:
Configure Speak Block Step 2 (Brianna)
Copy and paste the following into step 2 of the speak block:
{voiceTagsOne}I think we should try the door and use our skeleton
key. What do you think, {voiceNameTwo}? {voiceTagsEnd}
<break time="400ms"/>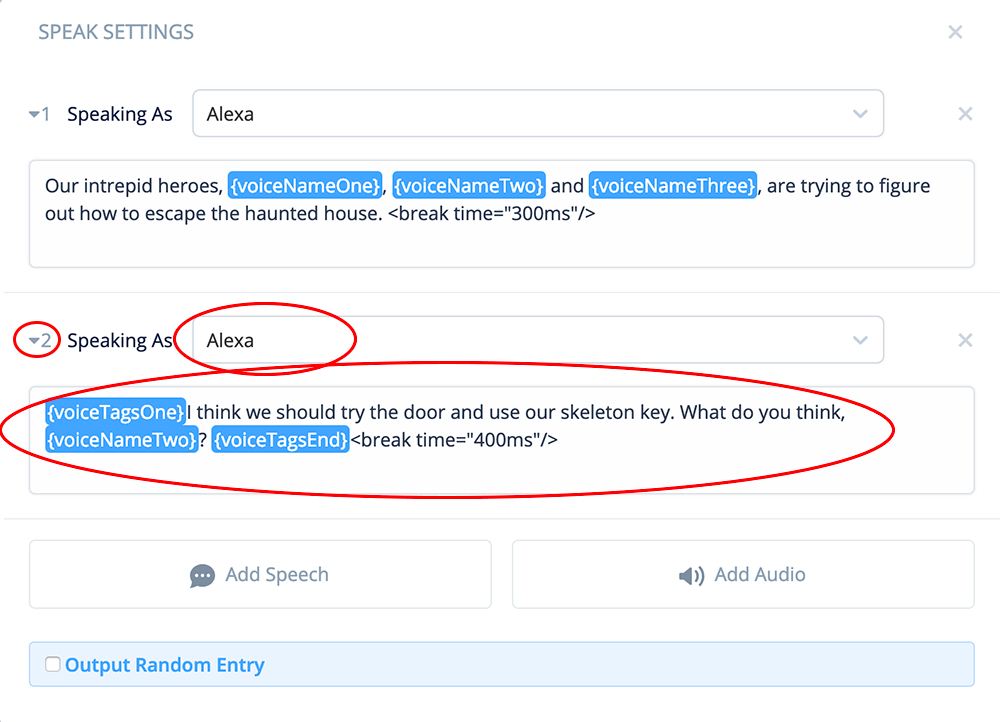
Pro Tip: Notice that when copying and pasting the variables, they are not highlighted blue. If you wish to see them highlighted, you can type over a character in a variable, and the autocomplete option will pop up. You can select the variable name (you might need to delete the character you typed).
The blue highlighting of variables is not necessary programmatically, but visually it helps the variables stand out, and helps confirm there are no typos. This may be of value when collaborating with others. It takes a little bit of practice the first few times.
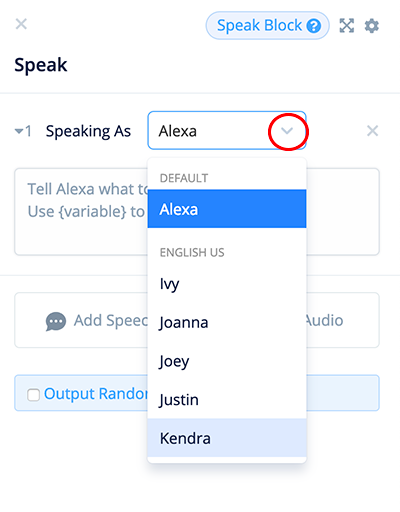
Important: Make sure the “Speaking As” is set to “Alexa.” If you try and pick one of the other Polly voices using the drop down, you risk overriding the SSML code for the voice.
Configure Speak Block Step 3 (Valerie)
Add step 3, and copy and paste the following:
{voiceTagsTwo} Hmm, that seems too obvious.  I think we should look
at that dusty old book there on the desk and see if there are any
hints. What do you think we should do, {voiceNameThree}?
{voiceTagsEnd}<break time="200ms"/>
Tweak the variables to highlight them in blue, if desired.
Configure Speak Block Step 4 (Tyler)
Add step 4, and copy and paste the following:
{voiceTagsThree}. Well, {voiceNameOne}, I agree with {voiceNameTwo},
that opening that door with the skeleton key is too bloody easy,
and thus is most likely a trap. Also that book looks like one of
those horrible growling books with nothing but evil spells that
would curse us. <break time="200ms"/> Quite frankly, I don't know
what to do. {voiceTagsEnd}<break time="400ms"/>
Tweak the variables to highlight them in blue, if desired.
Configure Speak Block Step 5 (Alexa Narrator)
Finally, add step 5 to the speak block, and copy and paste the following:
Our intrepid heroes are in a dilemma.  What do you think
{voiceNameOne}, {voiceNameTwo} and {voiceNameThree} should
do?<break time="200ms"/>  Should they open the door with the
skeleton key? <break time="300ms"/> Or should they open the
dusty book and see if there are any hints?
Tweak the variables to highlight them in blue, if desired.
Congratulations, the Speak block and the interaction is complete! Notice that in the last speak-step, Alexa is prompting the user with a question. If this were a real skill, most likely the flow would proceed to an interaction block.
Collapse the Speak block. Congratulations, our demo project is complete and is ready for testing!
In the next task, we will upload and test the voices.
Task 5: Upload the skill to the Alexa Developer Console and test
Upload your skill to the Alexa Developer Console (ADC). Once uploaded, enter a wake word and your demo project invocation name, and then run the test.
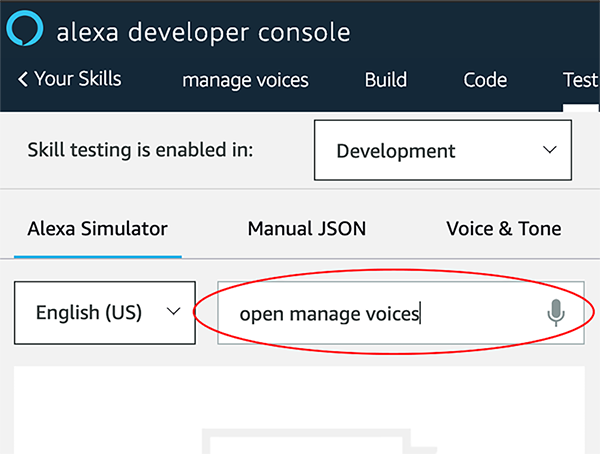
During the test, you should hear Alexa use the various voices reciting the lines, and also use the assigned character names. Visually, the output should be similar to this:
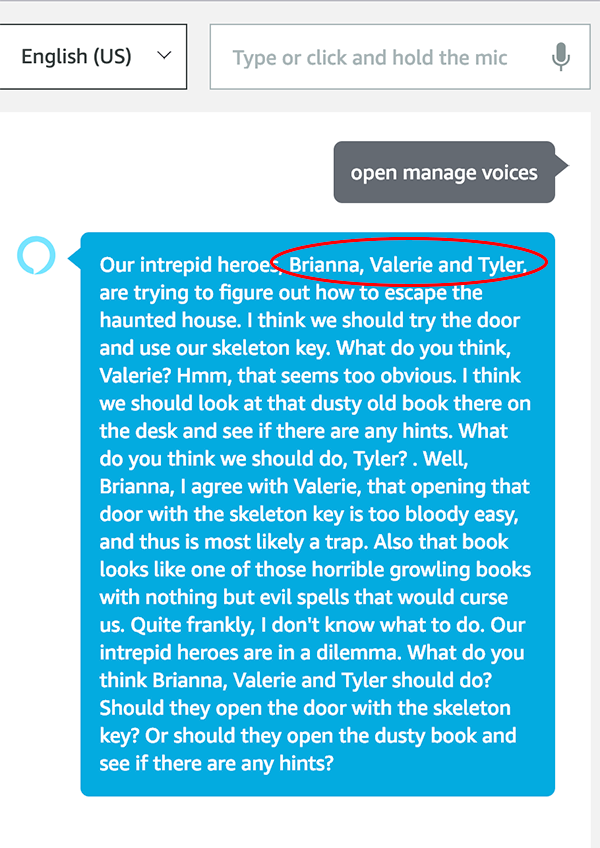
When listening to the skill playback, it should sound similar to this:
If you are receiving the same test results, congratulations, your configuration is working!
In the next section, we are going to make some modifications and then re-test.
Part 2 – Modify the Demo Skill and Test
This set of tasks walks you through editing our demo skill. Specifically, we will change a voice, change prosody for several voices, and a change a character’s name. Afterwards we will re-test the changes.
The benefits to this technique is being able to make all the changes in a single Set block to globally update how the voices sounds, as well as their character names.
Task 1: Review requested changes to the voices
Imagine the prototype is being tested by various parties. Perhaps it is stakeholders or beta testers and they provide feedback that can be summed up as follows:
Requested changes:
1. We don’t like Brianna’s voice. For this character, can it be a male character instead? It would be better in the story, and better compliment Valerie’s powerful character. Needs a cool name too.
2. Valerie’s voice is a tad high. Also, make her voice a bit louder, as she seems too quiet in comparison to Tyler.
3. Tyler talks way too fast.
If you have a large skill with dozens, if not hundreds of Speak blocks and speak-steps, it might take a relatively long time to edit each speak block and make these changes. Plus, there is a risk of missing one, or making a typo.
Another possibility is perhaps you might be doing a live demo for your client and would like to offer different voice options. For example, switching SSML tag values back and forth, and asking which ones they like best. You could make these global changes much more quickly if all you need to do is update the variables in a single place in the Set block, upload the skill to Alexa, and continue the demo.
In the next several tasks, we are going to do precisely this, and re-test to see and hear the changes.
Task 2: Implement the changes in the Set block
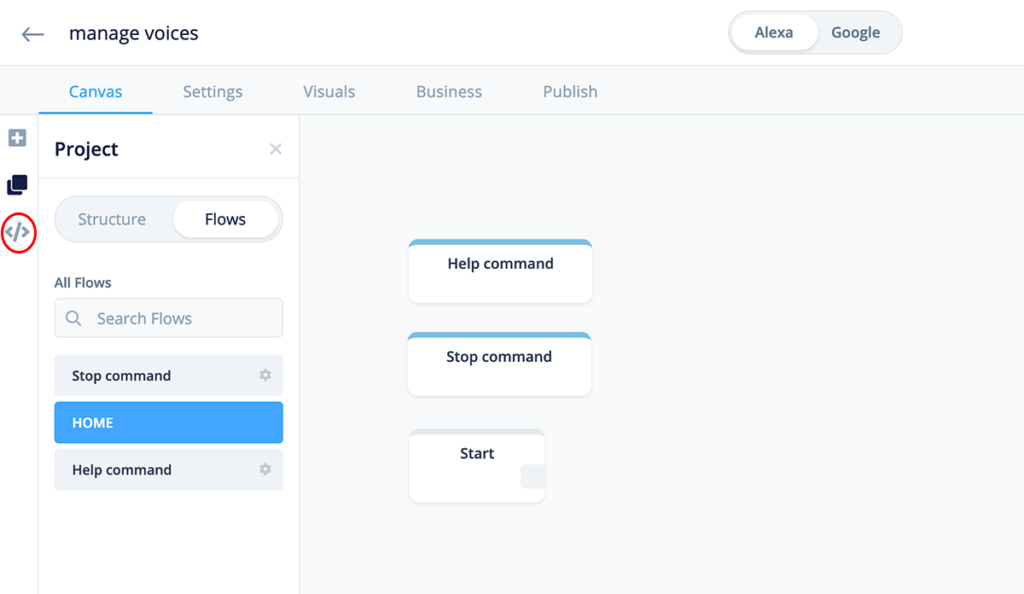
Let’s begin by finding the Set block on the project Canvas:
Open the Set block and make the following change to variable voiceTagsOne. Change the voice name from “Ivy” to “Matthew”. This is changing the Polly voice from a female-sounding voice to a male-sounding voice.
Before:
After:
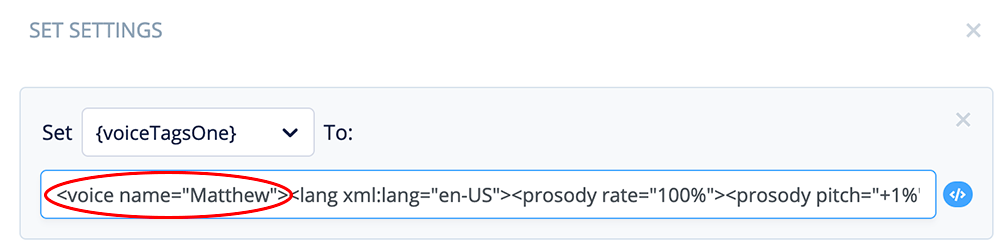
Second, let’s make the name change. Change variable voiceNameOne from “Brianna” to “Braden”.
Before:

After:

Third, let’s edit variable voiceTagsTwo prosody pitch to “-5%” to lower Valerie’s voice. Also, change the prosody volume SSML tag to “+5dB” to make Valerie a little louder.
Before:

After:

Fourth, change variable voiceTagsThree prosody rate to “92%” to slow down Tyler’s rate of speech.
Before:

After:

After the above changes are completed, close the Set block. Congratulations, the edits have been made, and we are ready to test the changes!
Task 3: Upload the modified skill to the ADC and test
Upload the modified skill to Alexa, and re-run the test.
Visually, the output in the ADC test panel should look similar to this:
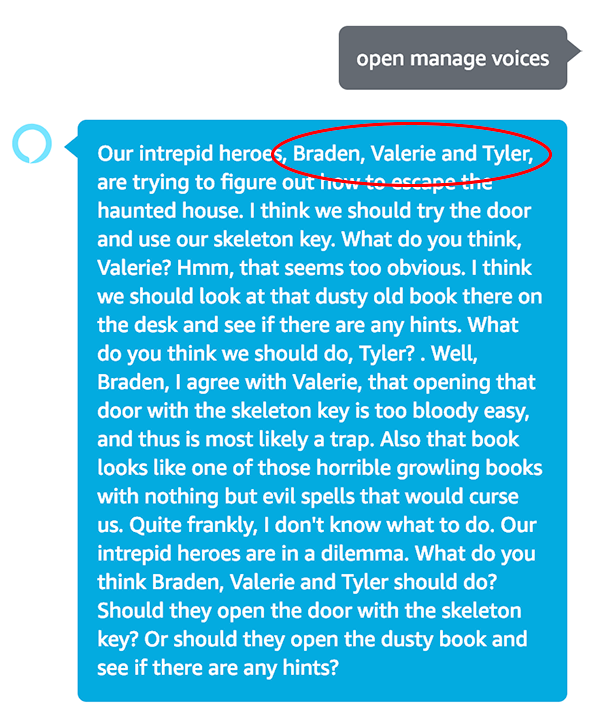
There is not much to see visually, other than the change of Brianna’s name to Braden. However, the voices should sound different:
The biggest noticeable change will be the female-sounding voice (Ivy/Brianna) changed to a male-sounding voice (Matthew/Braden). Depending on how closely you listen, the changes to pitch, volume and rate might be apparent as well.
If the tests have passed, you have learned a new technique for more easily managing the mechanics of voices and character names for your skills. Congratulations!
Conclusion
In larger skills with multiple voice characters, editing and updating them can be a challenge. What this tutorial has shown is a technique of using variables to store SSML tags for voice configuration, setting the variables in a Voiceflow Set block, and then applying them in a Speak block.
In our small demo/test skill, we only had one Speak block, with a handful of speak-steps in it. In a large skill, these same variables can be reused over and over in many Speak blocks.
When it comes time to make a change, editing them in a single location to make global changes to a voice should be easier, and reduce the risk of making an error when trying to update a voice across many Speak blocks. This will also help you be more efficient when responding to client or beta testing feedback.
What may be covered in future posts / updates.
Part 2 of this series will provide techniques for managing voices as user preferences.
Thank you for reading, and happy skill building!
Credits
Header photo by Christina Morillo on Pexels