
This tutorial describes how to to POST a record from Voiceflow to an Airtable.
A POST will add a new record to the bottom of an Airtable.
Level: Intermediate
This tutorial assumes you are familiar with both Airtable and Voiceflow. If not, there are some links to resources at the bottom of this post.
This tutorial has three parts.
- Part 1 covers gathering API information from Airtable for performing a POST.
- Part 2 shows how to prepare variables and configure an API block in Voiceflow.
- Part 3 shows how to test the configuration.
A big thank you to John Carnell of GetVoice.Agency for helping define the configuration for this tutorial.
PART 1: Gather Airtable Details
Airtable conveniently generates custom API documentation for each table. In this section we will gather the details needed for configuring the API block in Voiceflow for performing a POST.
Airtable “base” and “table” to which we will add a record
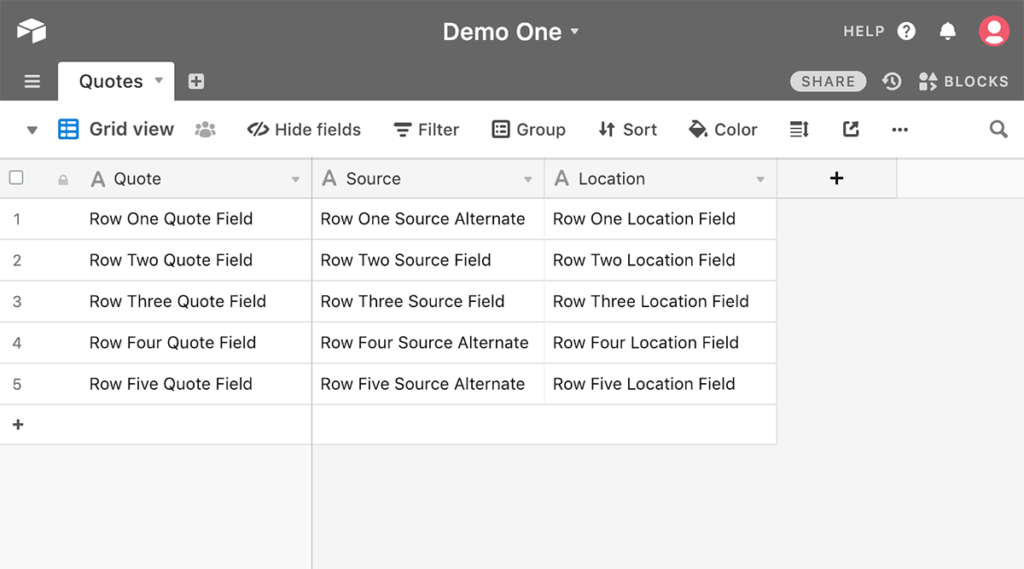
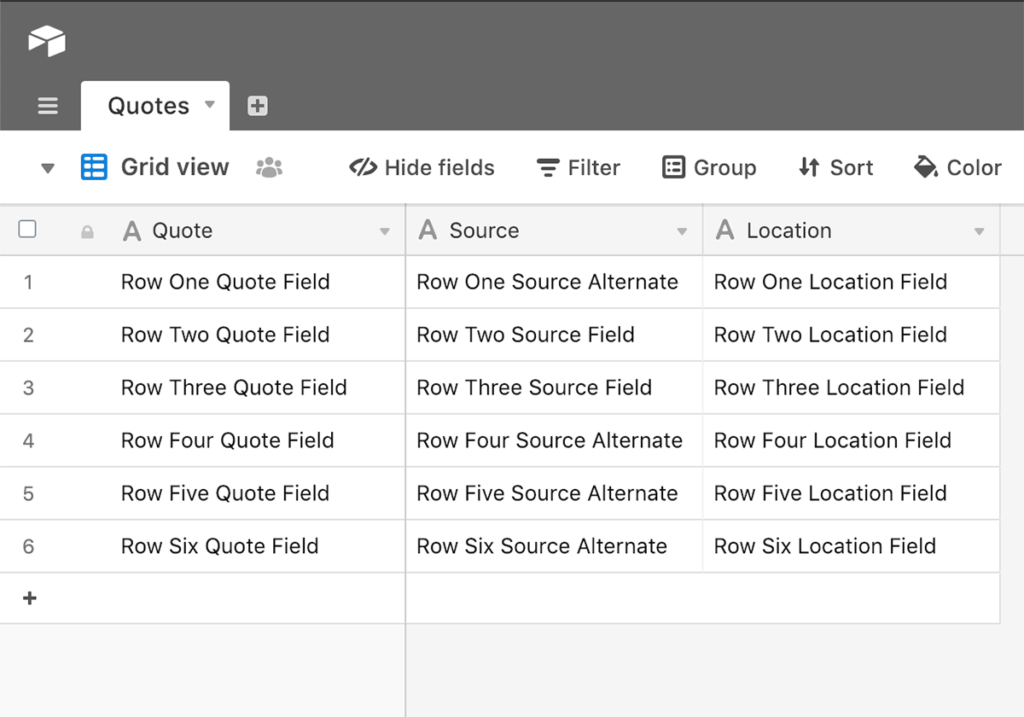
Airtable uses the term “base” for groups of related tables. The base we are using is named “Demo One.” In this base, we have a table named “Quotes.”
We will add a new record to the bottom of table “Quotes” during the tutorial. This table has three columns. For simplicity, this tutorial will refer to this as an “Airtable.”
You are encouraged to follow along using your own Airtable and make adjustments based on your table design.
Currently our Airtable has five records. We will be adding a sixth record during the tutorial.
Find the API Documentation for your Airtable
Airtable provides customized API documentation for each table. In this task we will find the documentation and gather the information needed for configuring the Voiceflow API block.
Access the table API documentation
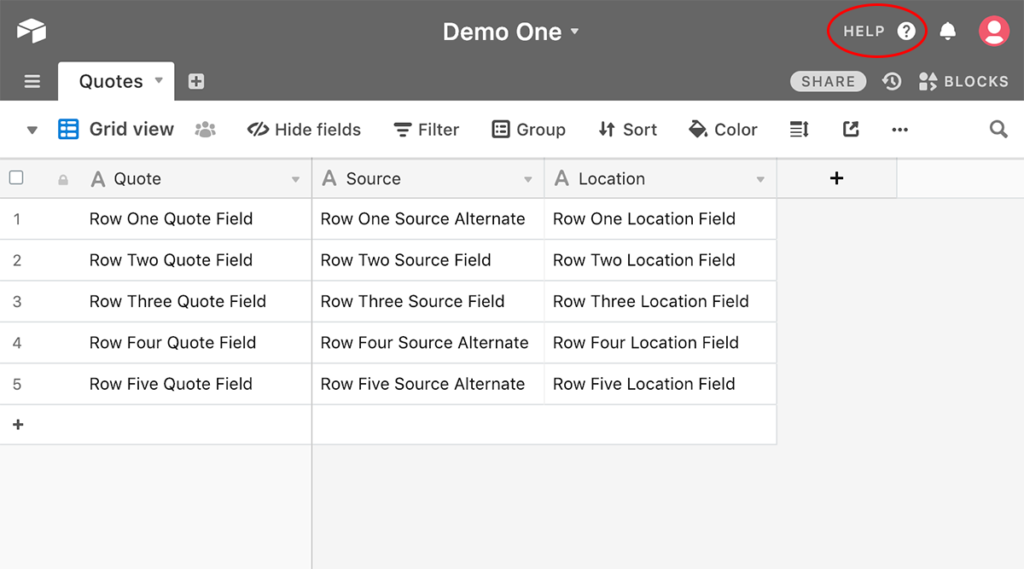
Click on either the “HELP” link or the question mark in the upper right corner. From the drop down that appears, select “API Documentation”
The API documentation has a substantial amount of customized, specific details for your table. At first, a page will open with “Introduction” selected in the left panel menu.
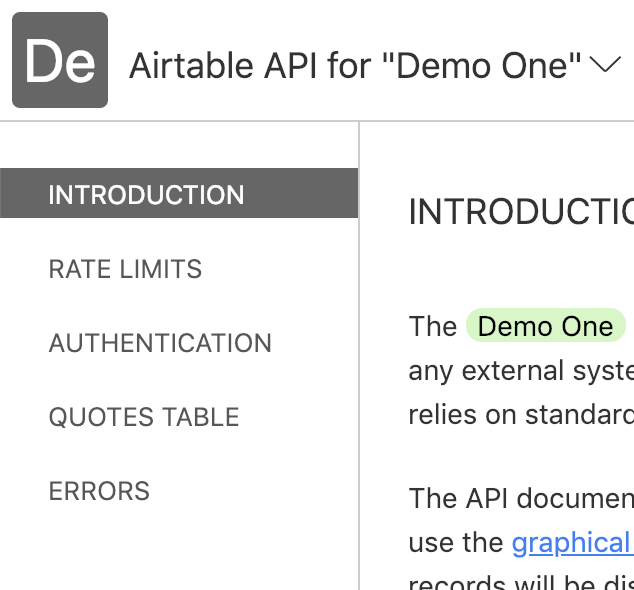
Find and Select your Table Name
Click on your table name in the left panel menu. For this demo, the menu selection is named “QUOTES TABLE.” For you, the name of the menu option will match your table’s name. A submenu will open up.
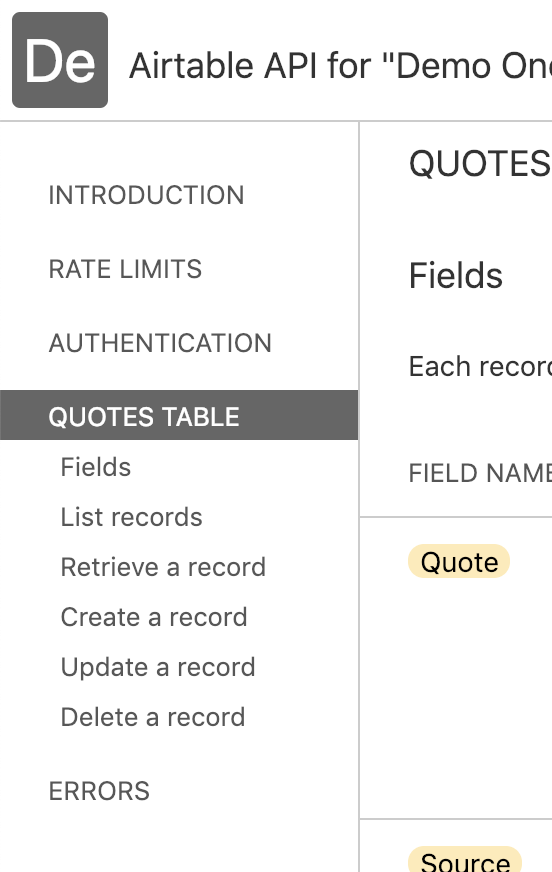
Find and Select the “Create A Record” option
Select the “Create a record” submenu option from the left panel menu.
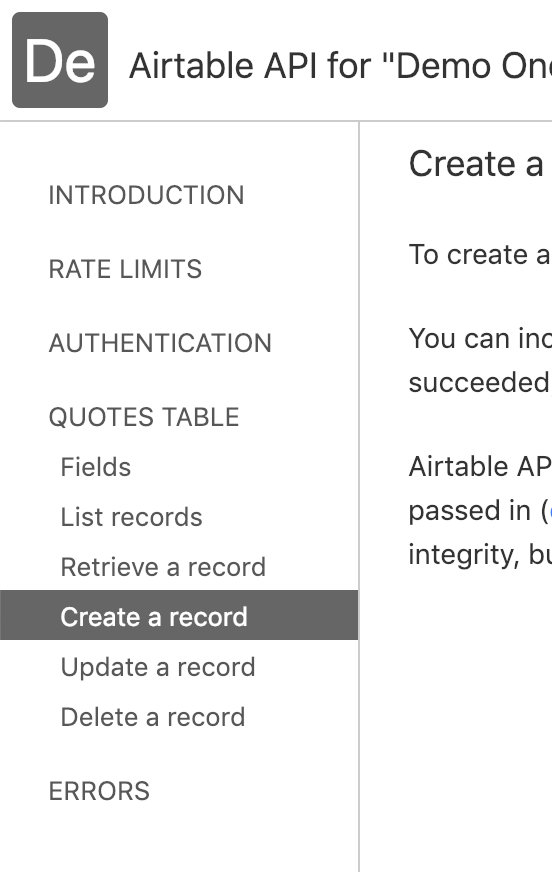
Review Details required for POST
This Airtable API Documentation page will have information you need for configuring your POST in the Voiceflow API block.
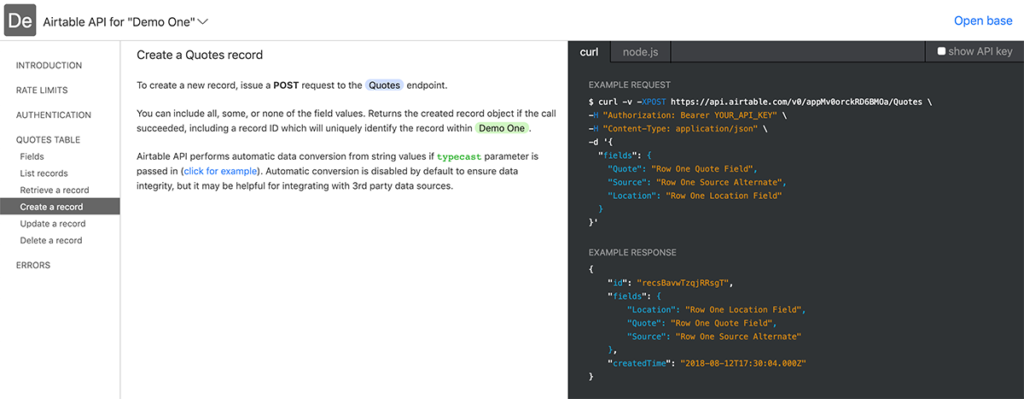
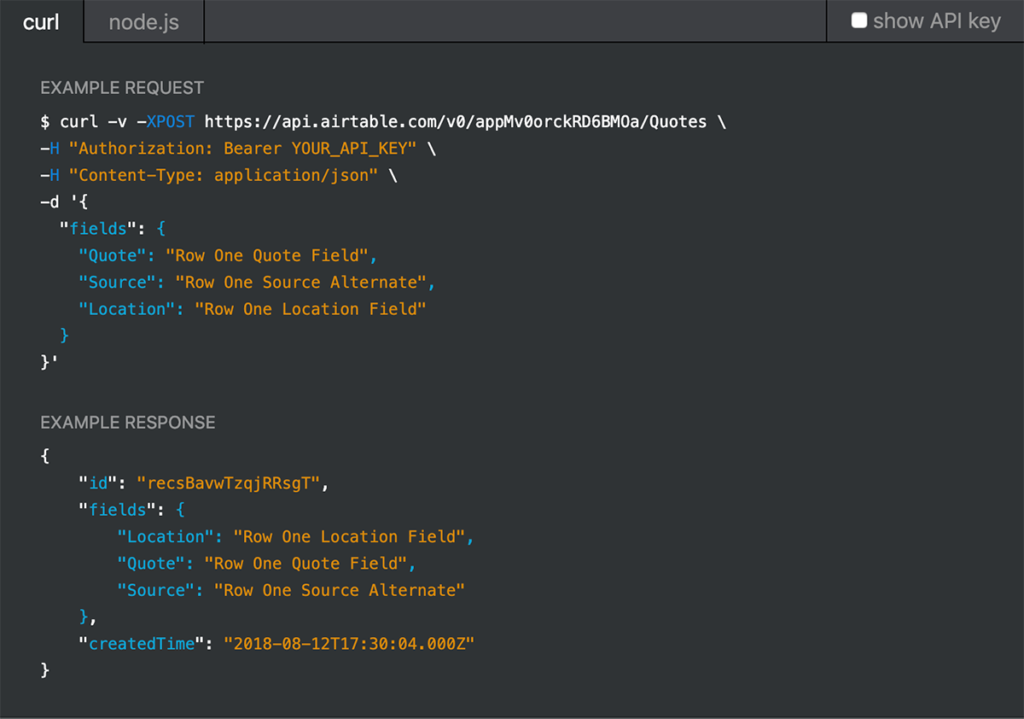
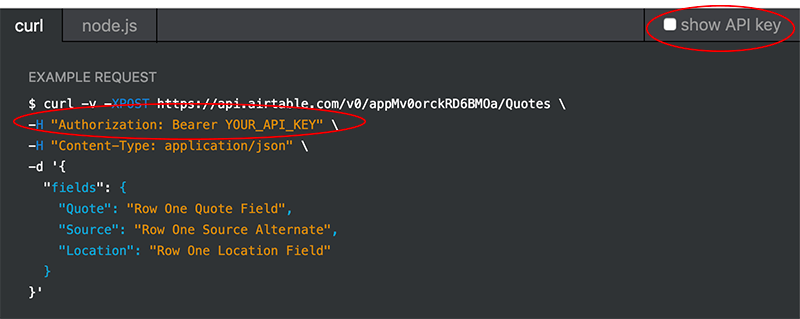
Let’s focus on the information in the right hand pane, specifically the “curl” tab. This has an EXAMPLE REQUEST specification.
You may want to have a worksheet handy, or you can copy and paste directly into your API block.
Review the value from the first line, which is flagged “curl…” and has a reference to “XPOST.”
$ curl -v -XPOST https://api.airtable.com/v0/appMv0orckRD6BMOa/Quotes \The part we need for copying and pasting is the URL itself:
https://api.airtable.com/v0/appMv0orckRD6BMOa/QuotesThe “show API key” is unchecked. If you don’t already have it saved somewhere, click the check box, and then copy and paste it to a worksheet.
It is your “secret key,” and will look something like this:
-H "Authorization: Bearer keyxfK9999999999" \Be careful not to share this key, unless your intention is to share access to the table. If you do accidentally share it, you can regenerate a new key for your Airtable account. The parts we will need for copying and pasting from the EXAMPLE REQUEST are these:
Authorization
Bearer keyxfK9999999999
Notice there is no colon in between the term “Bearer” and the key value.
The next part to review is the content type information.
-H "Content-Type: application/json" \The parts we need for copying and pasting are these:
Content-Type
application/json
The next part we need to review is the API body, or data structure, for mapping into the various fields in a row.
In this example, “Quote”, “Source” and “Location” the table’s column names. The values such as “Row One Quote Field” and so forth, are example values derived by Airtable from the first row of the table.
-d '{
  "fields": {
    "Quote": "Row One Quote Field",
    "Source": "Row One Source Alternate",
    "Location": "Row One Location Field"
  }
}'
The above example is used for designing the “body” for your API POST for your own table.
In your skill, the values such as “Row One Quote Field,” etc., will be replaced with your own values.
They can be literal / hard coded, as shown in the example, or they can be configured with variables using curly braces. This option will be illustrated more fully in Part 2.
In addition, there may be fewer or more rows in the body, depending on how many columns there are in your table design.
For this tutorial, the parts we will need for copying and pasting are these:
{
"fields": {
"Quote": "Row One Quote Field",
"Source": "Row One Source Alternate",
"Location": "Row One Location Field"
}
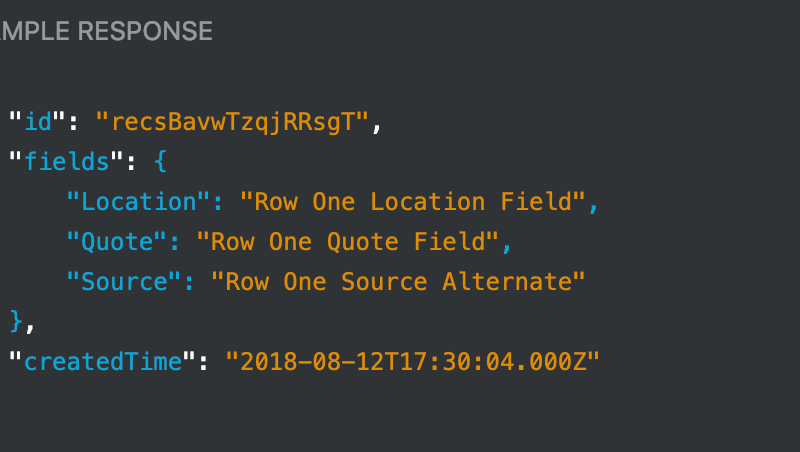
}Review the example API response
This part isn’t required, however it is good to review what the response will look like when the API POST is successful.
A similar response based on this example will be displayed in the debug window when testing in Voiceflow. This can be seen in the middle part of the black pane in the API documentation for “Create a record” for your table.
Now that we have everything we need, let’s proceed with configuring the Voiceflow skill.
Part 2: Configure Voiceflow variables and API Block
For this tutorial, we will first define some variables for storing the values to be passed in via the POST. Next, we will set some test values in the variables using the SET block. Third, we will then configure the API block.
Define Variables in Voiceflow
There are potentially many types of data you may wish to POST. They can be global values provided by Voiceflow, such as the UserID. They can also be values coming in from other API calls, or calculated values such as leaderboard scores. They can be values based on input captured from the user, such as nicknames and other preferences.
It is possible to pass in either hard coded values to Airtable directly in the API via the API body, or use variables. They can be local or global, depending on your needs.
For this tutorial, however, we will keep it simple and use the following local variables:
{quoteOne}		//A quote
{sourceOne}		//The source of the quote
{locationOne}		//The location where the quote originated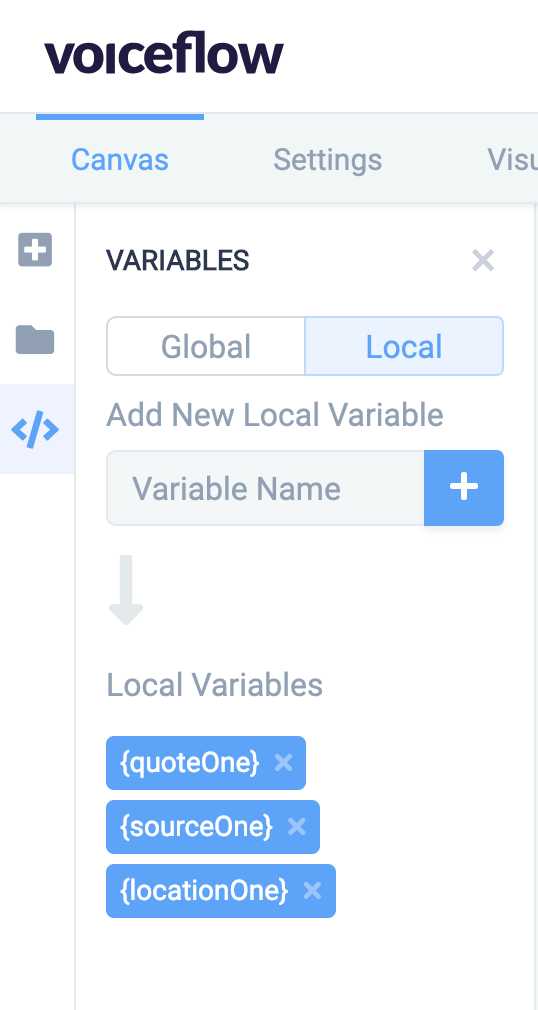
Add Values to the Variables in Voiceflow
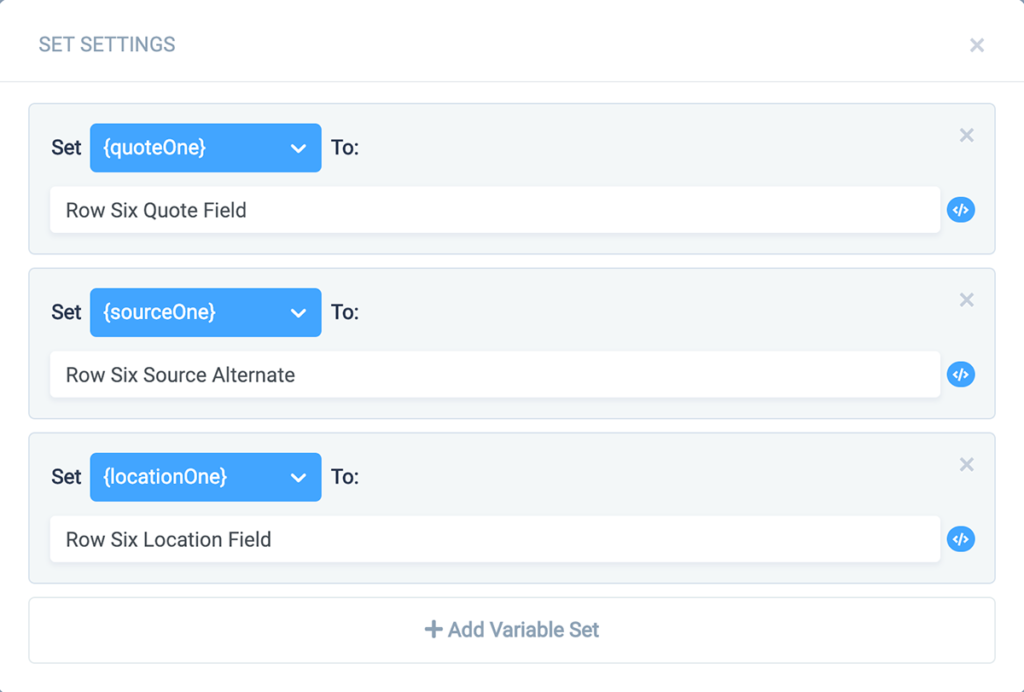
For this tutorial, lets use a SET block to add some values to the variables, and use these for testing.
Configure the API Block in Voiceflow
There are three parts of the API block we need to populate. The URL Endpoint, the Headers, and the Body.
Select POST and Populate URL Endpoint
Add the API block to your project canvas, then open it, and expand it. Select POST from the pulldown, and enter the URL gathered earlier from the Airtable API documentation:
https://api.airtable.com/v0/appMv0orckRD6BMOa/Quotes
Add the “Headers” information
In the Headers tab, on the first line, enter the Authorization and your secret API key, as shown below. Notice there is no colon in between the term “Bearer” and the key value. Also, on the second line, add the values for Content-Type and application/json.
Authorization
Bearer keyxfK9999999999
Content-Type
application/json
WARNING: Be careful when sharing your project via Voiceflow, as currently the secret API key is visible when shared. If you do share your project, either temporarily delete or substitute a dummy value for your API key, or plan to regenerate your secret API key in Airtable, and update the API block.
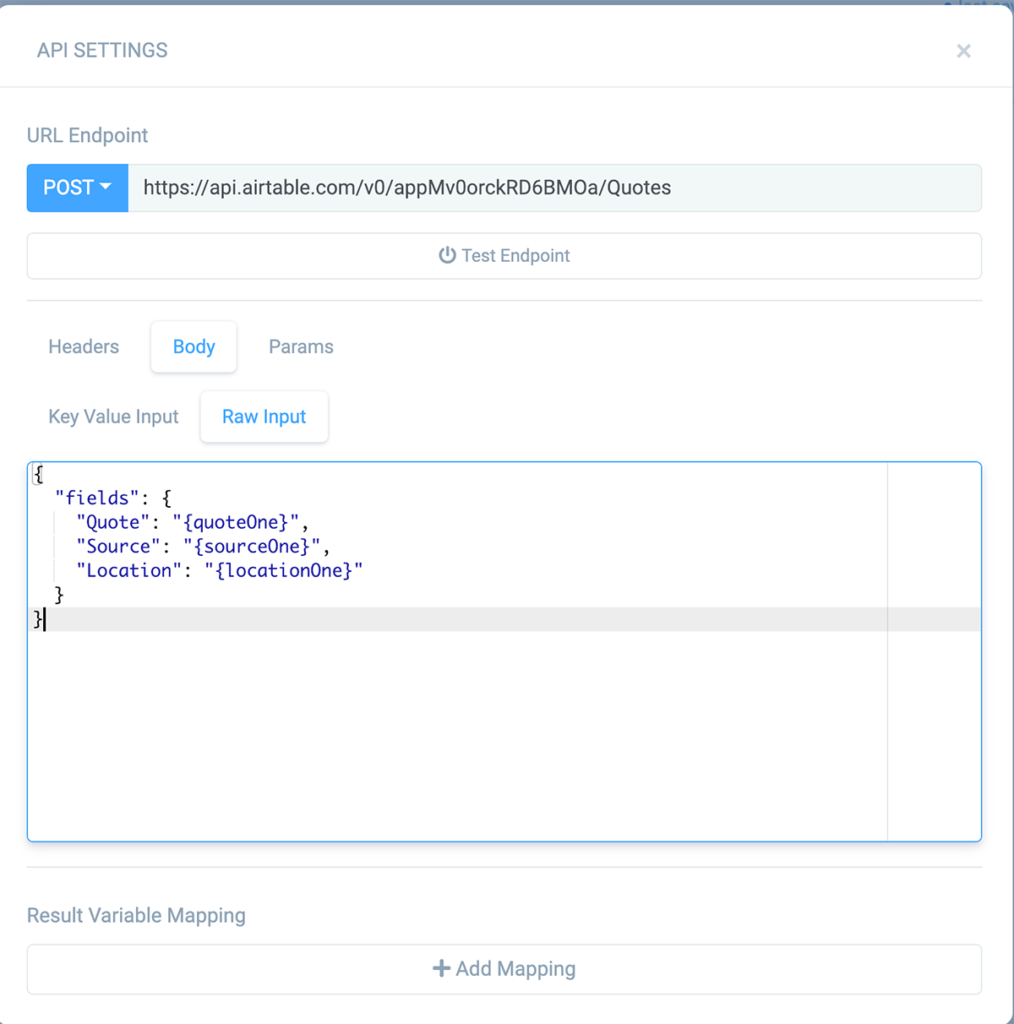
Add the “Body” information
Click on the “Body” tab, “Raw Input” section. Add the information as shown below (copy/paste from the eariler section). This data structure is used to pass the values from Voiceflow into the new record in Airtable.
{
  "fields": {
    "Quote": "Row One Quote Field",
    "Source": "Row One Source Alternate",
    "Location": "Row One Location Field"
  }
}
The above will be the values defined in the API documentation for your own table.
As discussed earlier, either variables or hard coded values can be used. For this tutorial we are substituting the variables we defined earlier. After pasting in the data structure, edit the data values with your variables.
{
  "fields": {
    "Quote": "{quoteOne}",
    "Source": "{sourceOne}",
    "Location": "{locationOne}"
  }
}
Be careful when copying and pasting with a word processor, as some word processors will change the apostrophes to curly quotes or smart quotes. In this case, make sure they are straight vertical quotes, otherwise you run the risk of a failure.
Also be careful you do not accidentally miss the last curly brace while copying and pasting (yes, I’ve done this).
After the body section is completed, close the API block and configure any remaining parts of your Alexa skill, as needed, for testing. Don’t forget to upload your changes to Alexa prior to testing.
Part 3: Test the API Block Configuration
Test 1
Let’s run it using an Echo device, and then check the airtable and see if the record was added.
Before:
After:
For this test, a sixth row was added. Testing was successful.
Test 2
For a more detailed test, or if you need to do some debugging, you can use the Voiceflow browser Test feature, with the Debug option turned on.
With the debug tool, you can review details and validate the API process completed.
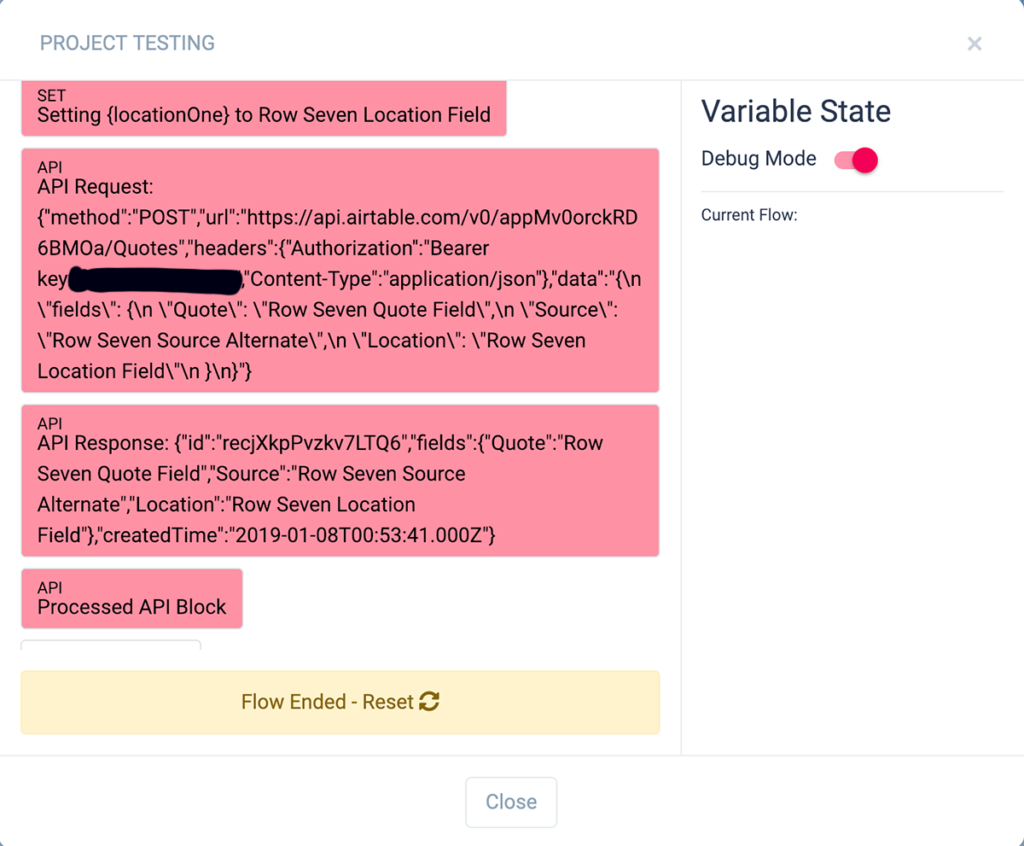
As you can see, the test screen shows that the skill processed the API block and no errors are displayed. A response is also provided, which is similar to the example response shown in the Airtable API documentation.
Conclusion
We’ve learned how to configure an API POST from Voiceflow to Airtable, which enables adding a record. We covered how to gather information from the Airtable’s API documentation, how to prepare variables and configure the API block in Voiceflow, and finally several ways to test.
Thank you for reading, and happy skill-building!
Resources
If you are new to Alexa skills and Voiceflow, this Voiceflow University Youtube video series is a good place to start.
Voiceflow New User Tutorials
Voiceflow University New User Tutorial Series on Youtube
Additional Voiceflow resources:
Voiceflow API Tutorials
If you are just learning about APIs, JSON Fundamentals, and how to configure API blocks using Voiceflow, it is recommmended you review some of the tutorials in Voiceflow University before proceeding with this tutorial:
Voiceflow University: Using APIs & Integrations.
Voiceflow Airtable Tutorials
The following Voiceflow tutorial covers the basics of designing a new Airtable base, and performing a GET:
Voiceflow: Using Airtable with your Alexa Skill (Build Table, GET)
This Voiceflow tutorial covers how to send data to Airtable and update an existing record by performing a PUT:
VoiceFlow: Sending Data to Airtable (PUT)
Airtable Resources
Airtable provides a comprehensive guide on how to use their product, including how to design and develop “bases.”
WARNING: Be sure to review Airtable’s current pricing plans and associated volumes and limits. Airtable has a free tier, but after a certain volume of usage you will be expected to sign up for a paid subscription.