By Mark Maestas and LaLa Speights
What is Voiceflow?
Voiceflow is a cloud-based, no-code tool for designing, prototyping and building voice applications. It continues to mature, and recently came out with some powerful new features, including markup, a robust commenting system, and real-time collaboration.
If you are new to Voiceflow, you can learn more here:
This template is available for download in the Voiceflow Marketplace
Basic Sample Dialog Template Download Link
After downloading, edit it to make your own, customized template which will work best for you and your clients.
This is the first in a series of Voiceflow sample dialog templates.
- Basic Sample Dialog Template
- Sample Dialog Template with Variables
- Sample Dialog Template with Flows
- Sample Dialog Template with a Prompts Database.
Introduction
A sample dialog is a document which shows an example interaction between a voice system and a user. Usually it is among a series of documents for a voice project.
Before creating sample dialogs, usually the Persona is defined and documented. The Persona will be referred to and kept in mind while crafting the prompts.
In turn, after sample dialogs are developed, these can be the starting point to create prototypes. In other words, sample dialogs tend to be one of the middle pieces of documentation for a voice project.
Rob Hayes of Voiceflow recently wrote an article along with an accompanying video. He provides great information about the variety of documentation you may wish to maintain for voice projects.
The basic sample dialog template shown here in this article is based on the one in Rob’s video. A link to his video can be found in his article:
How to Document Conversation Designs
Rob states “Good conversation design documentation = Good conversation design.”
“Conversation design is a primarily non-visual experience, but prototyping your conversation can make it tangible for stakeholder feedback and customer research. And in the end, better documentation will allow for better handoff and ensure that the conversations in your design are the conversations that get built.”
— Rob Hayes, How to Document Conversation Designs
You can use Voiceflow to document, collaborate on, share, and test sample dialogs. The basic sample dialog template, presented here, is the first in a series.
Voiceflow also supports real-time collaboration. A robust commenting system is available, and the Markup feature makes it easy to highlight and communicate key details. This makes it easy for others to participate in the design and testing of sample dialogs.
Your sample dialogs can be uploaded to the Alexa Developer Console for immediate and accurate testing. This is very useful for yourself and other team members to listen to and refine the prompts, the flows, and the overall experience.
In this article we cover the following areas:
- A Tour of the Basic Sample Dialog Template and Key Voiceflow Features
- Testing your Sample Dialogs
- Sharing, Collaboration and Comments
- Organizing your Many Sample Dialogs in the Voiceflow Kanban Board
A Tour of the the Sample Dialog Template and Key Voiceflow Features
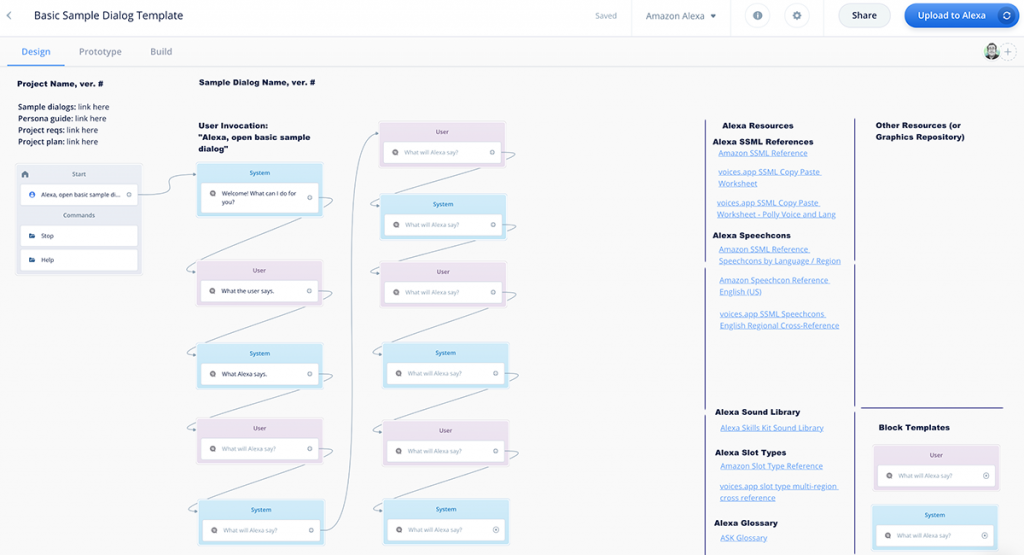
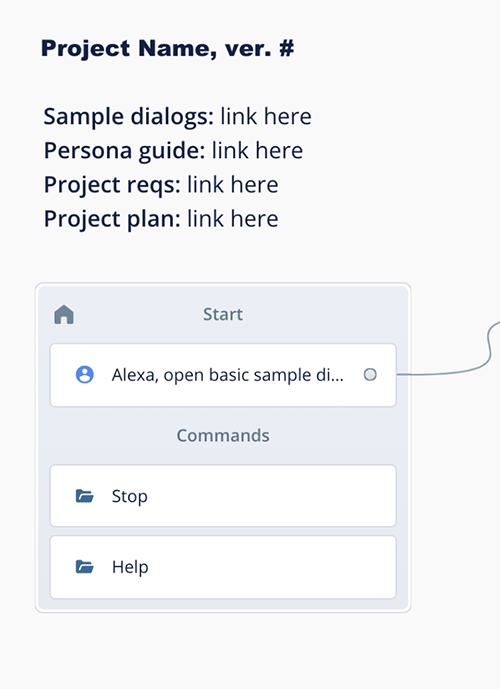
The template layout has three sections: 1. Project information and links. 2. Combine Blocks and Steps for documenting the sample dialogs. 3. Resources, such as helpful links and a graphics repository.
1. Project Information and Links Section
In the upper left corner, the Voiceflow Markup feature can be used to provide project information. As a project iterates, you may want to make copies of newer versions of sample dialogs, and archive older versions.
In addition you can create links to other source documents. These may be source documents from clients, as well as other design artifacts. These are easily editable, and you customize and make your own template which best match your needs.
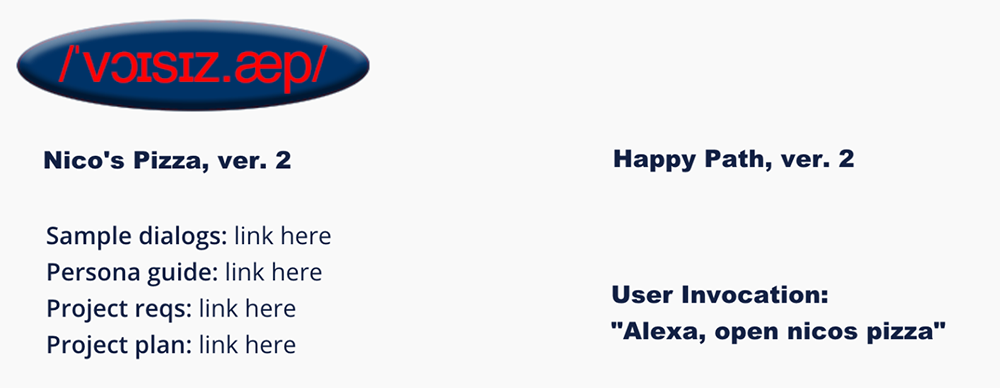
Branding and Client Information
If your sample dialog will be client-facing, you may also wish to use Markup to add the client name, identify the key stakeholders, and perhaps add either the client’s logo or your own.
Sample Dialog Version and Information
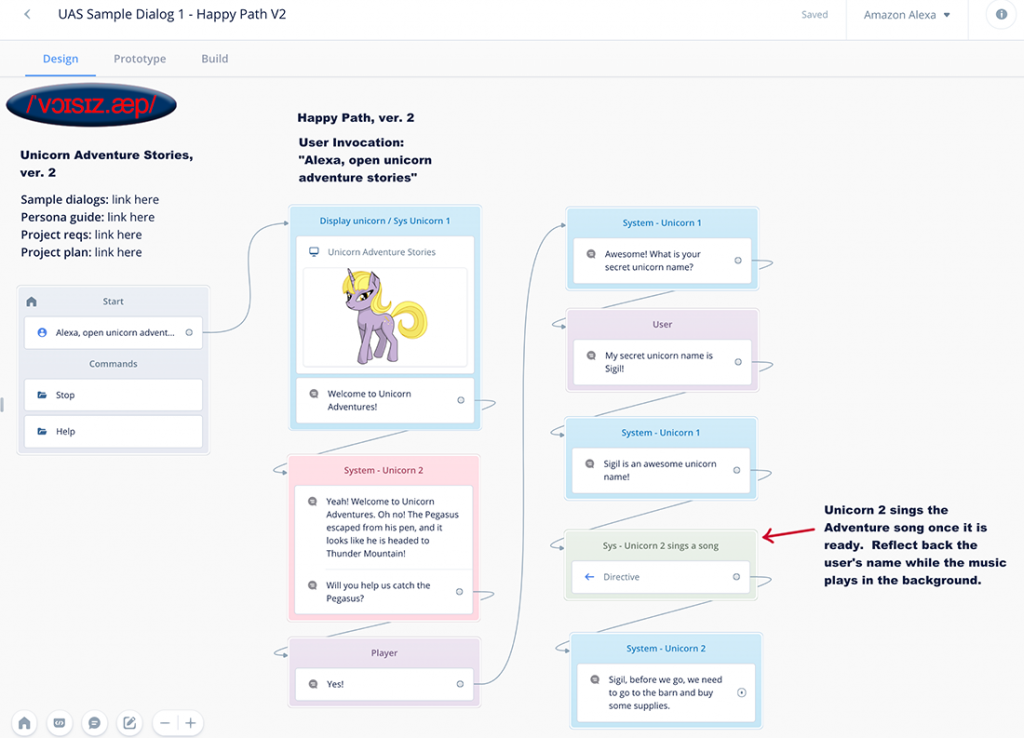
You may wish to give your sample dialogs names using Voiceflow’s Markup feature. For example, the very first one might be the “Happy Path.”
As design activities proceed, you may then wish to create separate sample dialogs for other paths, such as “Cancel Order,” the help flow, and so on. A very large project might have multiple happy paths, one for each major flow.
2. Combine Blocks and Steps Section
The middle part of the template has the Speak Steps, to document what Alexa says, as well as what a User might say.
You can also have additional types of Steps for audio and visuals. Depending on your dialog flows, you also might combine several Steps into larger “Combine Blocks.”
The template provides a series of Speak Steps as placeholders, where you can start adding prompts and example utterances.
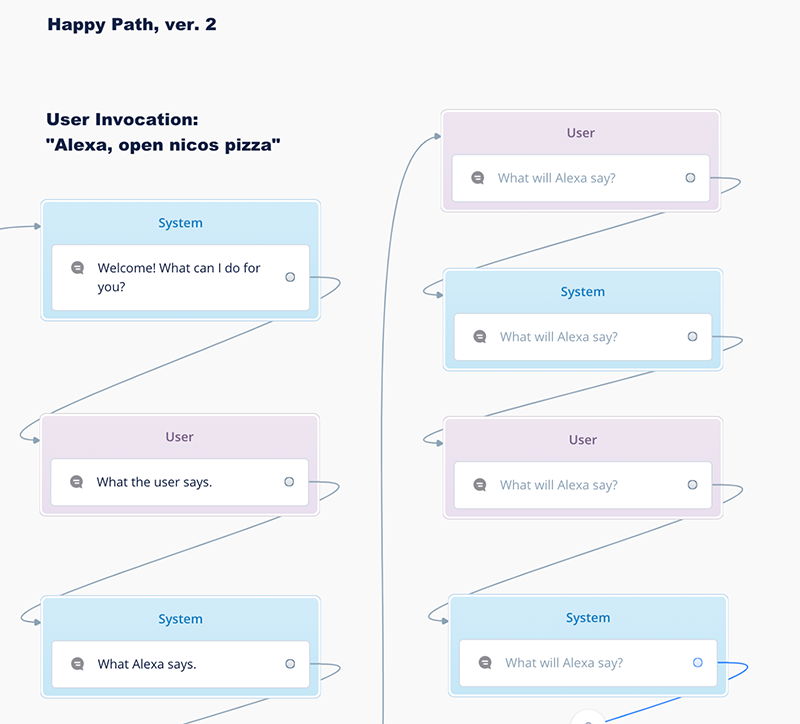
We have our steps wrap up and to the right, creating multiple columns going across the canvas. However you can customize your own template and organize the steps any way you wish.
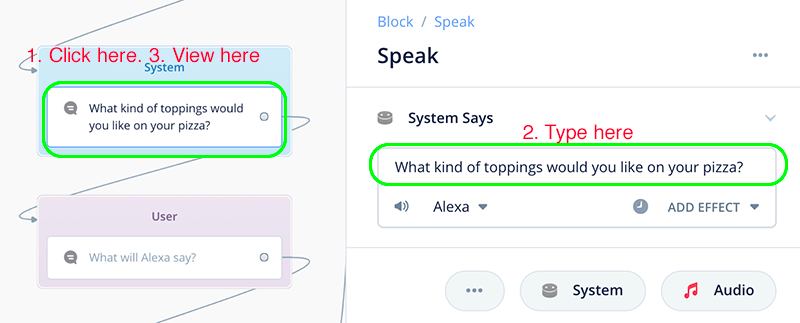
Adding and Editing content in Speak Steps
To get started, you can download the template from the Voiceflow Marketplace. If you are new to Voiceflow, you can set up a free, basic account. However be aware that many of the features shown in this article, such as Real Time Collaboration, Markup and Commenting, are supported only by subscribing to a Pro or Enterprise account, which are paid subscriptions.
Voiceflow Basic Sample Dialog Template Download Link
To add prompts, or to edit existing prompts, simply click on the white part of a Speak Step. A pane will open in the right-hand pane, and you can proceed to add or edit text.
When finished, simply click back onto the canvas and the right-hand pane will close. You can then view the text in the Speak Step on the canvas.
If you are new to Voiceflow, you will eventually want to learn how to use the various types of steps, including adding more steps and connect them in order to enhance and extend your sample dialogs. There is documentation available on the Voiceflow website as well as video tutorials.
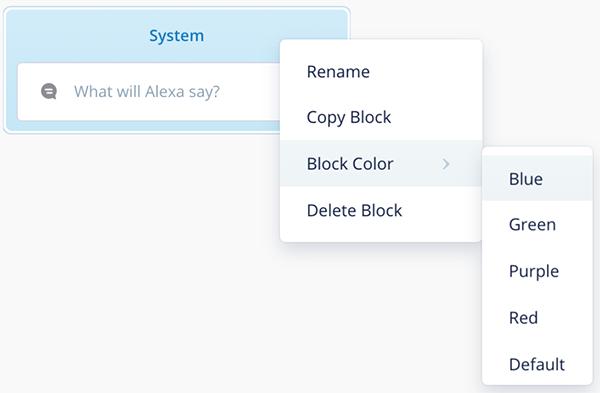
Step Coloring
The steps can be configured with different colors using Voiceflow, and of course you can develop your own color coding system and change these to your liking.
Improving how prompts sound with SSML
With Voiceflow, you can test how your prompts sound. While doing so, you may need to use SSML to improve them. Voiceflow supports several ways for applying SSML.
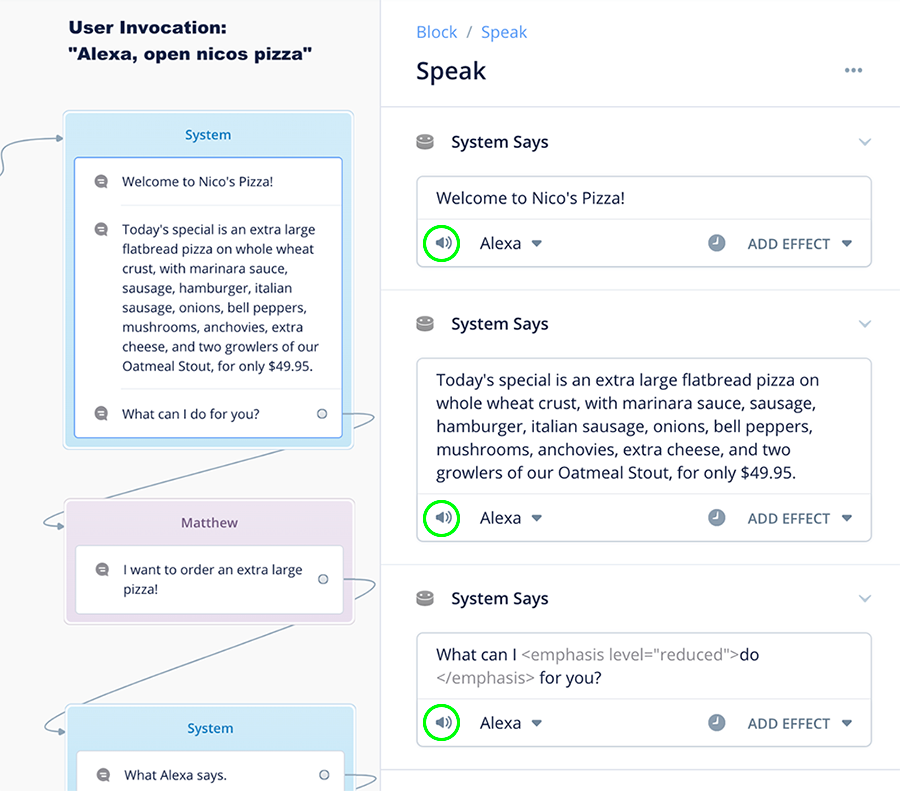
One way is to use the built-in effects feature, which is available in the Speak Step.
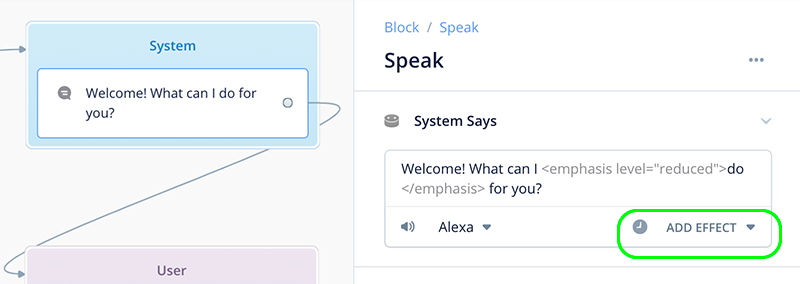
In the above image, notice how the opening and closing SSML tags for emphasis is applied in the right-hand panel. However also notice these are hidden in the Speak Step on the left side. Hiding these details is done automatically by Voiceflow to enhance readability of the sample dialogs.
A second way to apply SSML tags is to copy and paste them from the Amazon SSML reference. There is a link to it in the template resources section, on the far right side.
Alexa Polly Voices and Speak Steps
Alternate Alexa Polly voices can be applied to any Speak Step.
For the sample dialog specifically, an alternate voice can be used for the role of “User.” This will make the user utterances distinct from the system’s voice.
Polly voices can either be selected using Voiceflow’s built-in pulldown feature, or they can be added using the SSML voice tags from the Amazon SSML Reference.
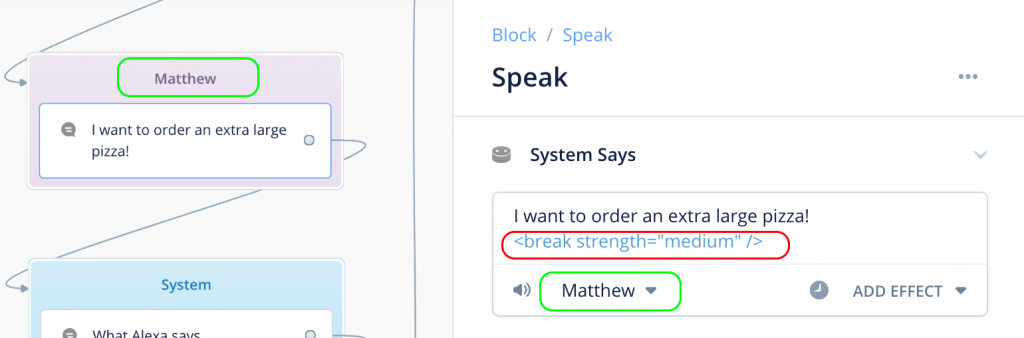
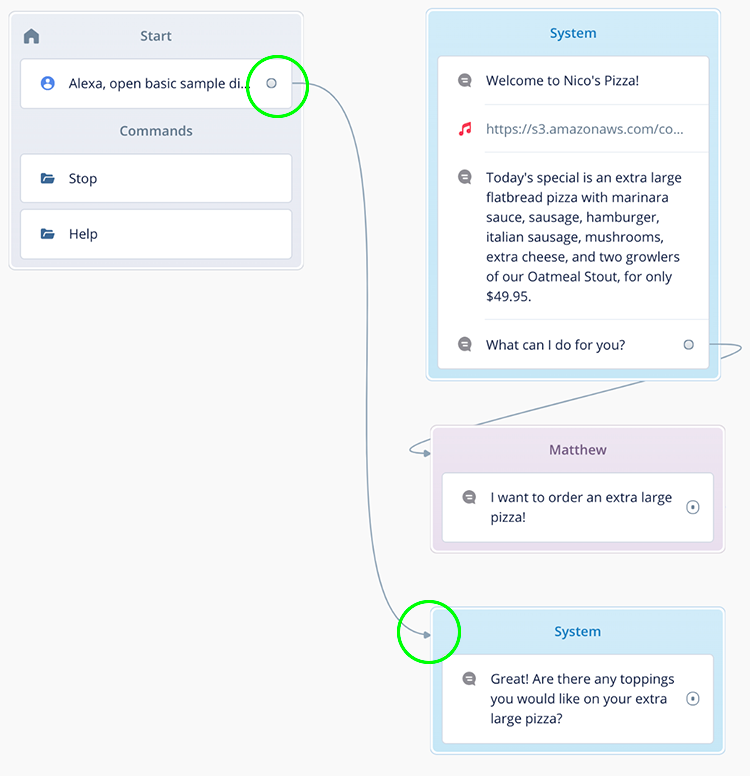
When the sample dialog is tested, Alexa’s voice will be the system’s voice, and Matthew will recite the User’s utterances.
PRO TIP: Add pauses after Alexa’s prompts and the User’s utterances. Otherwise sometimes the conversation occurs too rapidly, and adding pauses will make the conversation sound more natural. An example of this is the SSML break tag in the red circle in the above image. Just remember to take these out of Alexa’s prompts as you proceed with prototyping and creating the production skill.
Managing Speak Steps using Combine Blocks
The Speak Steps will grow in length for longer prompts. However at some point, they stop expanding, and cut off the text visually.
In this example, we added Alexa reciting a pizzeria’s daily special, as part of the opening prompt:

There are two things to note here.
First, notice that as Speak Steps expand in length, they will crowd the steps below them. When this occurs, it is easy to select the blocks below and drag them down a bit, when you need to do so.
Second, the last part of the prompt is cut off visually in the step. To remedy this, you can add additional Speak Steps right below the first one, and keep them organized in a larger Combine Block.
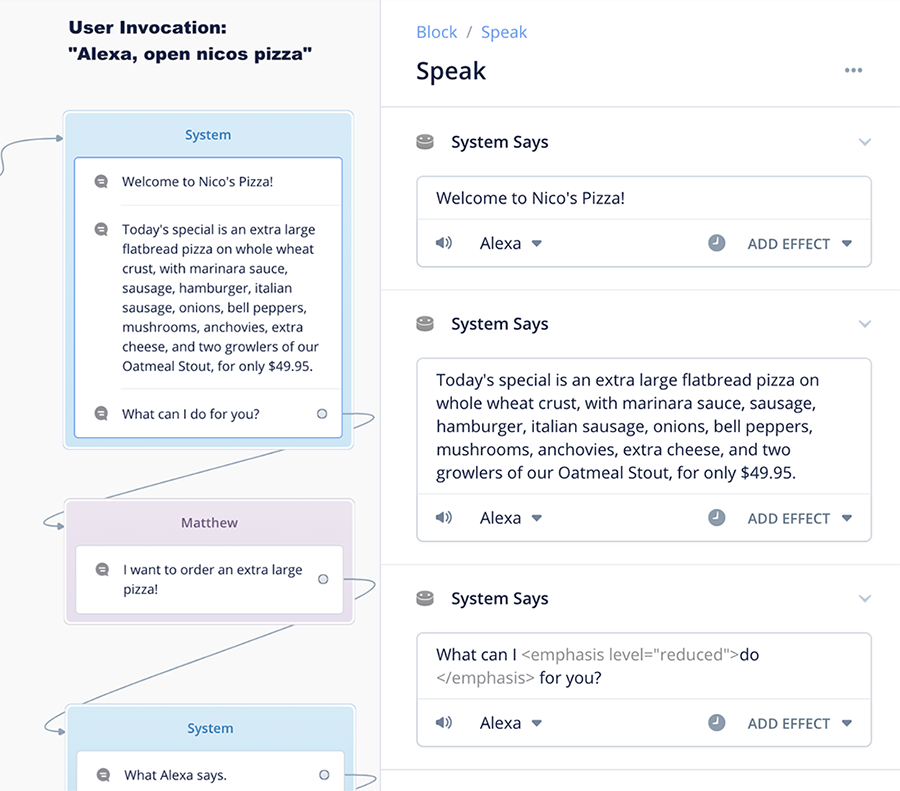
PRO TIP: Notice that “Today’s Special” is now in its very own Speak Step. If this project were to proceed into production, it would be easy to replace that static text and instead use a variable to store the prompt for “Today’s Special.” Then the daily special can be updated each day via an API call.
Adding Sounds to the Sample Dialog
Most word-processor based sample scripts, or those documented using other tools, might simply stop with the written prompts. The Conversation Designer and a teammate then might read prompts out loud, back and forth, to help refine the prompts.
While working on perfecting how the prompts sound and flow together, you may wish to take your sample dialogs to the next step. With Voiceflow, you can add audio, such as sound effects and music.
Voiceflow supports adding sounds in multiple ways. Let’s focus on sound effects first. This example is using a sound from the Amazon Sound Library.
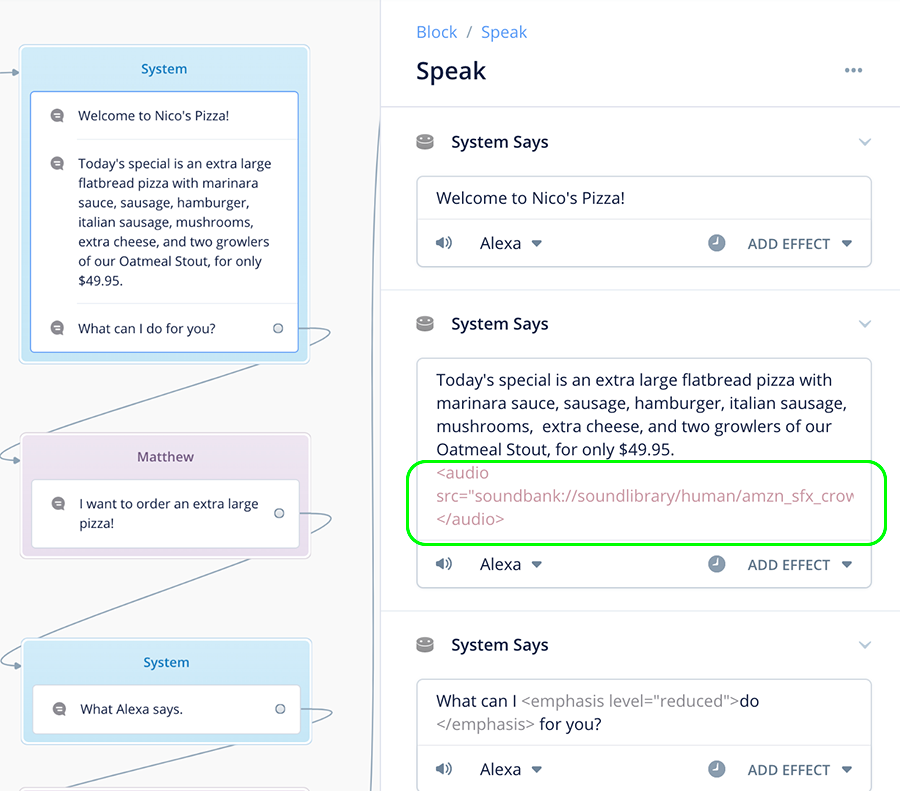
In the above case, a sound effect for clapping has been added directly inside the Speak Step using an audio SSML tag.
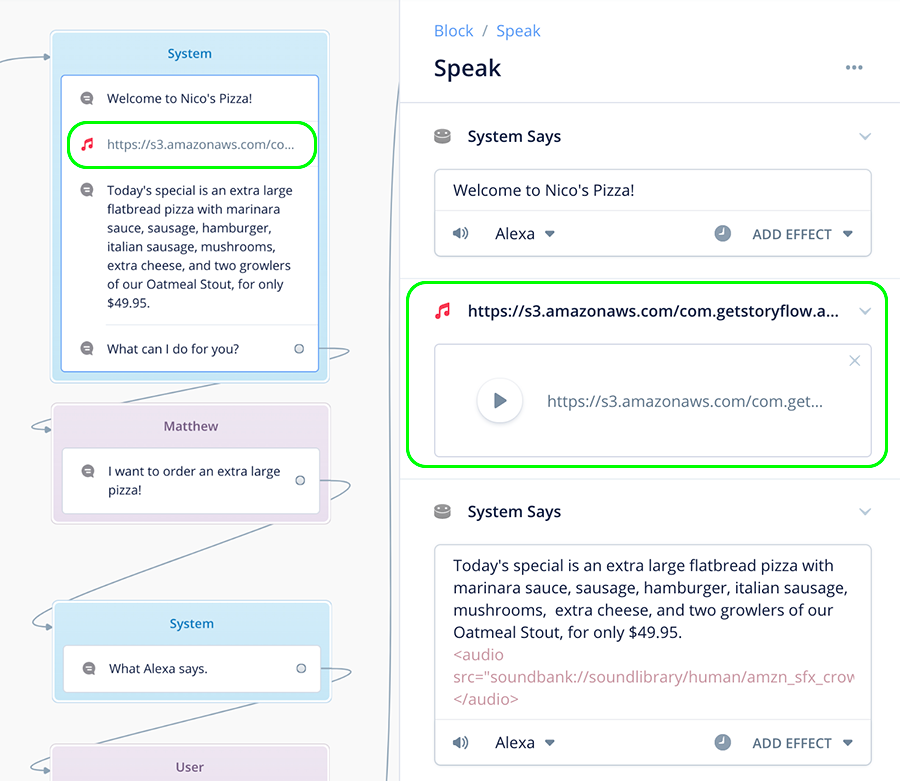
A second way to add a sound is to use your own. For example, you might host your mp3 sound effect on AWS S3 or another site.
A third way is to use the Audio feature of the Speak Step. In this case, you can either add a link, or drop in the mp3 file, directly into this part of the Speak Step.
Below, we have added a sonic brand sound for the client. In this case, after Alexa greets the user with “Welcome to Nico’s Pizza,” the system then plays Nico’s Pizza’s sonic brand.
As you write out prompts and combine them together, and add bits of music and sound effects, there are limitations. You cannot have more than 5 sound files between interactions, and you cannot exceed 240 seconds of combined speech and sound clips between interactions as well.
Timing, and using placeholders
Keep in mind there might be a timing issue with sounds. For example, in the early stages of the project, original music, alternative sound effects, and so on, might not yet be available.
An option is to add placeholders for them in the sample dialogs, and add them in as the project progresses.
Incorporating Human Actor Voice Recordings
Another type of sound file are voice recordings. Perhaps your skill will not be using Alexa’s voice, and instead will be using human voice talent recordings. In this case, one strategy is to document the scripted text initially in your sample dialog.
This creates a way to work on the prompts prior to handing off to the voice actors, and this might help reduce the number of re-recordings due to wording.
In addition, you can have placeholders. As the project proceeds, you can add the voice talent files into the Speak Steps, as audio, and hear how they sound.
Combining Sounds with APL-A
There is yet another way to identify sounds in your sample dialogs. APL-A was recently released by Amazon. To support this Voiceflow has developed the Directive Step, which is currently in Beta as of this writing.
APL-A will enable you to mix one or more of sound clips together, include text-to-speech, and have them play in parallel. An example application of this is having background music while Alexa recites dialog (dynamic text-to-speech, or TTS). APL-A is also something that you can include in your sample dialogs.
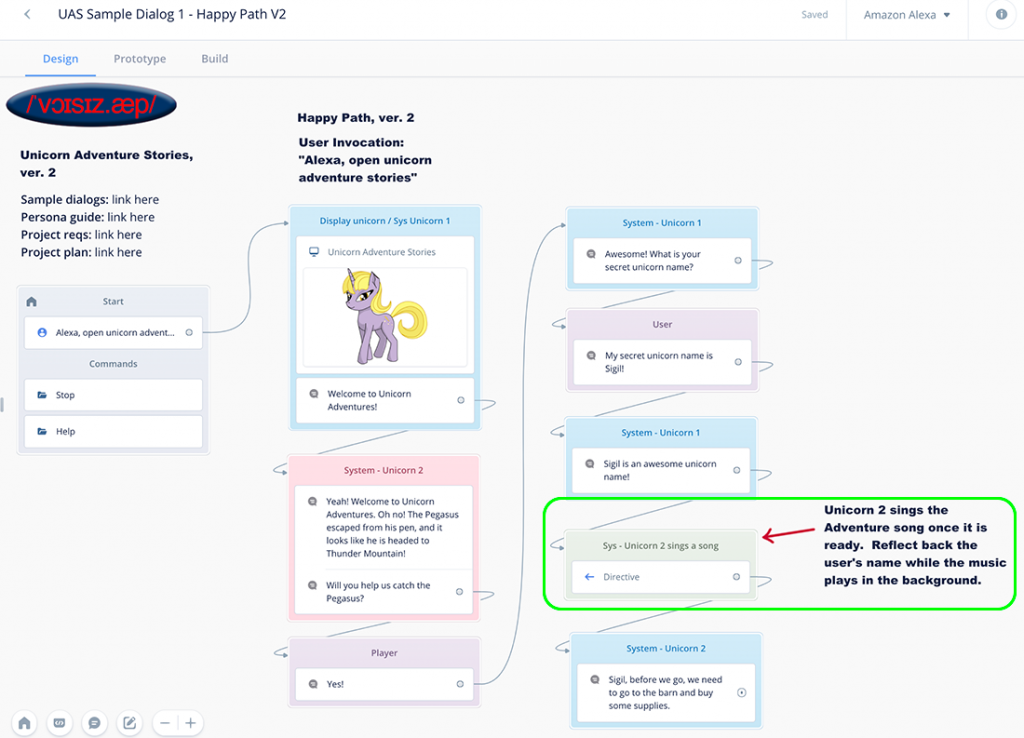
Consider the Unicorn Adventure sample dialog below. For now, we have just a placeholder Directive Step, and a callout describing it how it will work using Markup.
Working with Multiple Characters and Multiple Users
Let’s imagine we are working on the happy path for a Unicorn Adventure game.
In this case, we feature two system characters, Unicorn A and Unicorn B. They can be made distinct from each other through using two different Alexa Polly Voices.
On the canvas, they can also be made distinct with block coloring and labeling. The sample dialog might look like the following:
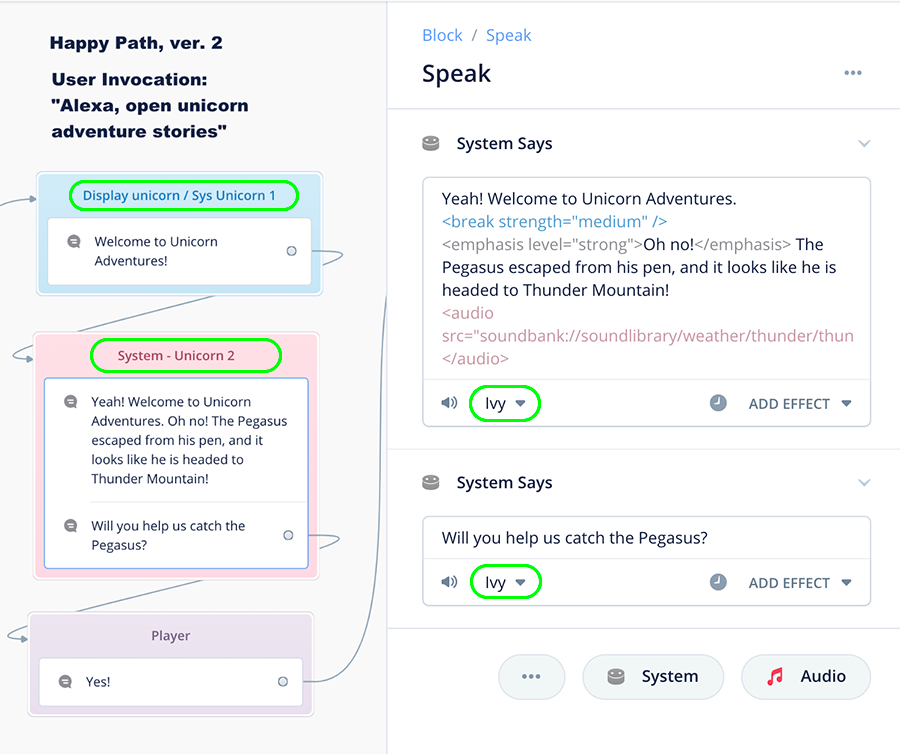
In the above, the first Speak Step for Unicorn A might be either Alexa’s native voice, or an Alexa Polly Voice. The second Speak Step is open on the right-hand pane, and as can be seen, Unicorn B is voiced by Ivy.
The example shows only one “player,” i.e. one user. However the principles for adding Speak Steps for additional user roles to provide example utterances, such as in a multiplayer game, would be the same.
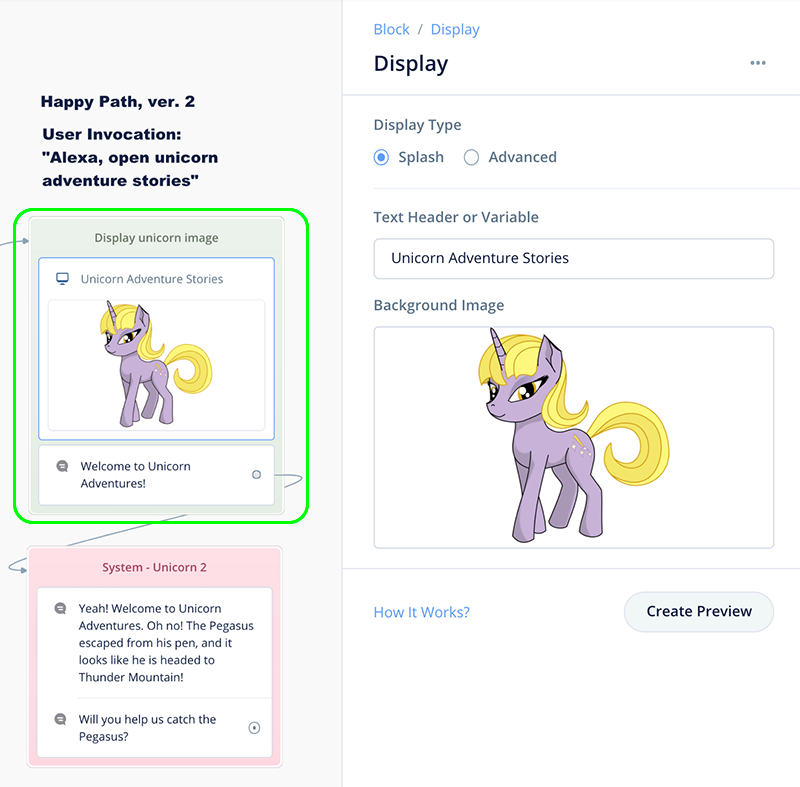
Working with Visuals
Voiceflow supports the Alexa Presentation Language (APL) with the Display Step. This enables creation of multimodal experiences. For sample dialogs, a nice feature about the Display Step is that it can present a thumbnail-sized image.
If the project is just getting started, and the artwork for the visuals are not yet developed, you can include a placeholder with the Display Step.
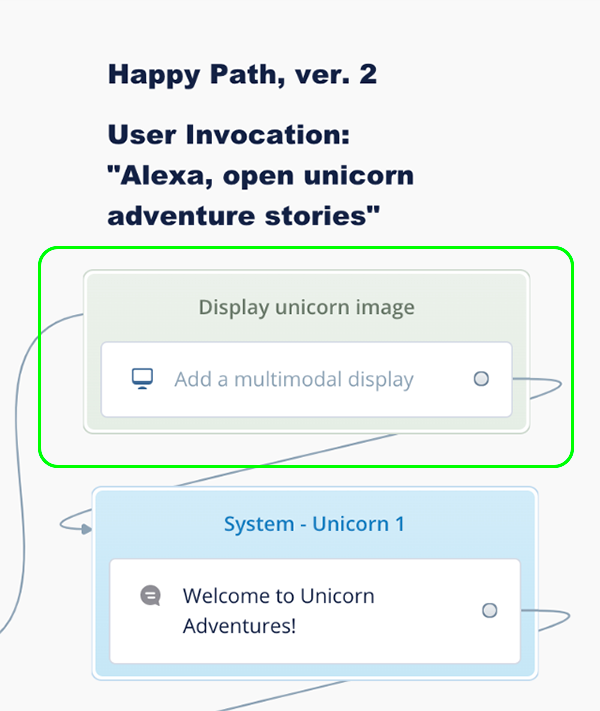
Later, when the artwork is ready, you can add it to the Display Step, as shown below. In this case, the Display Step was also added to the “Welcome” Combine Block.
3. Resources Sections
The right side of the sample dialog template includes a list of resources, and links to them. We have them here because we access these all the time.
Because we are not Google Action Developers, we only have Alexa resources. Add and edit the template resource links to your liking.
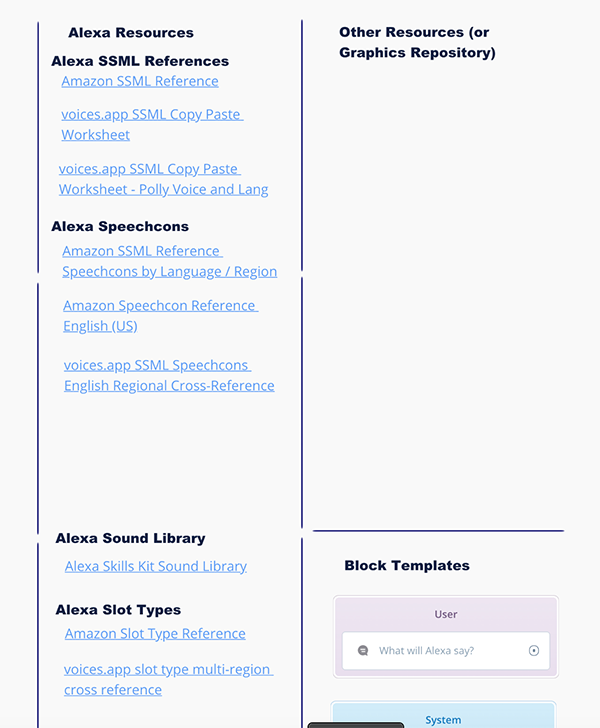
There are placeholders for other types of resources which you may wish to add. For example, you can have a graphics repository for those which you anticipate using frequently, and a repository of pre-colored, pre-named step templates.
Testing your Sample Dialogs
By testing iteratively you can improve your prompts and the overall experience. In this section we look at a variety of ways to test your sample dialogs.
1. Testing a Single Speak Step
In Voiceflow Speak Steps, you can click on the small speaker icons to play an individual prompt, as shown below. This will recite the prompt using voices built into Voiceflow.
Be aware that the voice audio heard when testing in this manner might not sound the same as when heard through an Echo device. However this is a nice option for quick tests to hear the prompts.
2. Voiceflow Prototyping Tool
This technique also uses Voiceflow’s built-in voices to recite the prompts.
To open the Prototype tool, click on the Prototype tab in the upper left area of the canvas.

A pane will open on the right side which will enable you to test.
There are optional settings which you can adjust to your liking, and just click “Start Test” to hear the conversation.

When you run the Prototype Tool, you will hear the conversation, and also see the text in the left hand panel.
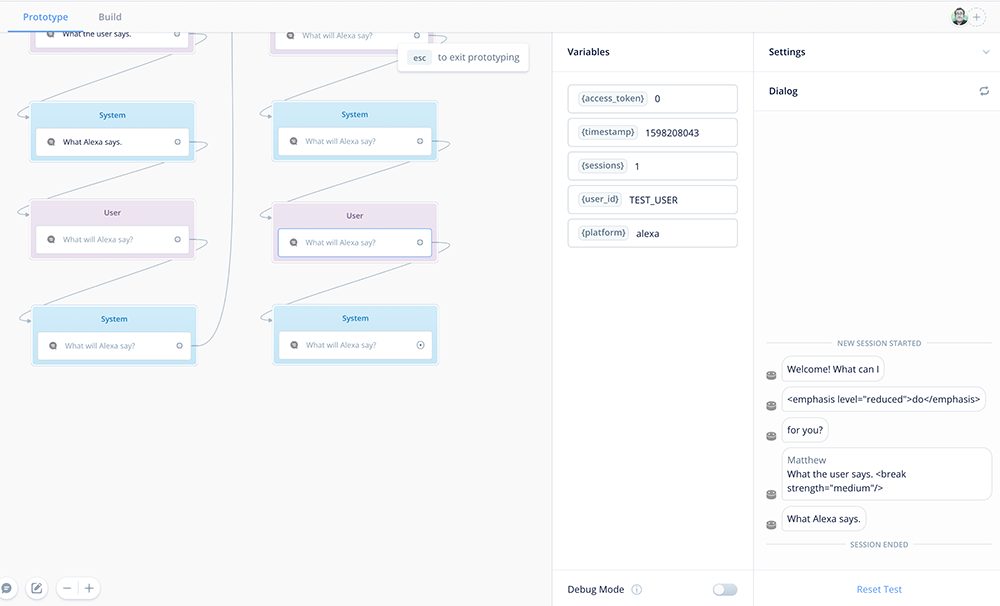
Again, be aware that the voice audio heard when testing in this manner might not sound the same as when heard through an Echo device.
3. Testing on the Alexa Developer Console (ADC)
There are several ways to test on the ADC. You can test on the console, and both hear the conversation, as well as read the conversation on-screen. You can also test using a device, such as an Echo Smartspeaker.
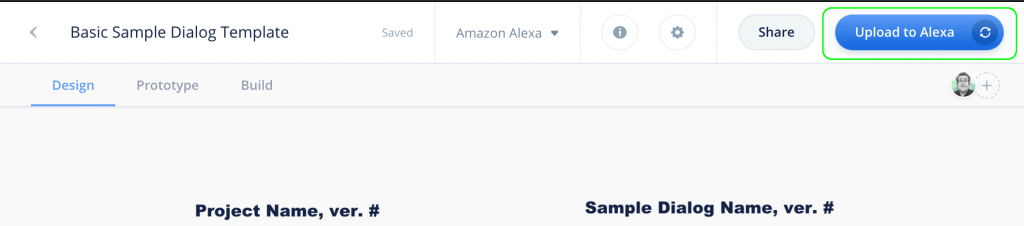
To test via the ADC, while in Voiceflow, upload your sample dialog project to Alexa.
You will see a success message once the upload is complete. From here, you can click on the link to go straight to your sample dialog’s test console.
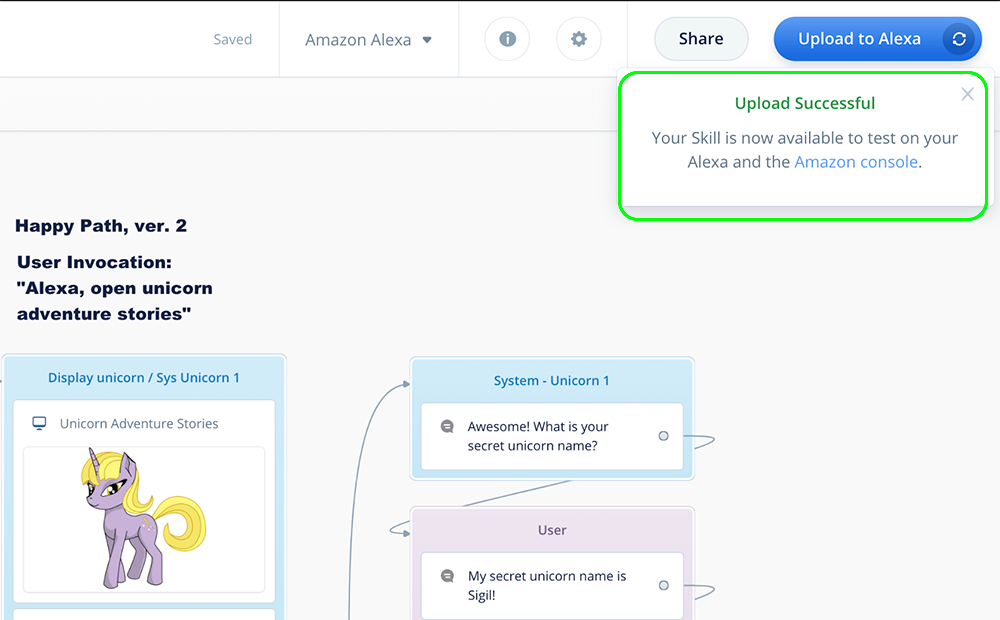
Once you have accessed the testing console, you can speak or type the invocation, and listen to the experience.
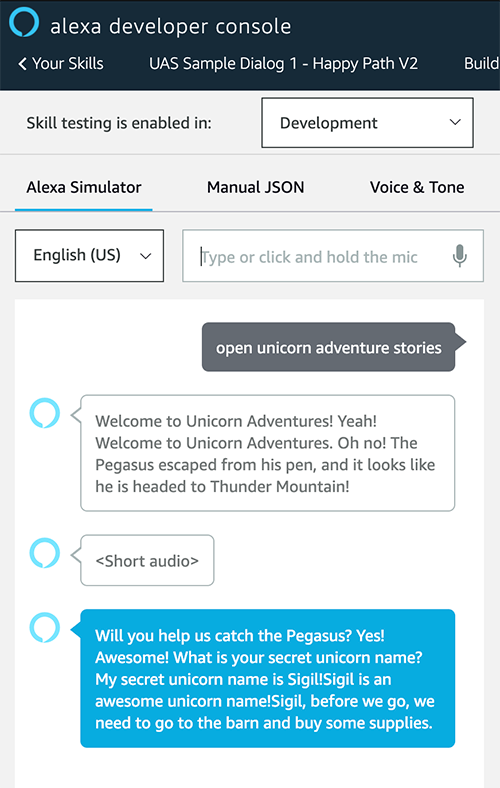
Alternatively, once the upload is complete, you can test using your device. In this case, you don’t even need to access the ADC console. Just ask Alexa to open your project using your invocation name.
When testing using your device, you can listen to the conversation between Alexa and your mock user, and if multimodal, you can view the images if your device has a screen.
4. Testing a single prompt on the ADC
On occasion, some prompts might need a lot of work.
To zero in and work on problematic prompts efficiently, you can disconnect the wire from the Start Block, connect it directly to that prompt, disconnect the wire from the other side of the prompt, and then upload it to Alexa for testing.
In this way you can test a single prompt and iterate on it by experiencing it either on the ADC test console or via a device such as a smartspeaker.
Sharing, Collaboration and Comments
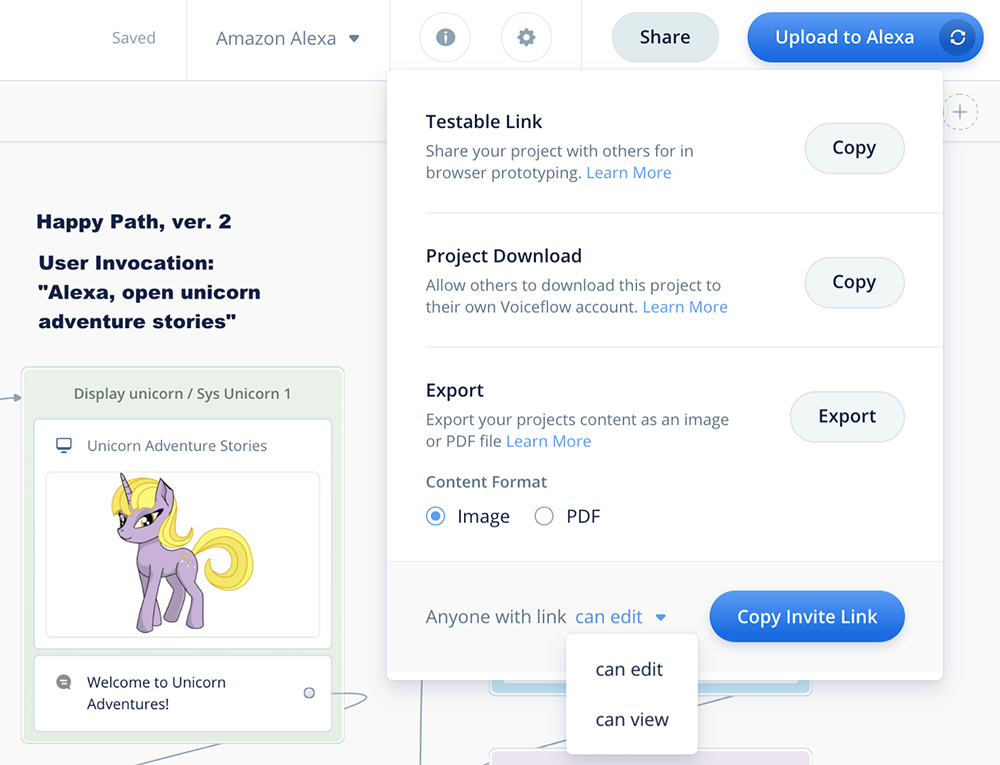
There are several ways to share your project with others. As can be seen below, you can provide a testable link, a download link, export a pdf or image of your project, or send an invite link to someone with either edit or view-only access rights.
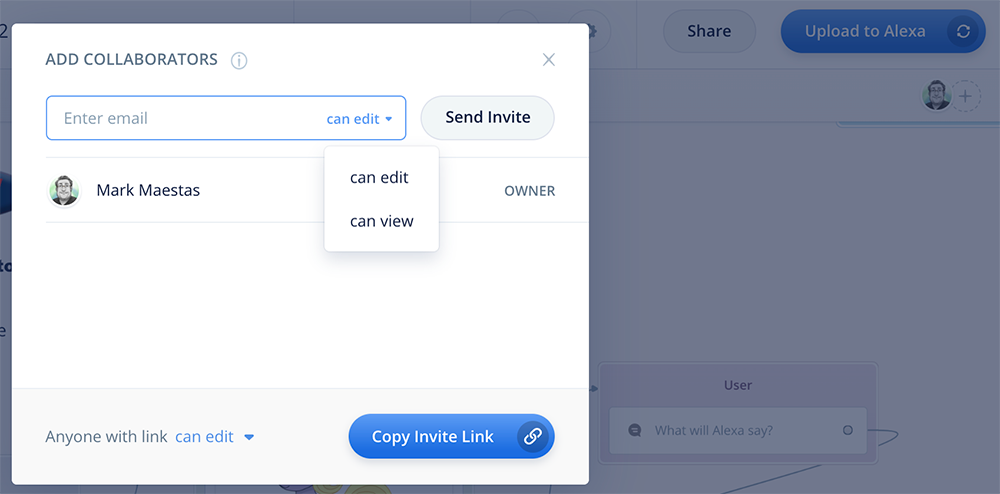
Collaboration, including Real Time Collaboration (RTC), is a powerful feature recently provided by Voiceflow. Within your sample dialog, you can send invites to teammates, stakeholders and clients, to view or work on the project.
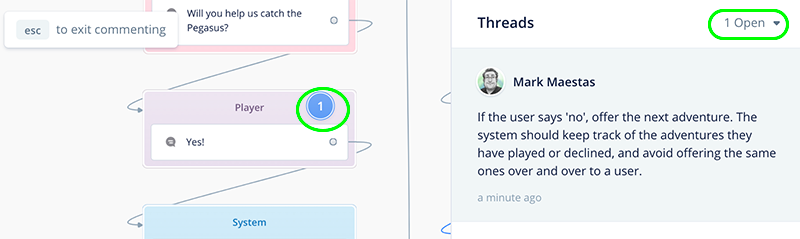
Voiceflow also provides a robust commenting system. Those you invite to collaborate and review your project can add comments. The system will track which step in the project has a comment. Once a comment is added, it can be posted.
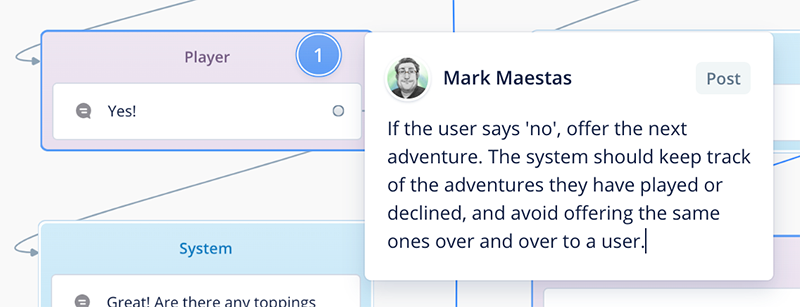
Once posted, comments can be tracked and resolved.
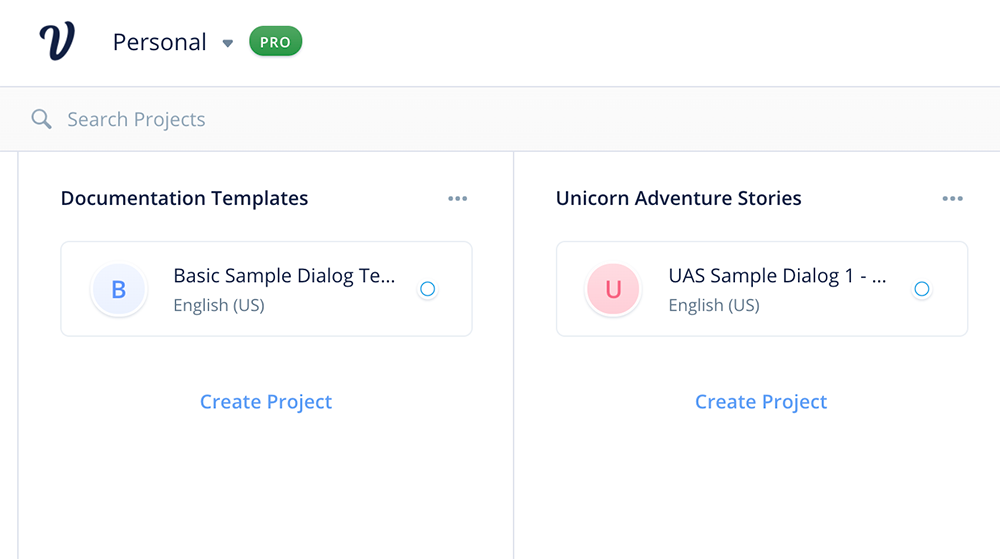
Organizing Sample Dialogs in the Voiceflow Kanban Board
A good practice is to have separate Voiceflow projects for each sample dialog, or a set of sample dialogs. These would be unpublished projects separate from your production skill.
Over time, it is likely you will accumulate many of them, for many projects, for a variety of clients.
To help manage your sample dialogs, we recommend taking advantage of the vertical columns in the Voiceflow Kanban board. You may wish to have a column with all your sample dialogs, and later, other types of documentation such as prototypes, for each of your major projects.
Voiceflow also allows you to create workspaces, and you may wish to create separate workspaces for each of your clients.
Conclusion
Voiceflow has matured in a way that makes it easy to not only document your sample dialogs, but also collaborate with others on them, test them to hear and see the actual experience, and refine them using several testing options.
The next article in this series, Part 2, will introduce an enhanced sample dialog template which adds variables.
We will have examples for managing Polly voices and Prosody SSML tags in a global fashion, as well as illustrate a way to maintain your commonly used words or phrases which require SSML phoneme tags.
The benefit of using variables is that you can do things like change a Polly voice or prosody in a single spot rather than updating multiple Speak Steps. This helps save time when you have sample dialogs with many prompts.
Part 3 in the series will introduce using flows to manage multiple sample dialogs in a single project.
Part 4 will introduce the idea of managing your prompts in a database, and bringing them into your sample dialog template as variables.
By the end of the series, you will have all four templates in your Conversation Designer toolbox.
Thank you for reading, and happy skill building!
Image Credits
Header image by bongkarn thananyali from Pexels.
Unicorn image by OpenClipart-Vectors from Pixabay.
Nice piece Mark!
Very thorough and easy to understand. Nice structure, Mark!