
Update (May 10, 2020)
Updated to reflect Voiceflow UI changes as of May 10, 2020.
A demo skill built using this tutorial is now available in the Voiceflow Community Marketplace. You can view and download it as a template.
Get User’s Day of the Week on the Voiceflow Community Marketplace
Introduction
At some point in your Alexa skill development career, you may need to determine the user’s day of the week.
For example, read out the daily specials for a pizzeria skill, daily activities for a kids skill, exercise routines, chores, daily meditations or other types of skills which incorporate weekly schedules.
For Voiceflow developers, this tutorial describes a technique for determining the day of the week based on the user’s location.
More specifically, the location of the user’s device, such as their Echo smartspeaker.
Determining the user’s timezone is key, because while it may be Monday in user 1’s location, it might already be Tuesday in user 2’s location.
This tutorial reproduces steps and most of the logic from the following foundational Voiceflow tutorial, by Nicolas Arcay Bermejo.
Getting the user’s time zone in your skill
Most of the steps are the same, except this tutorial also provides a few additional opportunities:
- Focus on getting the day of the week and storing it in a variable.
- Show how to use a sub-flow to encapsulate the “day of the week” determination.
- Provide a chance to practice creating and using “Flow Variables.”
- Encourage the use of comments both in code blocks and on the project canvas.
- Provide a demo skill in the Voiceflow Marketplace. This can be downloaded and used for a basis for your other skills.
Objective
First, determine the user’s timezone based on their device location. Then use this information, in combination with the system’s timestamp, to determine the day of the week (Monday, Tuesday, etc.). This will be stored in a Global variable and will be available for use in other parts of the skill for recital, additional processing or to control flows.
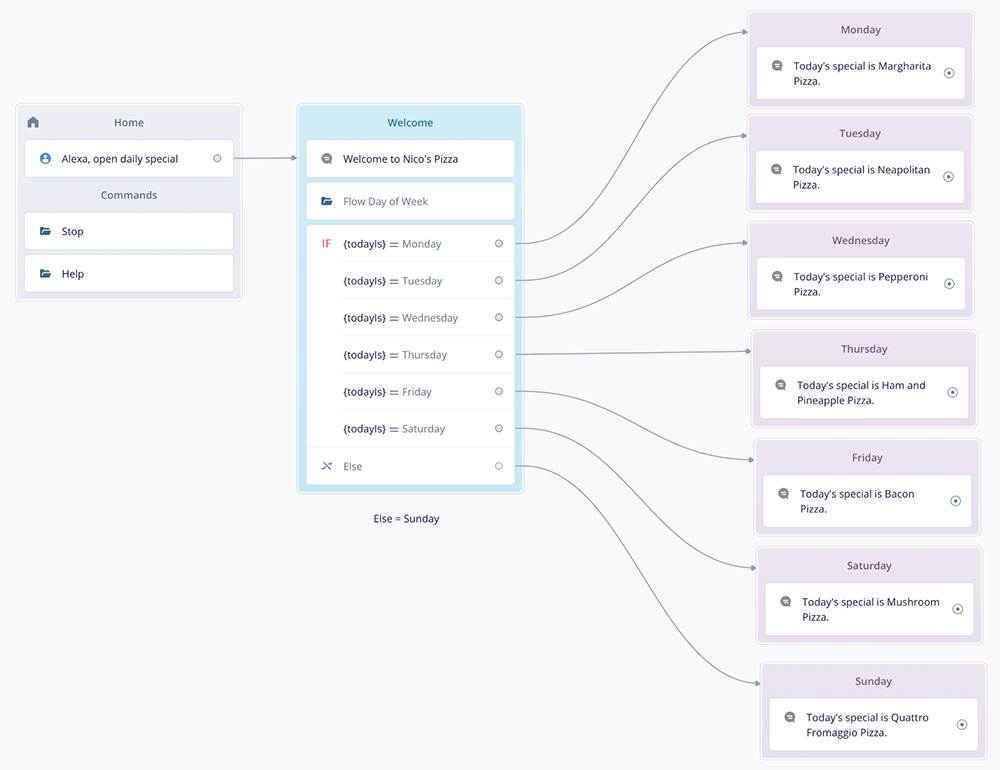
Once finished, the demo skill will look like this:
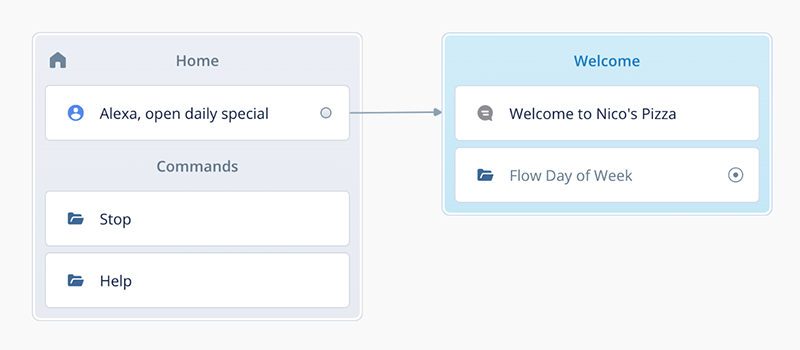
Home Flow (aka “Root” Flow):
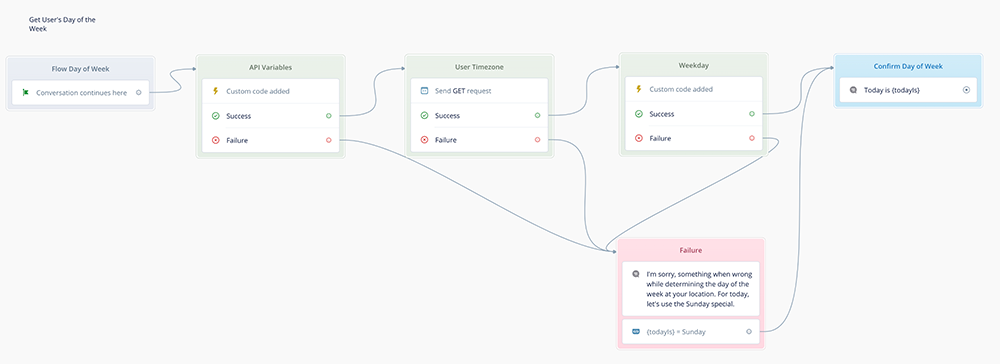
Day of Week Subflow:
The skill will first welcome the user to Nico’s Pizza. Then, the skill would flow to the subflow to determine the day of the week. The skill would then return to the home flow, check the IF condition and determine which path to follow based on the day of the week, and then announce the associated daily special.
Tutorial Steps
Initiate the new test project
Create a new project. You can also add to an existing skill as well.

Add Global Variable {todayIs}
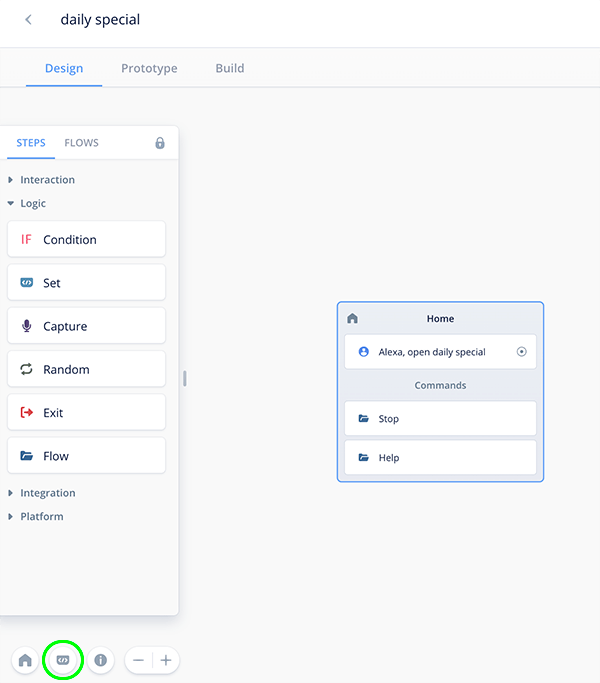
We are in the Home flow canvas. The first thing we will do is add a variable to store the day of the week (Monday, Tuesday, etc.).
In the lower-left corner, click the </> button, which is also known as the “Model” or “M” button. This will access the Intents, Slots and Variables panels.
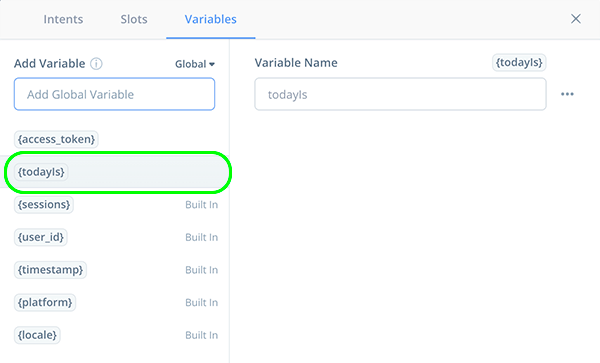
Click on the Variables panel tab and add a global variable named {todayIs}. Press the Enter button.
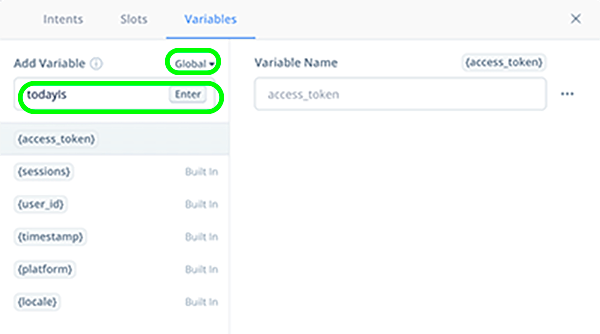
Once populated with the day of the week, this global variable can be used anywhere in the project.
Close the Variables Panel.
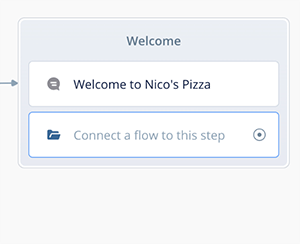
Add a Speak block with a welcome message
On the Home canvas, add a Speak block and connect it to the Start block. Enter some text, such as “Welcome to Nico’s Pizza.” inside the Speak block.
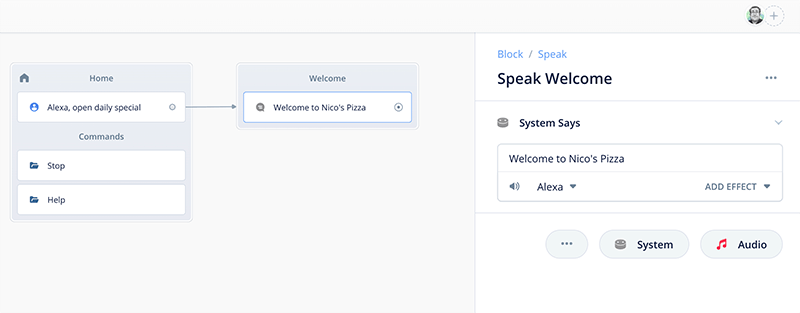
Optionally, for this and the other blocks, you can also Also rename the Speak block to something like “Speak Welcome”, “Speak-Welcome,” “Welcome Message” or even “Opening Prompt,” depending on what works best for you. Give it a try.
Also, as we develop this demo skill, this block will grow become a “Combo Block”, as we will be adding more blocks to it. This is optional as well. Try renaming it “Welcome”.
Adding these types of descriptions helps provide clarity both for other collaborators, as well as yourself when you return to maintain your project months later.
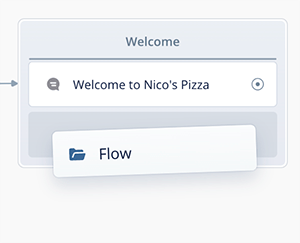
Add a Flow block named “Flow Day of Week”
Drag a flow block from the STEPS panel and add it below the Speak Welcome block. If you are new to Voiceflow, it looks like this:
Click into the Flow block to open the right-hand panel for configuration.
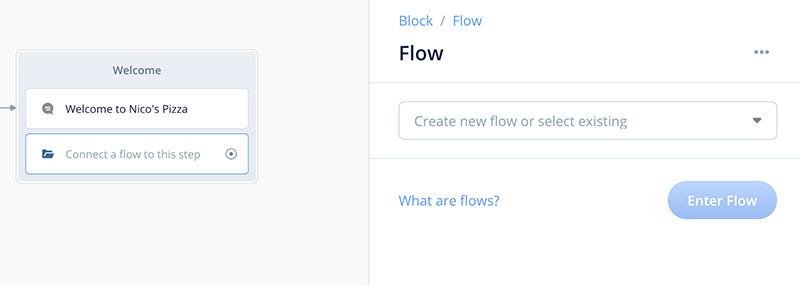
Rename the Flow block to “Flow Day of Week”.
Next, in the field where it says “Create new flow or select existing / New Flow Name” create a new flow, named “Flow Day of Week.” Then click “Create.” This will begin creating the new subflow.
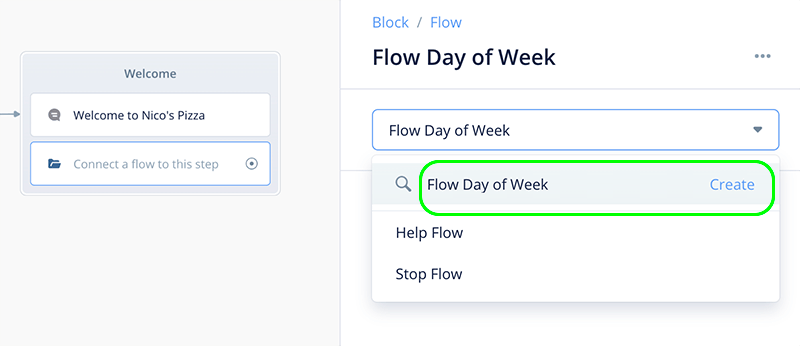
Upon clicking “Create,” this will take you into the new sub flow.
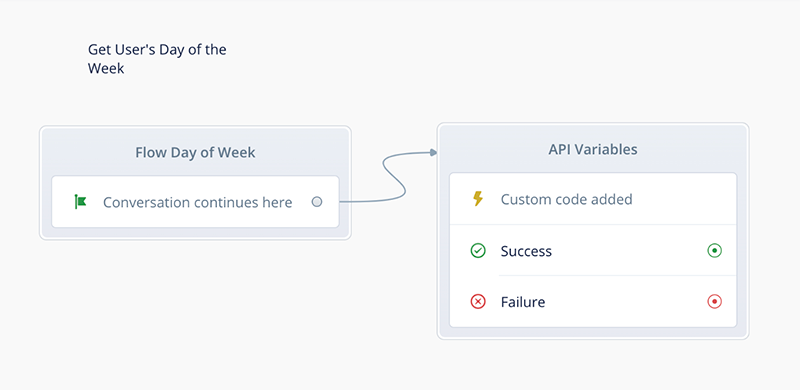
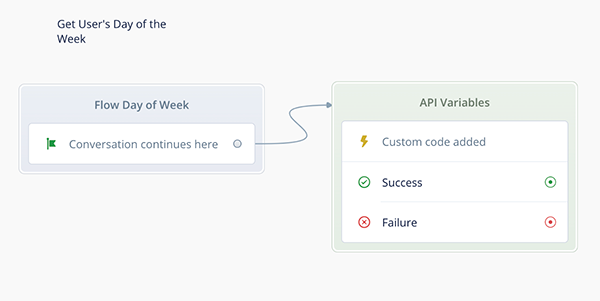
Optionally, you can right-click, select “Comment” and add some descriptive text such as “Get User’s Day of the Week.” This is a good practice when working with collaborators or when returning to do maintenance.
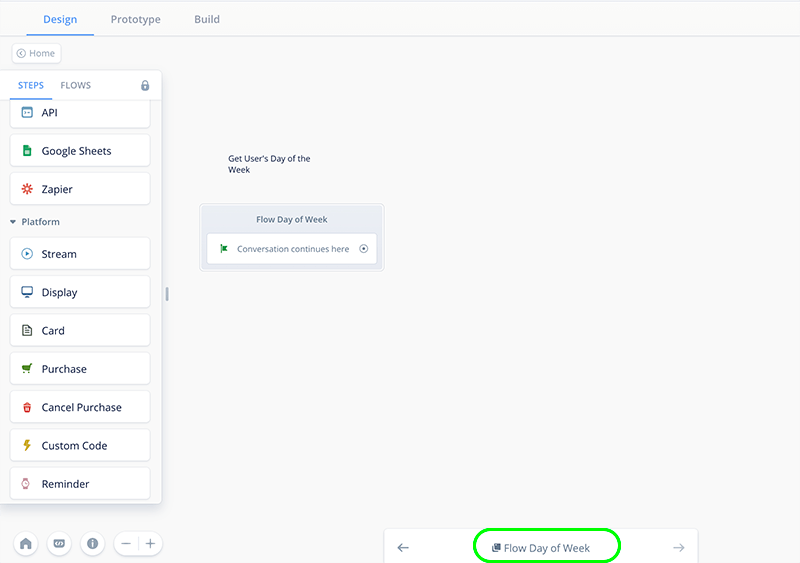
Begin developing the “Flow Day of Week” subflow
We are in the “Flow Day of Week” subflow. We will be adding a series of Flow variables and blocks to help determine the day of the week based on the user’s location.
Add four Flow Variables
Click on the </> (Model) button and open the variables panel while in the new flow. We are going to add some flow variables.
Flow variables are limited in scope to just within the flow. They are always re-initialized every time the flow is entered and exited, and are useful for things like temporary counters and calculations.
Begin by twirling open the small triangle next to “Global.” Here, we see two options, “Global” and “Flow.”
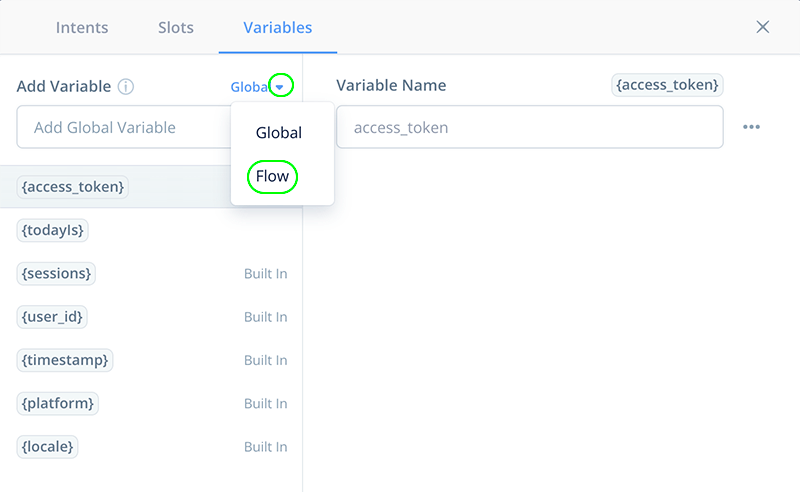
Select “Flow.”
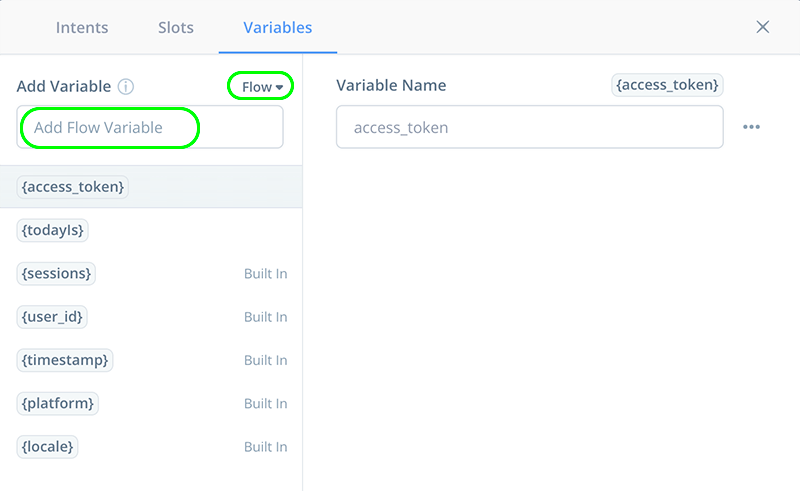
Enter the following four new Flow variables:
apiAccessToken
apiEndpoint
userTimezone
deviceId
Close the Variables Panel.
Add Custom Code Block “API Variables”
This block will be retrieving several pieces of information that will enable us to get the timezone of the user’s device. This information comes from a special built-in variable called the “System Variable.”
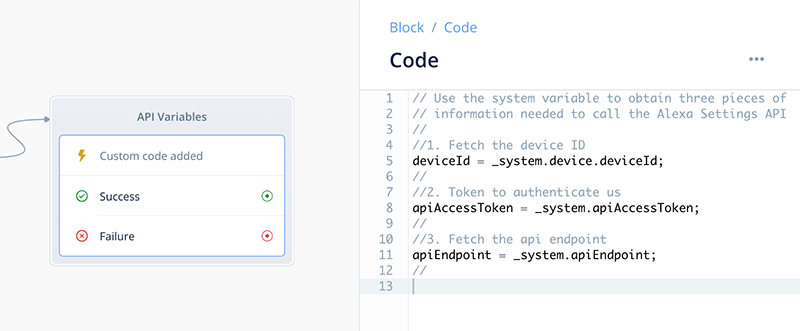
On the subflow canvas, add a Custom Code block and connect it to the opening block (where it says “Conversation continues here”. Rename it “API Variables.”
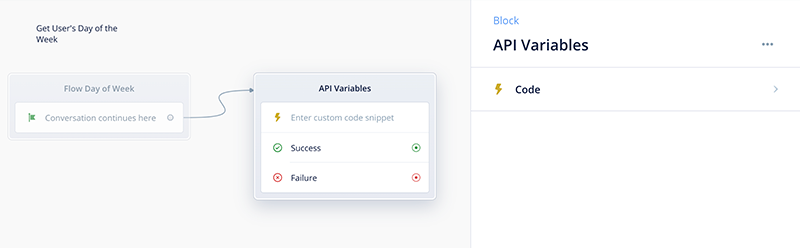
Click on the code block in the right hand pane to open it.
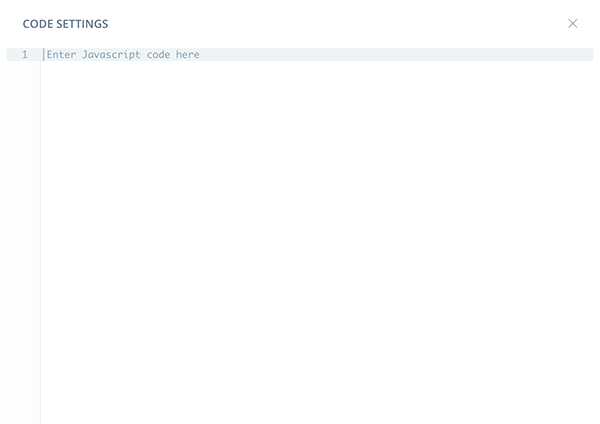
In the lower right part of the Code block pane, click on the 3 ellipses button, and then click “Expand Fullscreen.”
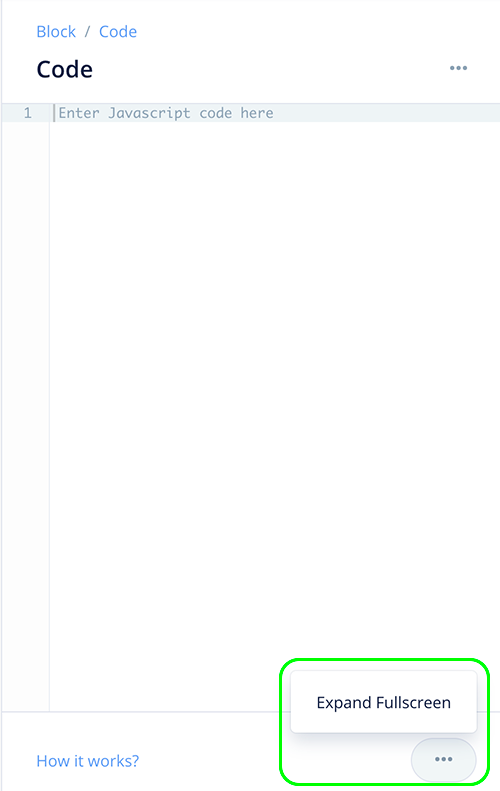
Expanding to fullscreen will give us more space to work with when we add the Javascript. Right now, the code block is empty:
Copy and paste the following into the code block:
// Use the system variable to obtain three pieces of
// information needed to call the Alexa Settings API
//
//1. Fetch the device ID
deviceId = _system.device.deviceId;
//
//2. Token to authenticate us
apiAccessToken = _system.apiAccessToken;
//
//3. Fetch the api endpoint
apiEndpoint = _system.apiEndpoint;
//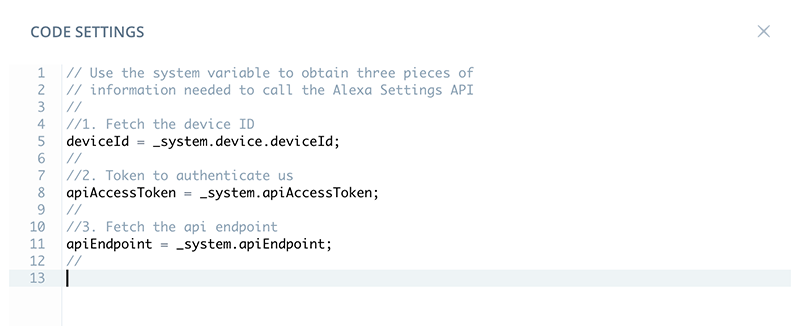
The lines with the two forward slashes are comments. Including the comments help explain what is going on and the purpose of each variable.
Once the code is added, close the expanded window.
Click anywhere on the canvas to close the right-hand pane for the block.
Optionally, you can color code your blocks. This helps focus in on blocks visually, and is useful when collaborating with others as well.
To color code our code block, right-click on the top part of the Combo block. In the selections, choose “Block Color”
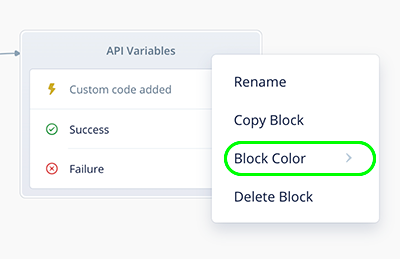
Upon clicking on “Block Color, a submenu of color options will appear. Of course, you can choose whatever you color wish, but for our code blocks, select “Green.”

Notice how our block is now green.
We are finished with the “Code-API Variable” block. Next we will add the next code block and connect it to the “Success” port. Notice we also have a “Failure” port, and we will return to handle this later in the tutorial.
Add Integration/API Block “User Timezone”
This block will use the system variable values retrieved in the previous block and use them to determine the timezone of the user’s device. An API call will be used to fetch this.
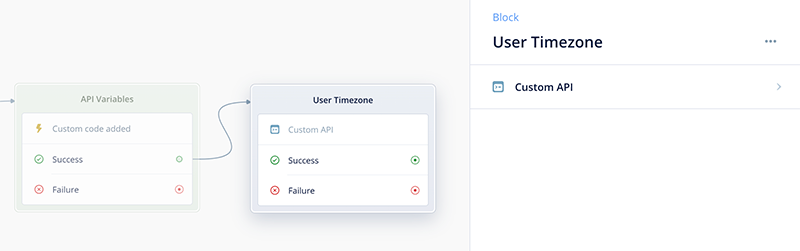
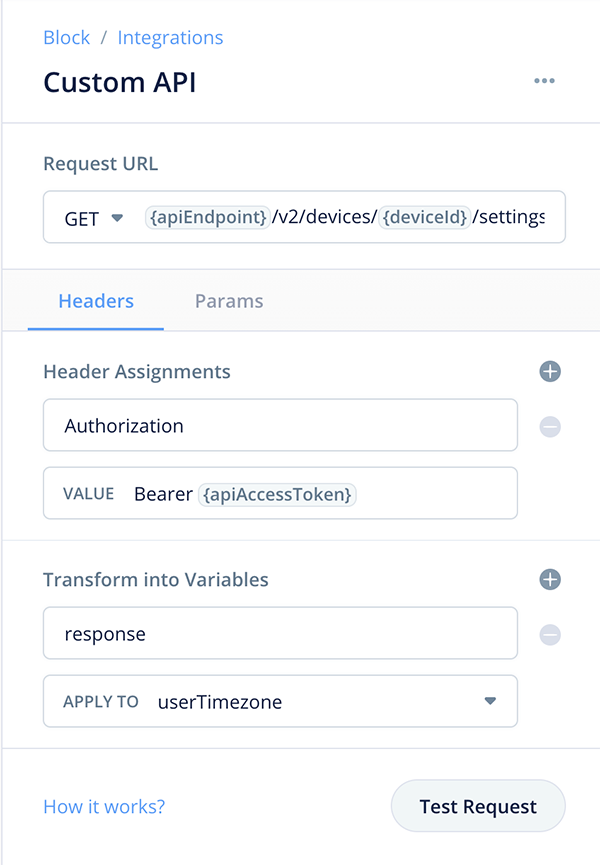
On the subflow canvas, add an API block and connect it to the Success port of the API Variables block. Rename it “User Timezone.” Click on “Custom API” inside the right-hand panel to open up the settings.
There are three sections we need to configure. (1) GET request URL, (2) Header Assignments, and (3) Transform into Variables. Let’s do these one at a time.
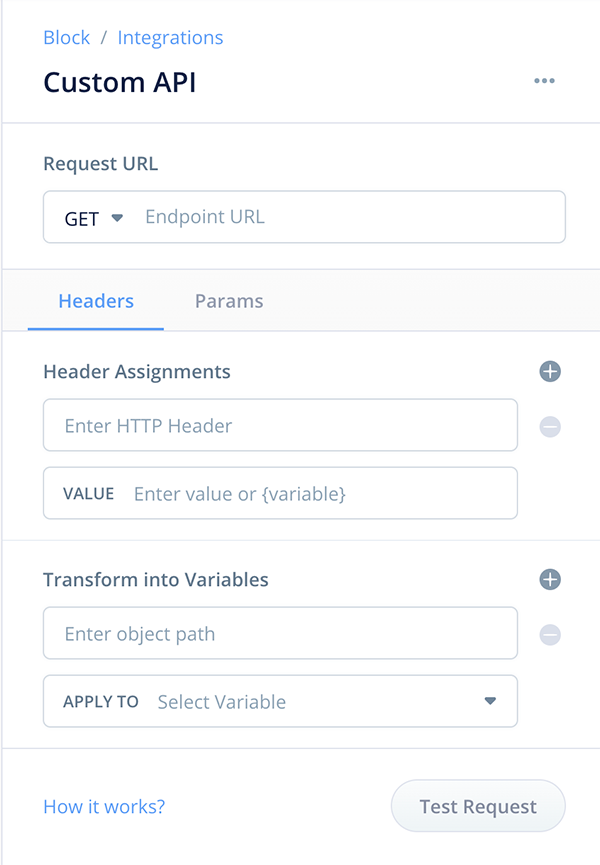
First, for “Request URL.” We are going to do a “GET.” In the “Endpoint URL” field, enter:
{apiEndpoint}/v2/devices/{deviceId}/settings/System.timeZoneThe GET will retrieve the user’s device timezone.
Second, in the two “Header Assigments” fields, enter the following:
Authorization

Bearer {apiAccessToken}Third, in the “Transform into Variables” field, enter “response” in the “Enter object path” field.
responseIn the “APPLY TO” field, use the dropdown to select the {userTimezone} variable.
In regards to testing, the “Test Request” button will not work at this point. We would need to manually add the input parameters. Instead we will plan to test on the Alexa Developer Console once the demo skill is complete.
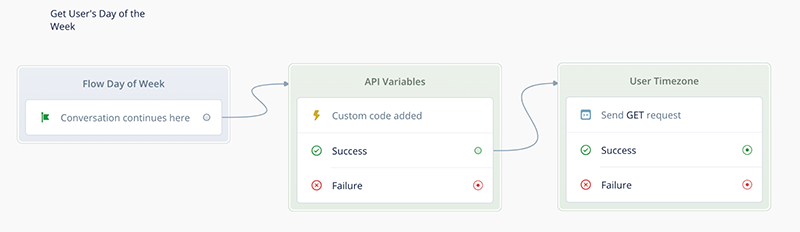
Close the Custom API User Timezone block. If you wish color the block as well.
The Integrations block is complete. This is what the canvas in the subflow should look like so far.
Add Custom Code Block “Weekday”
This block will utilze the user’s timezone information retrieved in the previous block and determine the day of the week (i.e. Monday, Tuesday, etc.). the value will be stored in our Global variable {todayIs}.
On the subflow canvas, add another Custom Code block and connect it to the Success port of the API Variables block. Rename it “Weekday”

Expand the Code block to fullscreen and copy/paste the following javascript and comments. NOTE: Depending on your browser, you may need to scroll the code below to see the entire line of code.
//Use the Voiceflow’s locale variable to configure functions
//.toLocaleTimeString and .toLocaleDateString.
//
//Same thing with the use of timeZone: userTimezone which allows
//us to obtain the time and date corresponding to the user’s
//time zone.
//
//Determine weekday at user's location and assign to todayIs.
//The result will be "Monday," "Tuesday," etc. depending on the
//user's device location.
//
todayIs = new Date().toLocaleDateString(locale, { weekday: 'long', timeZone: userTimezone});
//
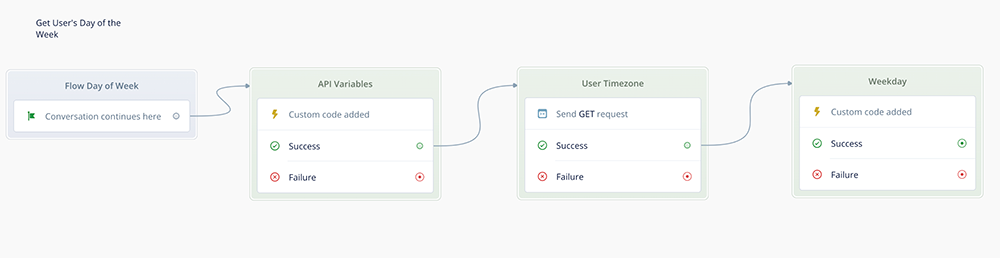
Close the block, and if you wish, give it a color.
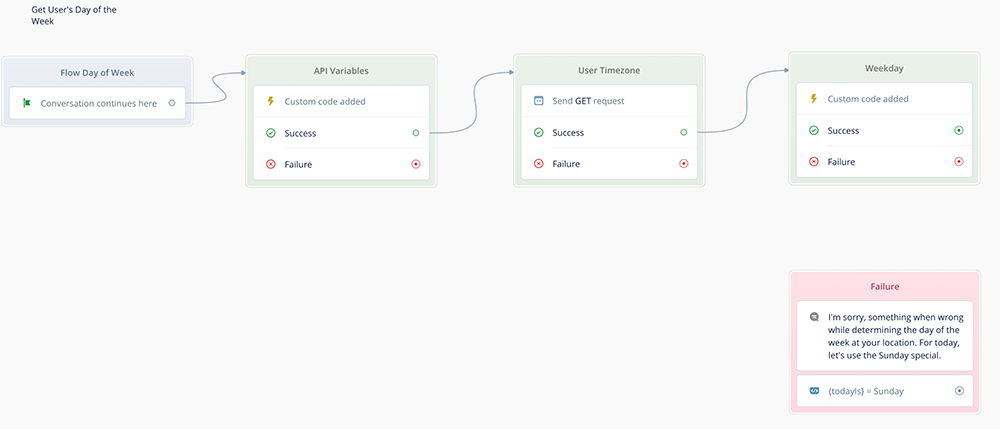
At this point the subflow should look like this.
Add Failure Handling
As you look at the three blocks, you can see there are three possible failure points. How to handle these will depend on your skill and how critical a failure might be.
For this tutorial, we are just going to explain there was an error, and set the weekday to “Sunday” as a default. If any of the three connected blocks fail, then “Sunday” will be assigned to the {isToday} global variable.
Handling the failure will consist of a Speak block and a Set block, both within a Combo block.
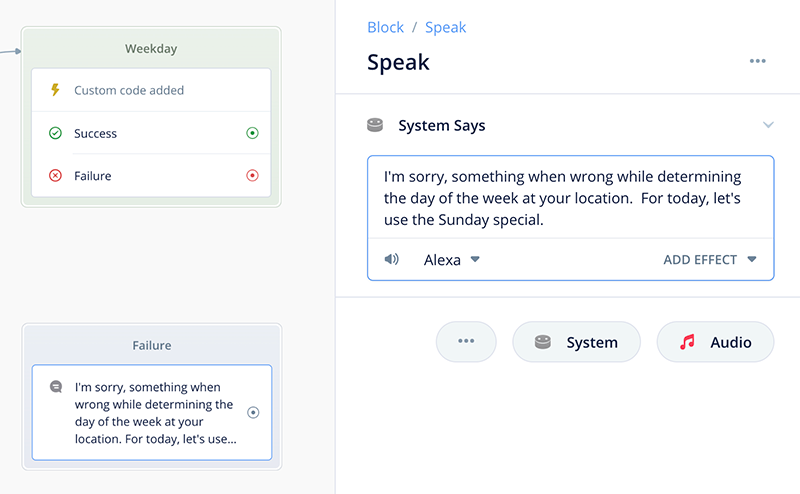
Add a Speak block to initiate the Failure Combo block
Add a Speak block as shown below. Rename the Combo block “Failure.”
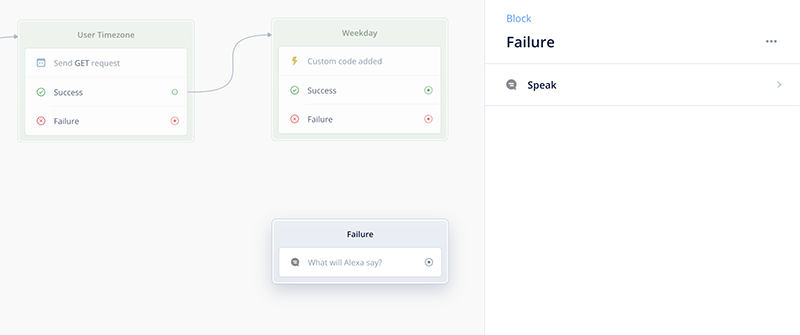
Add the following text to the Speak block:
I’m sorry, something when wrong while determining the day of the week at your location. For today, let’s use the Sunday special.
Add a Set block to the Failure Combo block
Next, add a Set block just below the Speak block. This will expand the combo block.
Inside the Set block, assign the value Sunday to the {todayIs} variable.
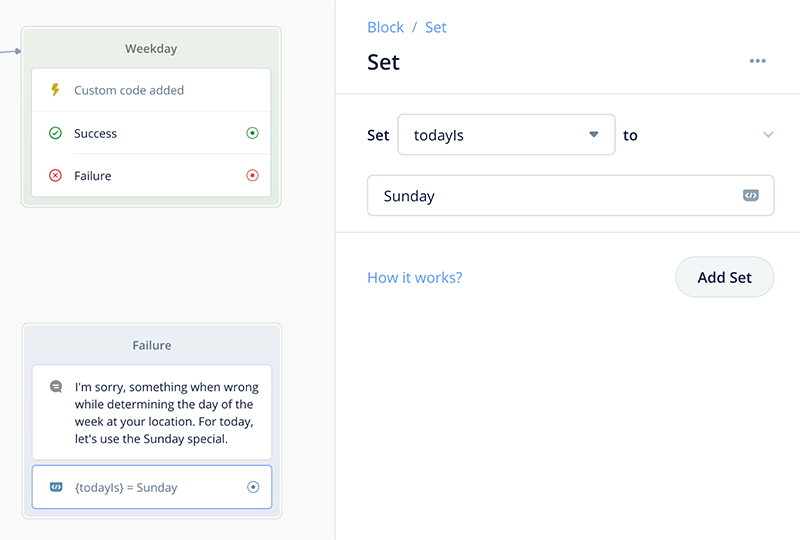
Close the Set block. Give it a color if you like. I made the one below red, to make it stand out from the others because it is related to error handling. The subflow canvas should now look similar to this:
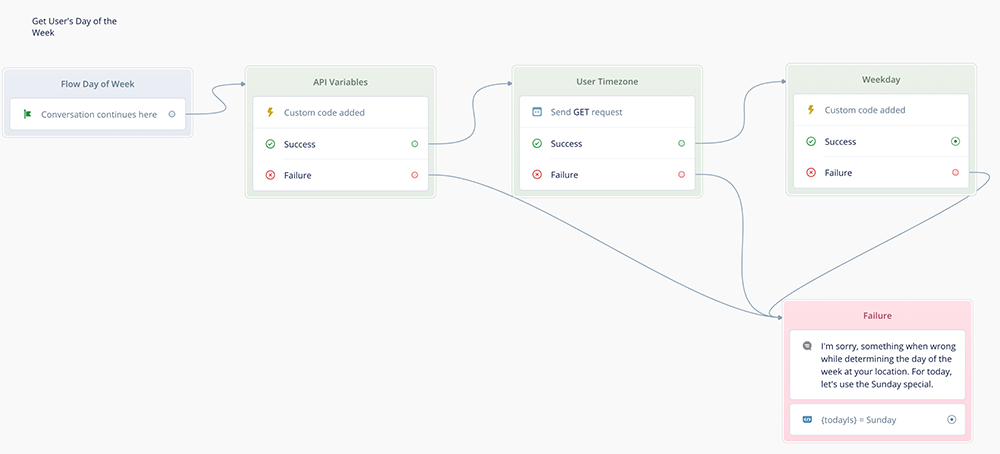
Connect the three blocks to the Failure Combo block
On the canvas, connect the fail ports of all three blocks to the input port for the Failure block as shown below. The canvas for the flow should now look like this:
Add a Speak block named Confirm Day of Week
Let’s add a Speak Block which will recite the day of the week. This is optional and can be a part of your own skill, depending on your design needs.
Alternatively this can just be test block to check that the variable was populated correctly, and then be disconnected after testing. For this tutorial, let’s add it. Rename it “Confirm Day of Week.”
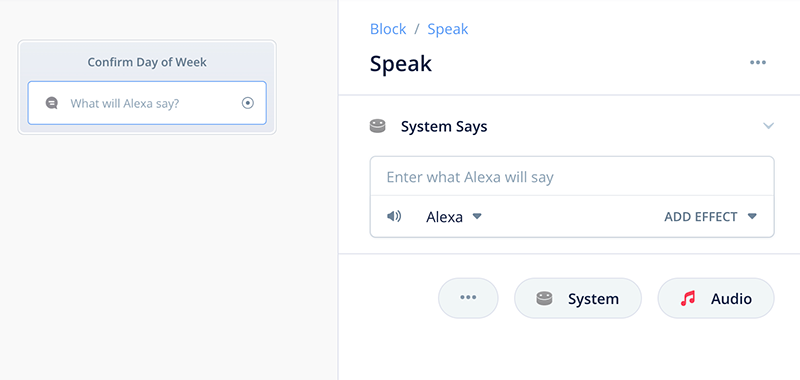
Add the following text inside the block: Today is {todayIs}
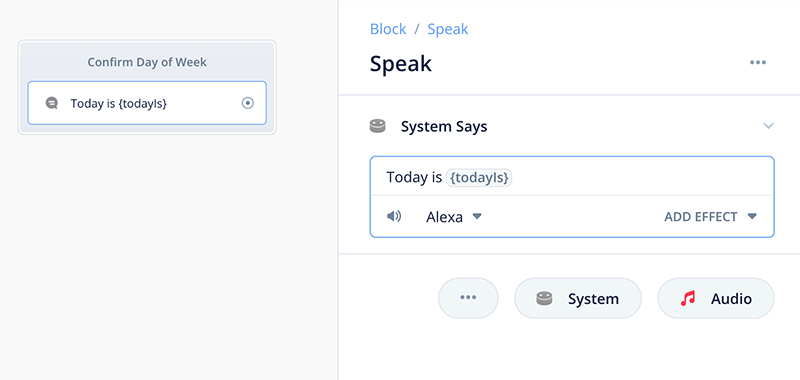
Close the Speak block, and if you like, give it a color.
Connect the “Speak-todayIs” block:
First, from the Weekday Block’s Success ouput port as an input to the Speak block.
Second, from the Failure Port Set block output port to the input of the Speak block. The canvas should now look like this:
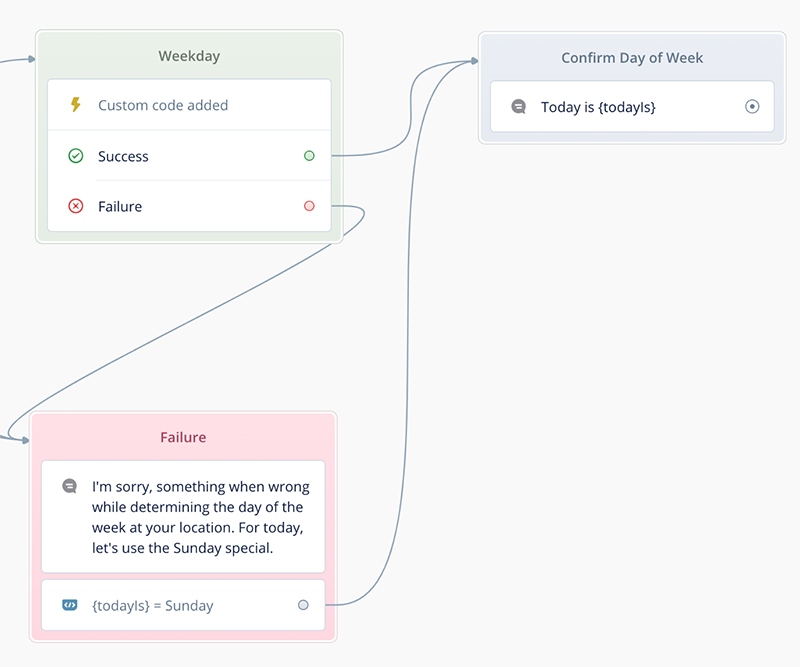
The “Flow day of Week” subflow is now complete! When this subflow completes, the Global variable {isToday} will contain the user’s day of the week. When the skill finishes the Confirm Day of Week Speak block the flow will return to the Home flow.
Return to the Home flow
Return to the Home flow canvas. At this point, this is what it should look like. Feel free to color the block if you haven’t already.
Add an IF Condition block for Day of the Week
Next we are going to add an IF condition which uses the {todayIs] variable and add a bit of content to round things out. This IF block will provide seven paths depending on the day of the week.
Add an IF block directly below the “Flow Day of Week” in the Welcome Combo block. Open the IF block in the right-hand panel.
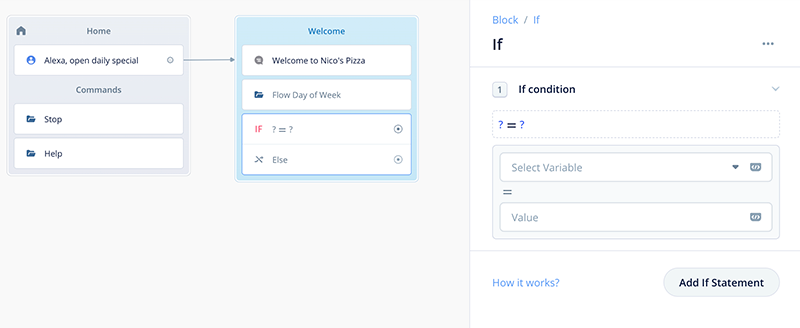
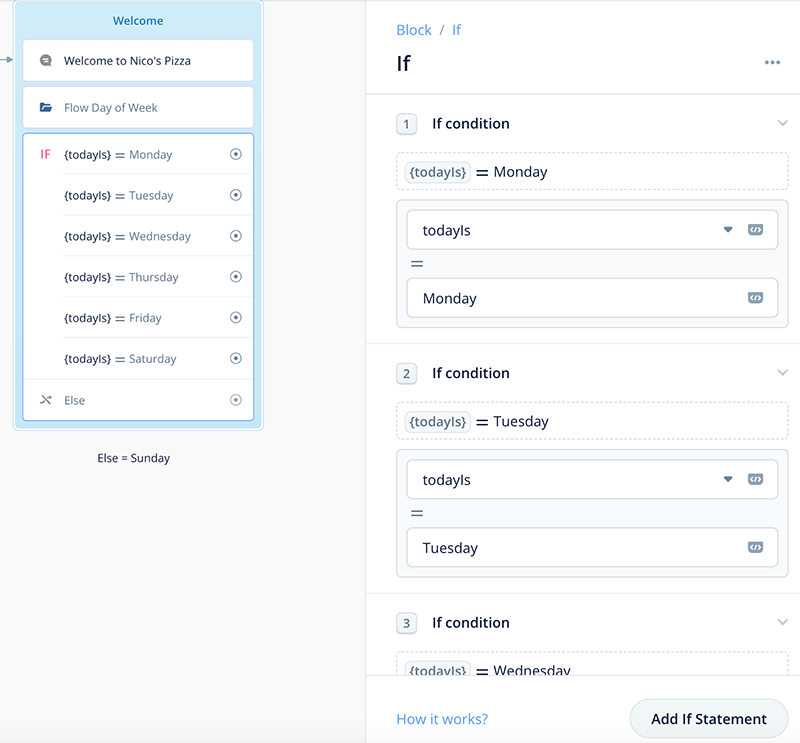
Add six IF statements, one for day of the week (Monday through Saturday) . For example, if {todayIs} = Monday, the skill will flow along the first output port. if {todayIs} = Tuesday, the skill will flow along the second output port, and so on.
The Else port will be for Sunday. Optionally, also add a comment: Else = Sunday.
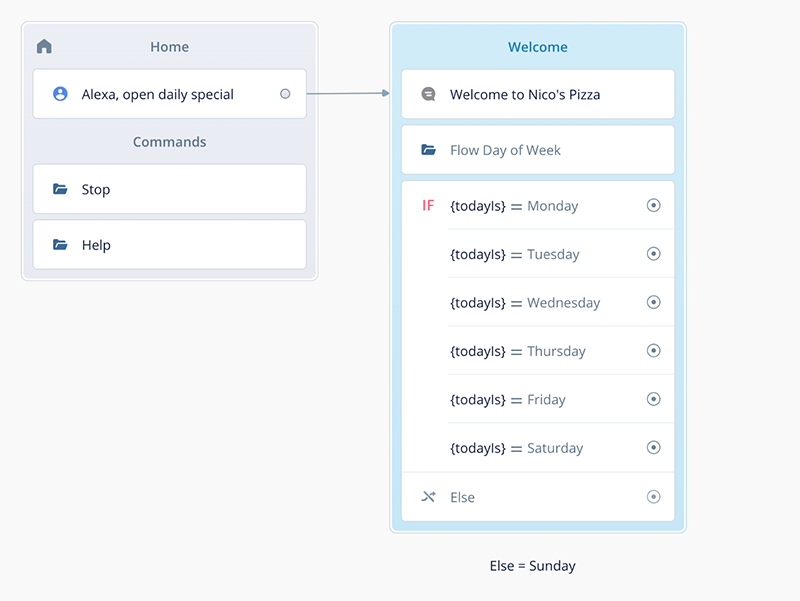
Close the IF Block. The Home canvas should now look like this:
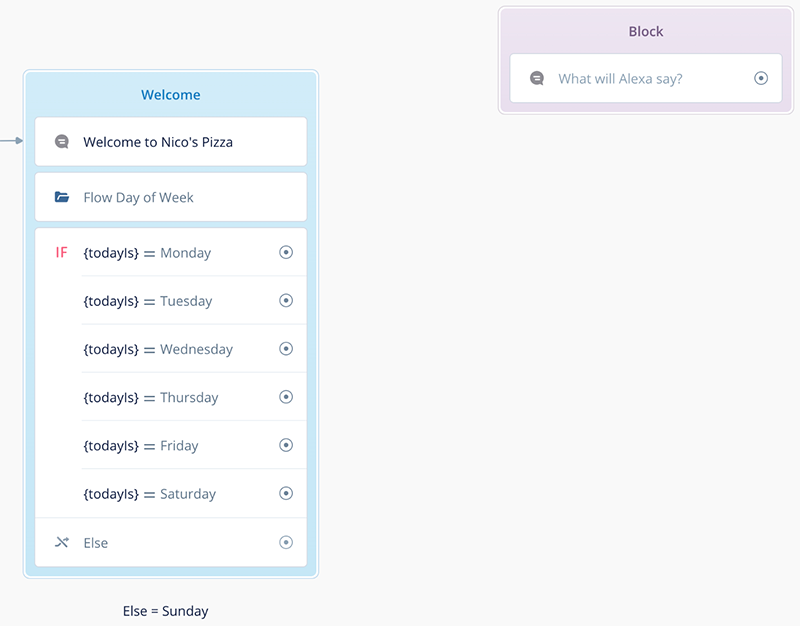
Add Seven Speak Blocks for the Daily Specials
Let’s add a Speak Block for each of the daily pizza specials.
Bring out a Speak block and put it on the canvas. Optionally, change the color of the block as well.
For now, don’t name it or add text, as we are going to use it as a copy/paste model for the other six blocks.
There are many ways to copy a block. One way is to right-click on the block, select Copy, and then right-click Paste.
Another ways is cmd + C and then cmd + V if you are using a Macbook, or Ctrl +C / Ctrl +V if you are using Windows.
In either case, make six more copies of the Speak block and place them near the IF block.
Rename each of the blocks as follows:
Monday
Tuesday
Wednesday
Thursday
Friday
Saturday
Sunday
Likewise, edit the text in each of the blocks:
Today's special is Margharita Pizza.
Today's special is Neapolitan Pizza.
Today's special is Pepperoni Pizza.
Today's special is Ham and Pineapple Pizza.
Today's special is Bacon Pizza.
Today's special is Mushroom Pizza.
Today's special is Quattro Fromaggio Pizza.
Organize the blocks on the canvas, and connect each of them to the If Block’s output ports. The Homeflow is complete and should look similar to this:
Congratulations! The tutorial skill is now complete enough for testing the day of the week logic.
Testing
Please be aware we can’t test this functionality using the Voiceflow Prototype / Test tool. Instead we need to test on the Alexa Developer Console.
Upload the demo skill to Alexa and test either using the Alexa Developer Console / Test tool, or use an Alexa Device. Below is a screenshot of my test results:
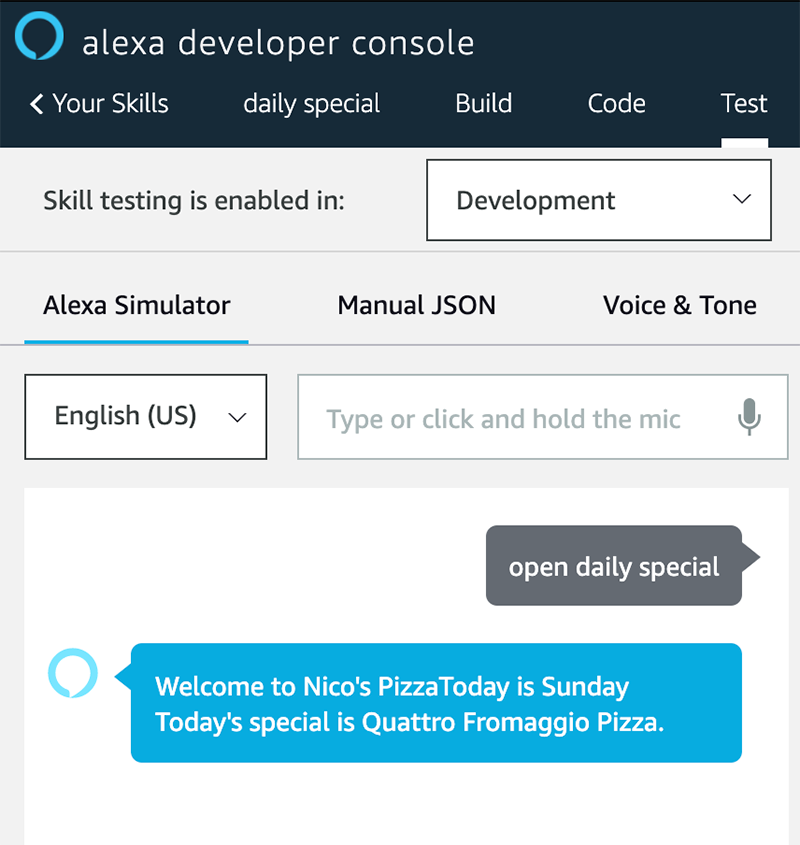
I happened to test on Sunday, and as can be seen, testing was successful.
Conclusion
This tutorial has shown how to determine the day of the week for the user, based on their timezone and the system’s timestamp.
For your own skills, you can build on this demo skill to create a variety of features.
For example, a choice block might be added asking if users if they want to place orders for delivery, make a reservation, or even ask about more items on the menu. You might even finish up the skill by simply connecting to the stop flow if all the skill does is provide information.
If you are new to Voiceflow, this tutorial also showed how to organize features into subflows to keep things tidy and easy to manage, and how to use Flow variables. There are more things you can do with Flow variables, such as mapping values in and out of them using Flow blocks, which you may wish to learn more about.
This tutorial also showed an example of including comments for code inside the code block. It also showed an example of adding comments directly on the project canvas.
Including comments is a good practice, particularly if you are collaborating with other team members, or simply to remember the purpose of design components when you return to do maintenance in the future.
Happy skill building!
Credits
Foundation Voiceflow Tutorial by Nicolas Arcay Bermejo: