
Update (July 3, 2020)
Updated to reflect a Voiceflow UI change. Utilize the new Else prompt feature in the Choice step for No Match. This improves the overall appearance of the flows on the canvas, avoiding the “figure-8” configuration.
The demo skill built using this tutorial is now available in the Voiceflow Community Marketplace. You can view and download as a template.
Generate a Non-Repeating Random Number on the Voiceflow Community Marketplace
Level: Intermediate
This tutorial assumes you are familiar with the basics of creating Alexa skills using Voiceflow.
If you are brand new to Voiceflow, this Youtube video is currently the best place to start:
Intro to Voiceflow – Ep. #1 | Basic Blocks (May 6, 2020)
Some additional resources:
Facebook Community – A place to ask questions as well as contribute!
Voiceflow Community Marketplace – Free downloadable example projects
Introduction
This tutorial shows you how to configure Custom Code blocks to generate non-repeating random numbers for your Voiceflow projects.
The values range from one to a maxlmum value which you can specify. In this tutorial the demo project random number range is one through six for ease of testing. In your own skill, if you have a hundred facts questions, you would set the upper value to 100.
The generated numbers are stored in a variable. The variable can be used in IF blocks to route the flow among different paths. An example would be randomly playing selections from a music playlist.
It can also be used as a parameter in API calls when retrieving external data. An example is randomly retrieving records from a table.
Once all the numbers are consumed in the range, the array variable is re-initialized.
Special thanks to Nicolas Arcay Bermejo and Dave Curley for contributing to the formulas used in this tutorial.
The Voiceflow Random Block versus Incorporating a Custom Code Block
Depending on your needs, there are multiple ways to generate randomness in your skill.
If you just want to randomize what path to follow, the easiest option is to use Voiceflow’s Random Block.
In my case, I have some quotes skills which have hundreds of quotes. In this situation, the Random block starts becoming clunky to implement, and so instead I use a code-based solution, as described in this tutorial.
As such, a code-based solution, using Voiceflow’s Custom Code block, is a better option if you need to generate non-repeating random numbers that range into the hundreds or thousands.
Limitations
Range: One through a specified maximum value.
The Javascript formula used for this tutorial will generate a random integer between ONE and a specified maximum value (inclusive).
If a random value between ZERO and a maximum value is needed, or if alternate minimum values need to be specified, different formulas will be needed.
Occasional repeats when the sequence restarts.
After the range of numbers have been consumed, the algorithm will clear the array variable tracking them, and re-set. If a user continues with the skill, a new set of random numbers will be provided.
On occasion, however, the same number might be generated, back-to-back, when the variable array is re-set.
For example, suppose you have a six-digit range, and they are generated as follows:
1, 3, 4, 6, 2, 5
On occasion, when the sequence re-starts, the new sequence could begin with a “5”. Example:
5, 3, 1, 2, 6, 4
This is preferred for skills using random numbers based on games of chance, or when mixing multiple choice answers for quizzes.
However it might not be a great customer experience if they hear all the facts in a facts skill, and then they hear a fact back-to-back. Or they have listened to all the songs in a juke box and then two songs play back-to-back. This becomes an increasingly a rare occurrence if your maximum number range is in the hundreds or thousands, but nevertheless, it is something to be aware of.
If this is a potential problem, the resolution is to add a bit more logic to the skill, to make sure the last number of a sequence is not the same as the first number when the random numbers re-set. While out of scope for this tutorial, be sure to ask in the Facebook Voiceflow Community Group if you need assistance with this.
Latency risks with large maximum values
This tutorial features a basic algorithm for generating random numbers and also for tracking previously generated numbers in an array variable.
This array variable will grow in size and is checked each time a new random number is generated. As the number of previously generated numbers grows, latency will increase.
There may be more sophisticated algorithms which can be implemented which may help with latency if you are working with a very high maximum value for your random number range. For example, there are a variety “shuffles” described in Javascript websites. These can be implemented as an alternative in the Voiceflow Custom Code block, although the code will likely be more complex.
If you are working with a very high maximum value in your production project, be sure to test whether latency might be an issue.
If you need assistance with implementing a more sophisticated algorithm in the Voiceflow Custom Code block to help manage latency, be sure to ask in the Facebook Voiceflow Community Group if you need assistance with this.
Javascript Reference Documentation
Below are links to reference documentation and a discussion for the javascript code used for this tutorial.
w3schools.com JavaScript random() Method
Stackoverflow: Random non-repeating number generation in javascript between two limits
Demonstration Skill Overview
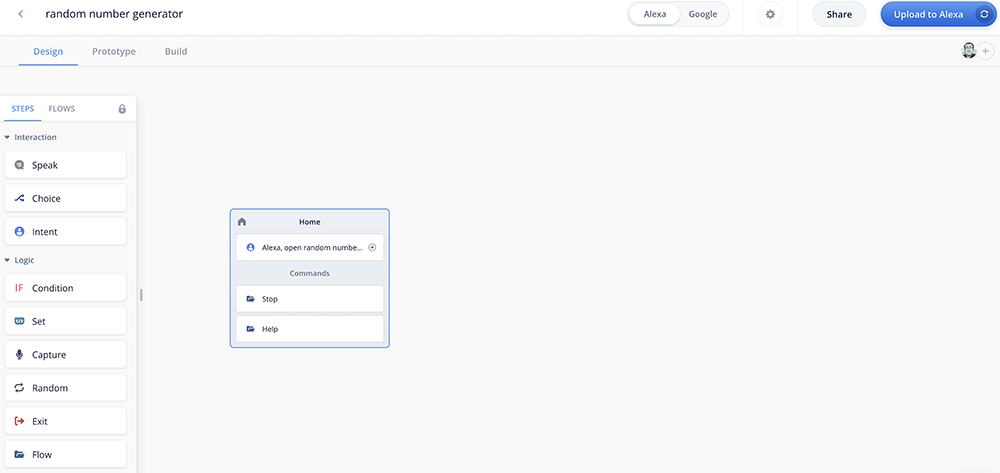
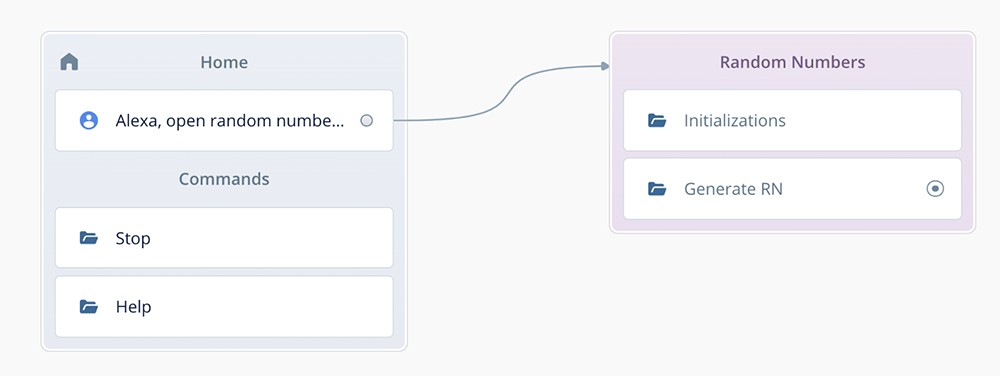
This demo skill shows how to configure and test the code. Here is how our completed demo project will look:
Home Flow:

There are two subflows, one for Initializations, and one for Generating the Random Numbers. Here are what our subflows will look like once complete:
Initializations Subflow
Generate Random Number Subflow
Tutorial Organization
This tutorial is organized into three Parts. The first part is a series of tasks for configuring your test project, an Alexa skill. Parts 2 and 3 shows how to test and provides examples.
Part 1 – Build the Demo Project
Part 2 – Voiceflow Prototype Tests
Part 3 – Alexa Developer Console (ADC) Tests
Part 1: Build the Demo Project
This section illustrates how to configure a Voiceflow project which will be an Alexa test skill. The objective is to configure a testable random number generator where each new number is unique until all the numbers in the range are consumed.
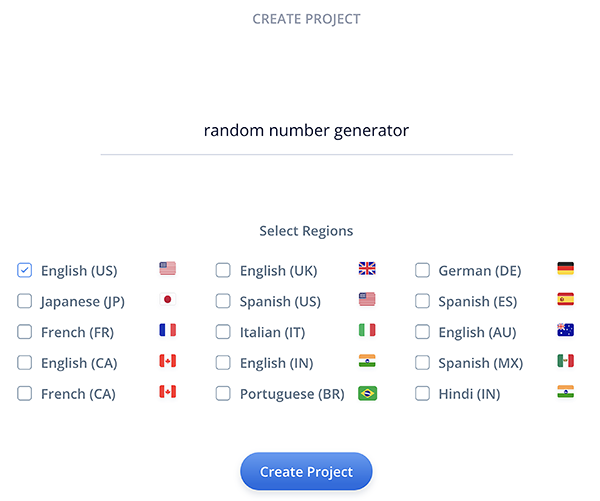
Task 1: Initiate a new Test Project
Initiate a new project, select your region, and give it a name.
We will name our demo project “random number generator,” and this will be our invocation name as well when we test on the Alexa Developer Console.
Here is our new project canvas:
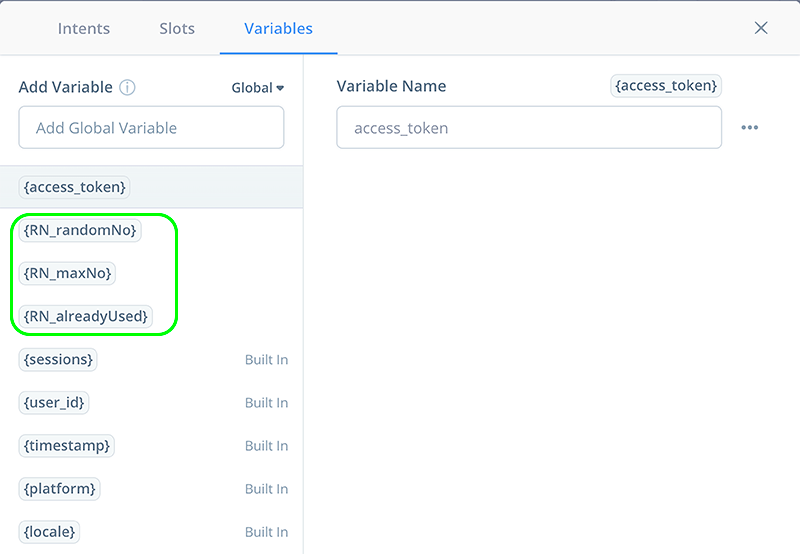
Task 2: Variable Configuration
Add the following three Global variables into the Variables Panel.
RN_randomNo
Captures newly generated random numbers.
RN_maxNo
Identifies the upper range of random numbers.
RN_alreadyUsed
An array variable used to track random numbers as they are generated and to avoid repeat numbers.
PRO TIP: If your skill needs multiple sets of random numbers, you may wish to employ a combination of Global and Flow variables.
For example, suppose you have a game for 1-4 players. Your skill design might require maintaining non-repeating random numbers for each individual player.
In this case, you may want to configure four sets of global variables, one for each player. Then, in the Generate Random Numbers subflow, you may wish to configure local variables. Your skill design would then pass in the global variables when calling the subflow, and return the updated values when exiting the subflow.
As such, the Generate Random Numbers subflow would be called multiple times during game play. Voiceflow provides a variable mapping feature for the Flow block which supports this type of use case.
This is a more advanced design and is out of scope for this basic tutorial. If you need this for your design and need assistance, post a question in the Facebook Voiceflow Community Forum.
Task 3: Combine Block: Initializations and Flow Step: Initializations
This flow will initialize the random number-related variables. It is run once, when the skill opens. However it should not be included in the loop when random numbers are generated.
On the home canvas, add a Flow block and connect it to the Start block.
This will also be the start of a Combine block, and the Flow block will be the first step.
PRO TIP: In Voiceflow, a “Combine Block” is a large block which contains multiple blocks within it. These multiple blocks are described as “Steps.” Blocks which stand alone continue to be referred to as “Blocks.”
Rename the Combine block “Random Numbers” as shown below. We will be adding more steps to this new Combine block, and it will grow.
Rename the Flow step “Flow-Initializations.”
If you like, you can give this new Combine block a color.
PRO TIP: Naming the Combine block, the steps within a Combine block, and adding colors are optional, but are good practice. Adding comments directly on the canvas is a good practice as well. The names, colors and comments are helpful identifiers if you are collaborating with other team members or when returning to your project months later to do maintenance.
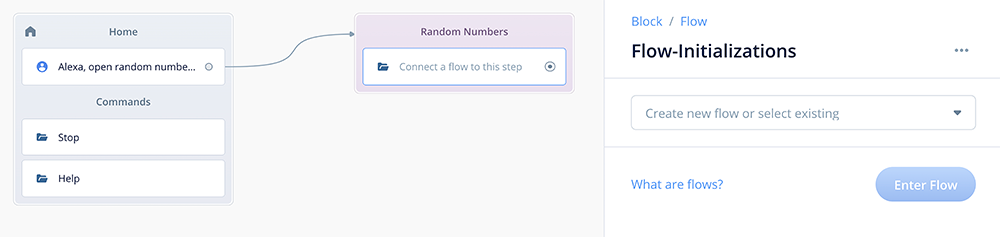
Inside the Flow step, create a new flow named “Initializations.”
Enter the new “Initializations” subflow.
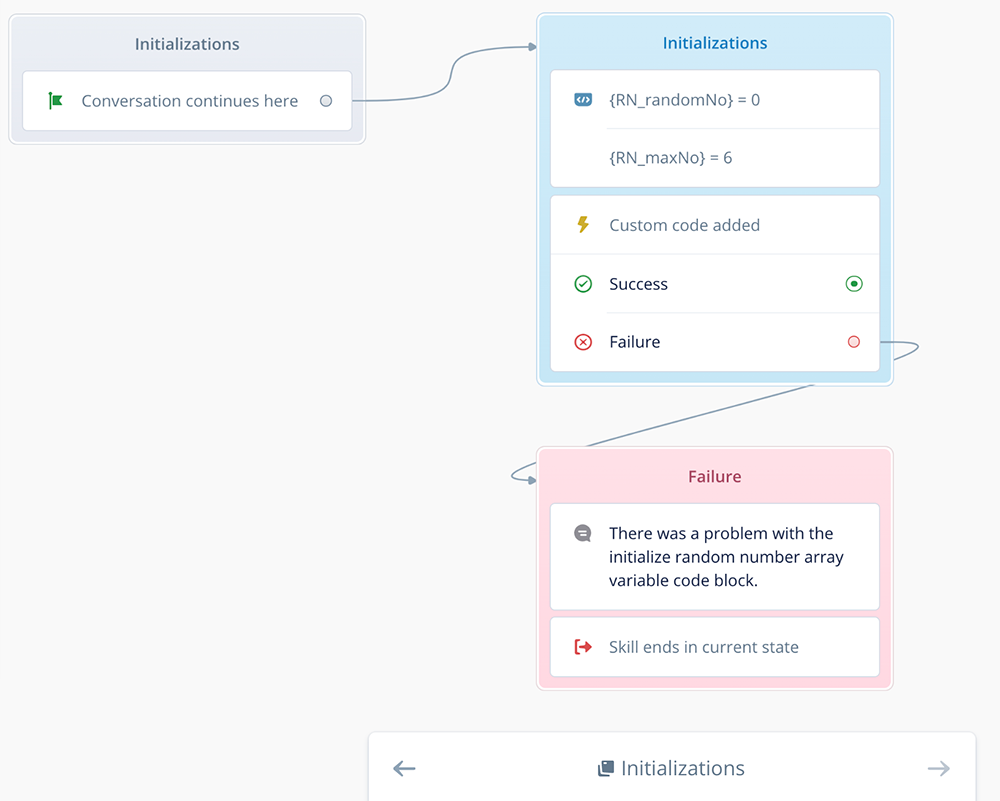
Task 4: Combine Block: Initializations, and Set Step: Initialize Variables
In the Initializations subflow, we are going to initiate a Combine block consisting of several steps. This will include a Set step and a Custom Code step. We will also add a separate “Failure” Combine block to handle errors in case the Custom Code step fails.
Add a Set block to the canvas and connect it to the Initializations Start step.
This will also be the start of a new Combine block, and the Set step will be the first step.
Rename the Combine block “Initializations” as shown below.
Optionally, rename the Set step “Set-Initialize Variables.”
If you like, you can give this new Combine block a color.
Set two variables as follows:
Set RN_randomNo to 0
Set RN_maxNo to 6
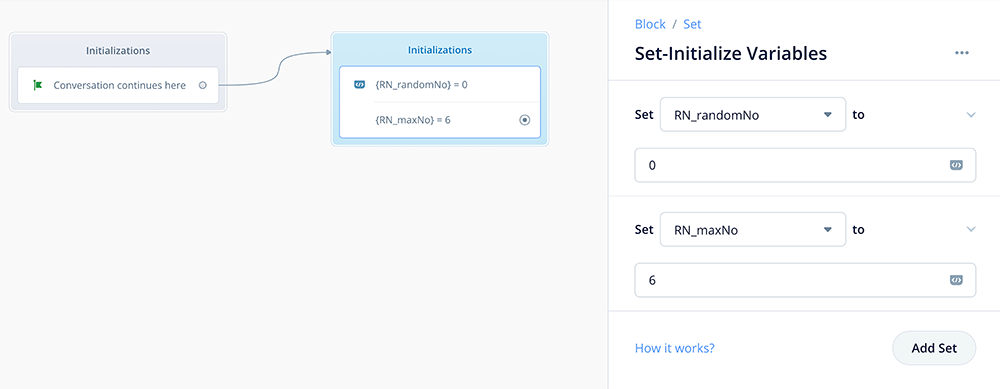
Variable RN_randomNo stores the random numbers. It is initialized to zero each time a new session starts. Setting it to zero is done to avoid carry over from previous sessions, and also to satisfy the IF condition for the first pass in the upcoming Custom Code step.
Variable RN_maxNo sets the upper end of the range when numbers are generated. For this tutorial it is set to six. As a result, the process will generate random numbers ranging from 1 to 6, inclusive. Set this number to the desired upper value for your projects.
Task 5: Custom Code step: Initialize Variables
Add a new Custom Code step to the Combine block just below the Set step. Rename it “Code-Initialize RN Array Variable.”
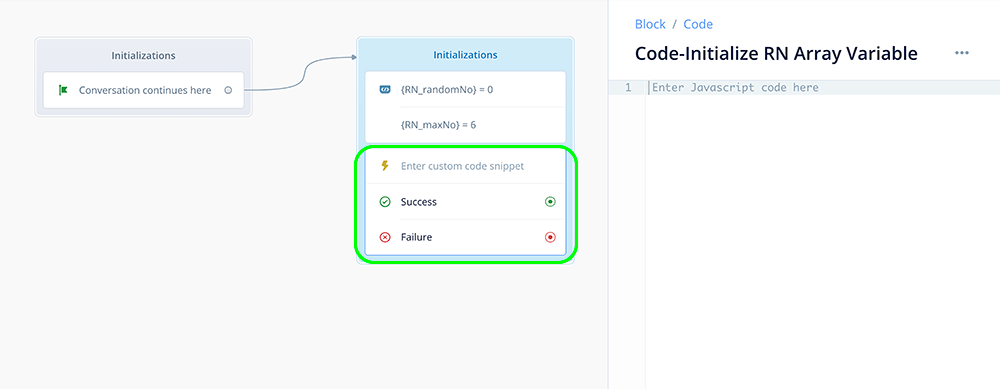
Add the following javascript code and comments:
//Initialize an array variable which
//stores random numbers as they are used.
//
var RN_alreadyUsed = [];
//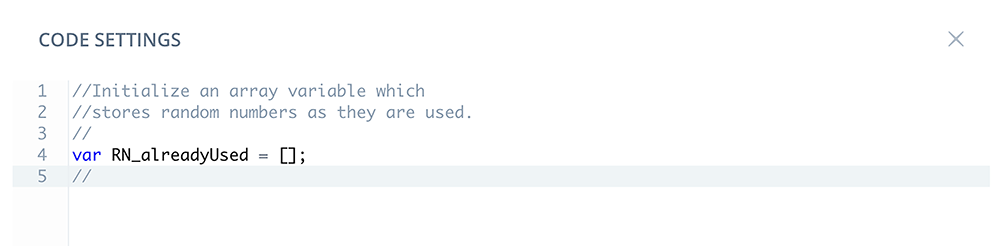
Array variable RN_alreadyUsed is initialized each time a new session starts to avoid carrying over values from previous sessions.
PRO TIP: The demo skill re-initializes the random number variable and array variable which tracks them each time the skill is re-visited by individual users. You might have a use case where you want to preserve where the user left off from a previous session.
For example, lets suppose you have a skill with 100 cat facts. During the first session, perhaps a user listens to 40 of them. When the user returns, you might want them to not hear repeats from their first session, and instead hear the other 60 cat facts before the random number array re-initializes.
In this case, you may wish to use the sessions variable to avoid re-initializing these variables when a user returns to the skill.
This advanced technique is out of scope for this basic tutorial. However if your design requires this and you need assistance, post a question in the Facebook Voiceflow Community group.
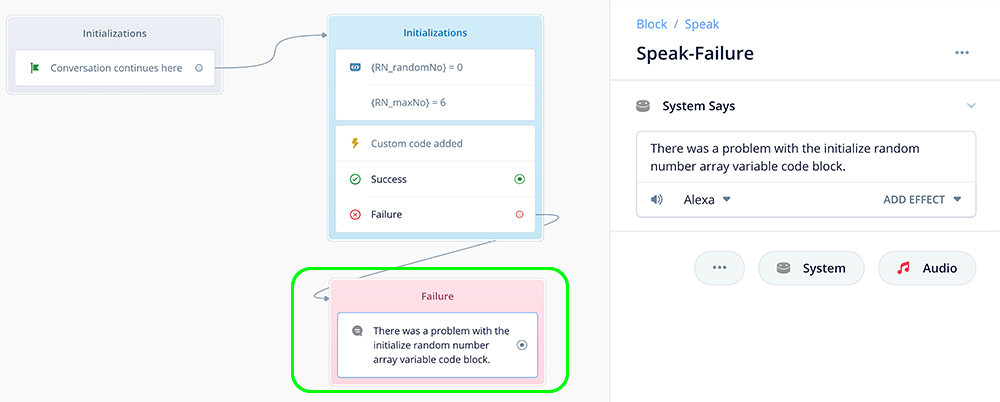
Task 6: Speak Block and Exit Block: Error Handling
Add a new Speak block below the “Initializatations” Combine block.
This will start a second Combine block within the subflow. Optionally, name it “Failure” and give it a color.
For our demo skill, we are just going to have a Speak step inform us whether there was a problem with the Custom Code step during testing, and then do a quick exit.
PRO TIP: For your own projects you may wish to have more sophisticated handling which is more user-friendly, and can recover from errors when in production.
During early testing stages, however, it is handy to have a Speak block as part of the flow, in order to more easily pinpoint when errors occur. After testing is done, you can then disconnect it and set it aside, and incorporate and test the alternative handling when the skill is close to ready to go into into production.
Let’s proceed. Copy/paste the following text into the Speak step.
There was a problem with the initialize random number array variable code block.
Connect the failure port of the Custom Code step to the new Speak-Failure step:
Add an Exit step to the Failure Combine block, just below the Speak-Failure step:

To summarize, if the Custom Code step is successful, the flow will exit via the “Success” port. Because there is no connection, the flow will return to the home flow at the point where the Initializations subflow was originally called.
However if the Custom Code step fails, the flow will exit the “Failure” port, and proceed to the Speak-Failure step in the Failure Combine block. The skill will recite the error message and then stop.
Congratulations, the Initializations subflow is now complete!
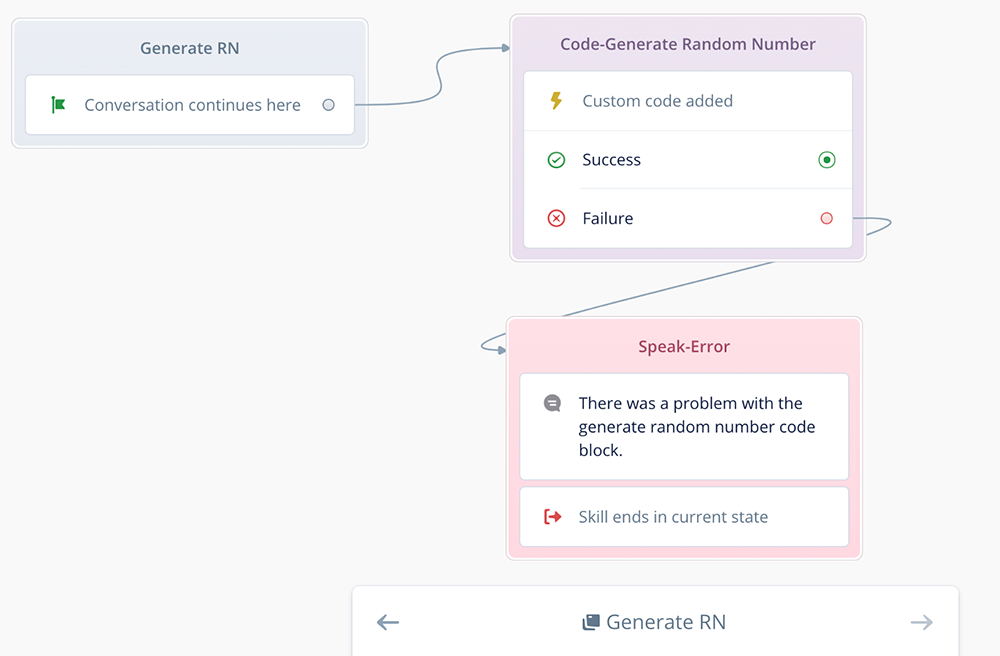
Task 7: Flow Step: Generate RN
Return to the home flow.
Add a new Flow step directly below the Initializations flow step as shown below, and rename it “Flow-Generate RN.” The purpose of this flow will be to generate random numbers and track previously used numbers.
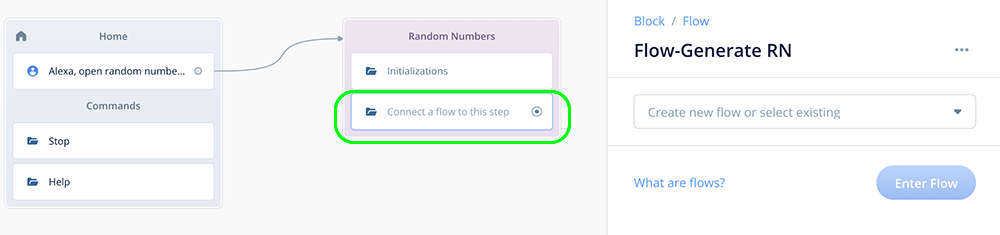
Inside the flow step create a new flow, named “Generate RN,” and enter into the new flow.
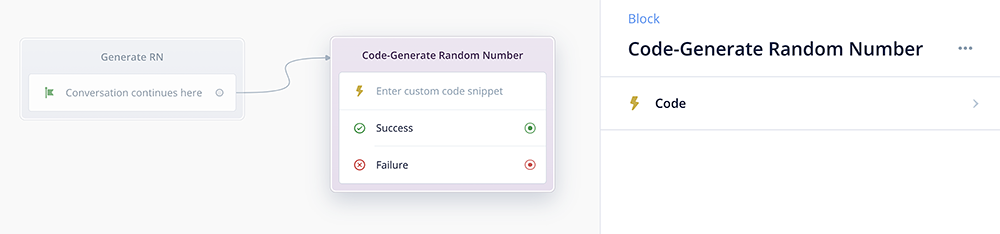
Task 8: Custom Code Step: Generate Random Number
The Generate RN subflow will be responsible for generating random numbers, tracking them, and checking for duplicates.
Add a new Custom Code block to the canvas and connect it to the Generate RN Flow Start step.
Rename the Combine block “Code-Generate Random Number” and give it a color if you wish.
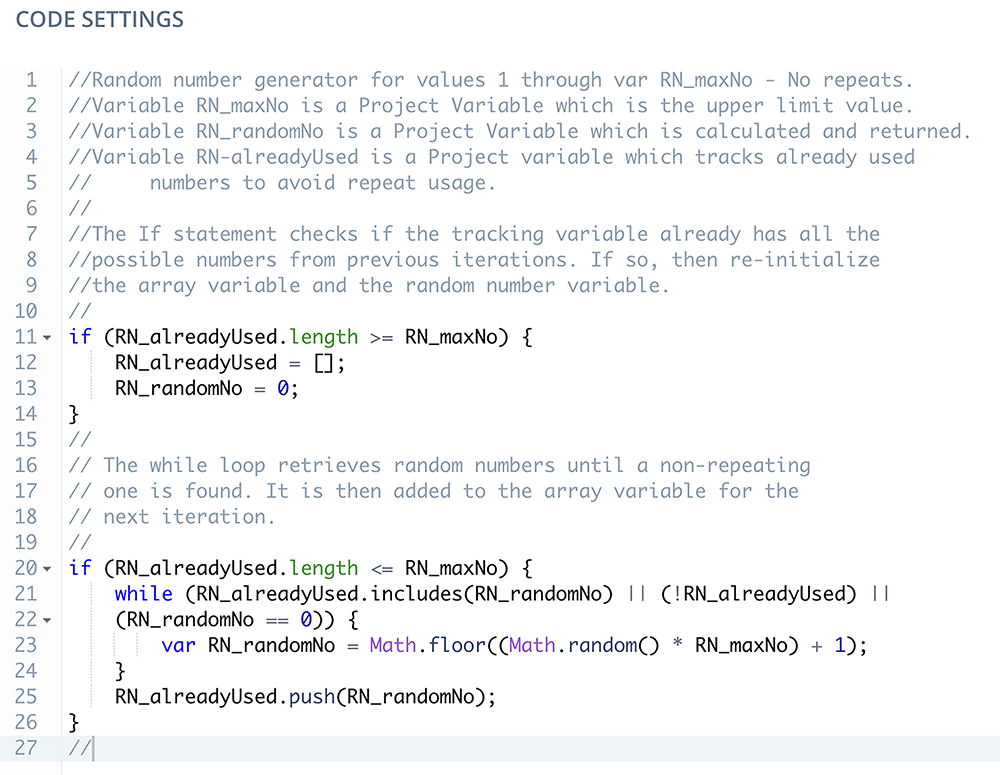
Add the following javascript code and comments inside the Custom Code step:
//Random number generator for values 1 through var RN_maxNo - No repeats.
//Variable RN_maxNo is a Project Variable which is the upper limit value.
//Variable RN_randomNo is a Project Variable which is calculated and returned.
//Variable RN-alreadyUsed is a Project variable which tracks already used
//     numbers to avoid repeat usage.
//
//The If statement checks if the tracking variable already has all the
//possible numbers from previous iterations. If so, then re-initialize
//the array variable and the random number variable.
//
if (RN_alreadyUsed.length >= RN_maxNo) {
    RN_alreadyUsed = [];
    RN_randomNo = 0;
}
//
// The while loop retrieves random numbers until a non-repeating
// one is found. It is then added to the array variable for the
// next iteration.
//
if (RN_alreadyUsed.length <= RN_maxNo) {
    while (RN_alreadyUsed.includes(RN_randomNo) || (!RN_alreadyUsed) ||
    (RN_randomNo == 0)) {
        var RN_randomNo = Math.floor((Math.random() * RN_maxNo) + 1);
    }
    RN_alreadyUsed.push(RN_randomNo);
}
//
Close the Custom Code step.
To summarize, the code does the following:
The array variable stores all of the numbers as they are generated and used. In the first IF statement, the array variable will be re-initialized after all the numbers in the range have been generated.
The second IF statement generates a new random number. It checks if the newly generated number has already been generated before by checking the contents of the array variable.
If the newly generated number has already been used, another number is generated, and continues doing so until an unused number has been found.
If it has not already been used, the new number is stored in the RN_randomNo variable, and the value is logged in the array variable.
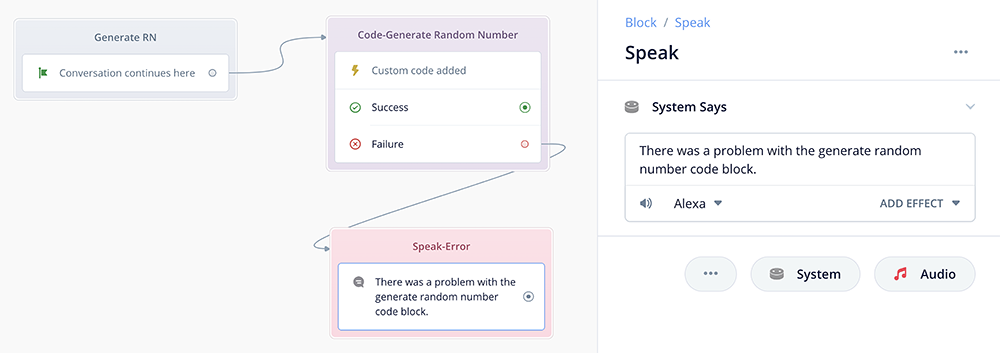
Task 9: Combine Block: Speak-Error
Add a Speak block below the “Code-Generate Random Number” Combine block.
This will start a second Combine block within the subflow. Optionally, name it “Speak-Error” and give it a color.
For our demo skill, we are just going to have a Speak step inform us whether there was a problem with the Custom Code step during testing, and then do a quick exit. As noted earlier in the tutorial, you may wish to have more sophisticated handling for your own skills.
Let’s proceed. Copy/paste the following text into the Speak step:
There was a problem with the generate random number code block.
Connect the failure port of the Custom Code step to the new Speak-Error Combine Block:
Add an Exit step to the Speak-Error Combine block, just below the Speak step:
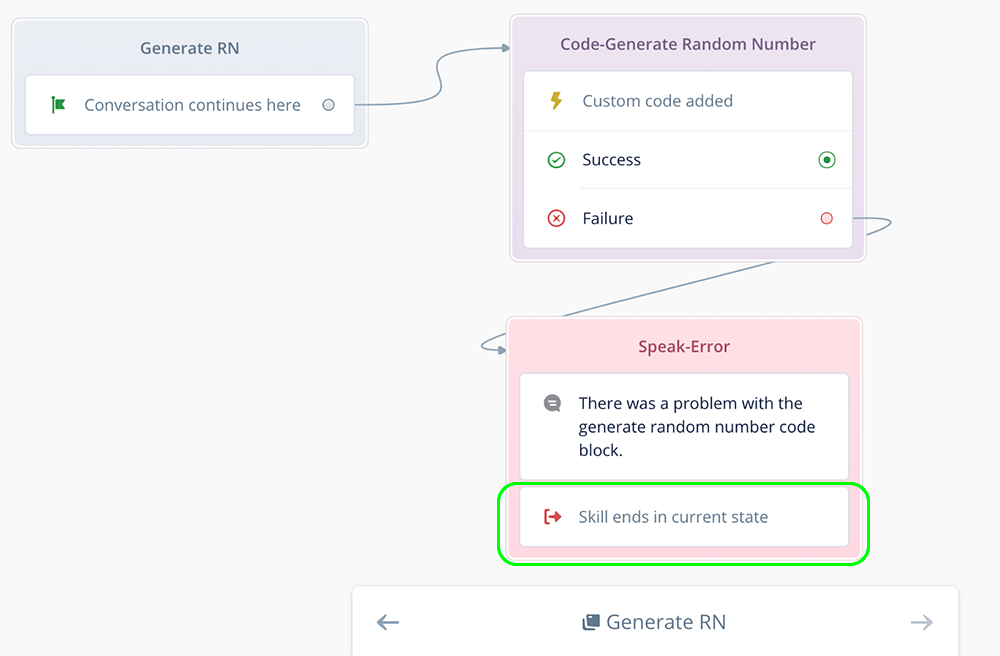
To summarize, if the Custom Code step is successful, the flow will exit via the “Success” port, and because there is no connection, the flow will return to the home flow, where the Generate RN flow was originally called.
However if the Custom Code step fails, the flow will exit via the “Failure” port, and proceed to the Speak-Error Combine block and recite the error message. The skill will then stop.
Congratulations, the Generate RN flow is now complete!
Task 10: Speak Step: Recite random number and prompt for another number.
Return to the Home canvas. At this point, this is what the Home flow should look like:
Add a new Speak step to the Random Numbers Combine block, just below the Generate RN flow step. Rename it “Speak-Confirm RN” and add the following text:
The random number is {RN-randomNo}. Would you like another number?
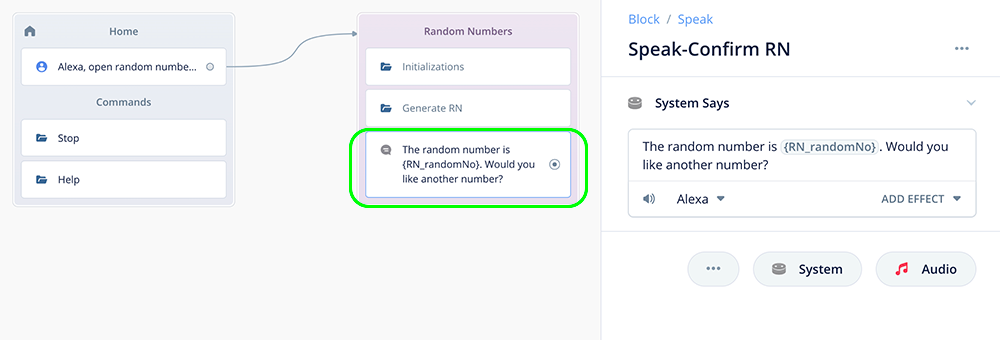
Alexa will recite the random number generated, and also prompt the user if they would like to generate another random number.
Note that the variable name should match what was configured in the Variables panel. For your own project, you can use the “typeahead” feature to display and select the variable name via a drop-down.
Task 11: Choice Step: Generate another Random Number? YN
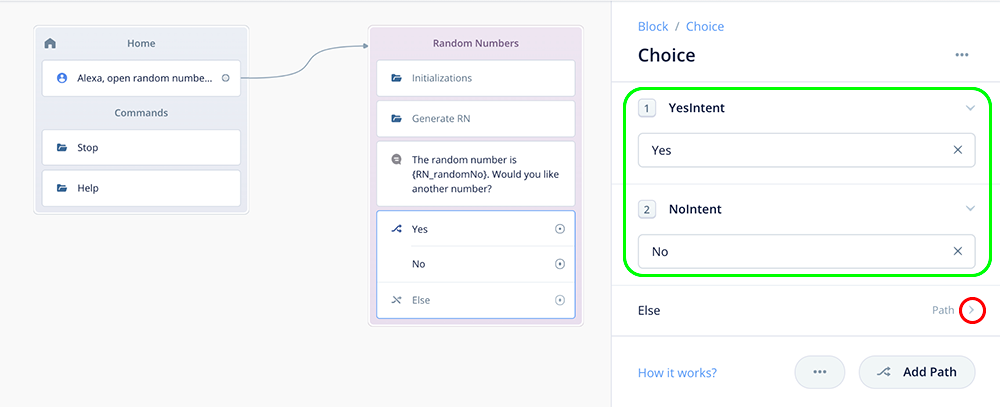
Add a Choice step to the Random Numbers Combine block directly below the Speak step.
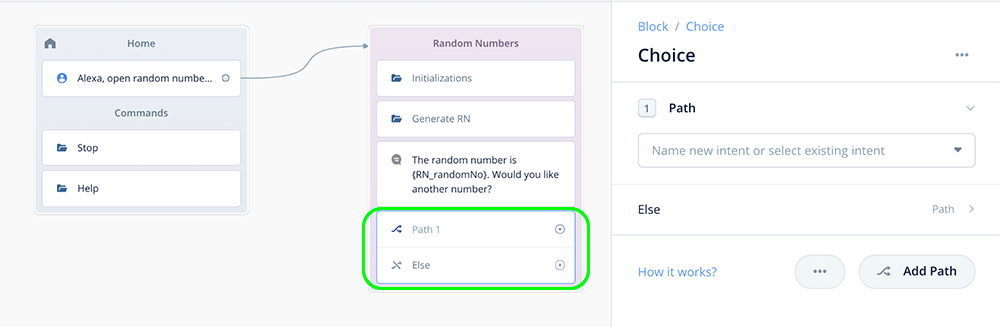
Add two Yes/No intents. “Yes” and “No” intents are both existing intents provided by Amazon. The first is the Amazon YesIntent. The second is the Amazon NoIntent.
No Match Response
In the previous image, notice the Else / Path option, and the icon in the small red circle. Click on this icon to twirl open the Else option.
Once open, select the “Reprompts” radio button. This will open a speech window for “No Match One.”
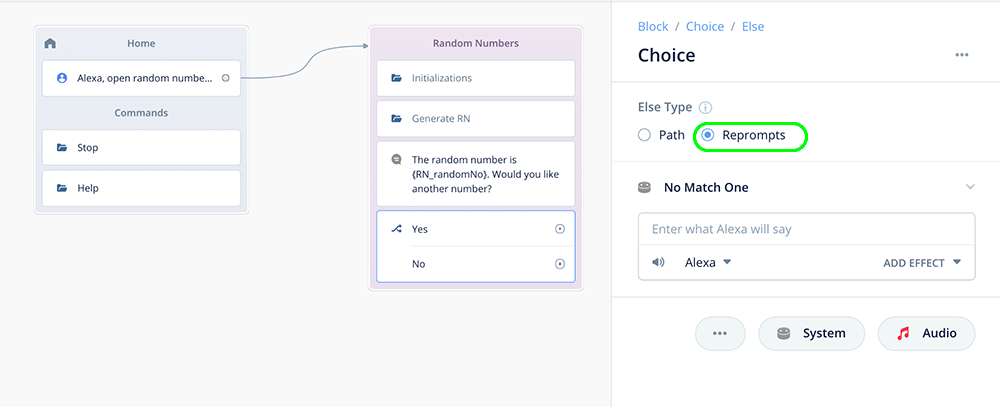
Add the following prompt for “No Match One.” This will play if a user provides an unanticipated response.
I’m sorry. I didn’t quite catch what you said. You can say yes, or no. Would you like another random number?

Afterwards, click on the “Choice” breadcrumb at the top of the step (red oval).
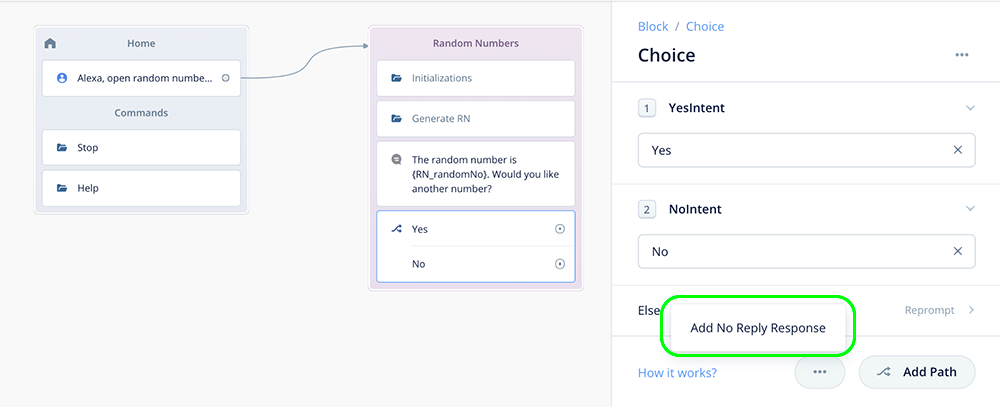
No Reply Response
Add a “No Reply Response” to the Choice step. This prompt plays if the user is silent and does not provide an answer.
While in the Choice step, access the “Add No Reply Response” option.
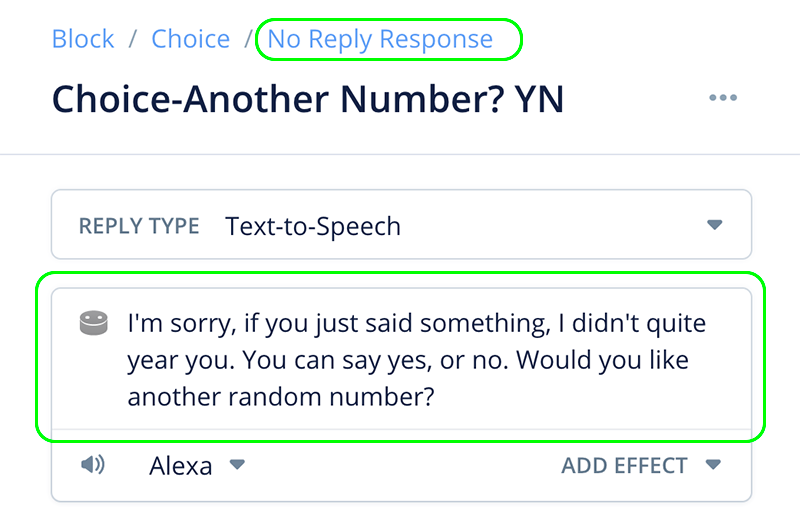
Add the following text:
I’m sorry. If you just said something, I didn’t quite hear you. You can say yes, or no. Would you like another random number?
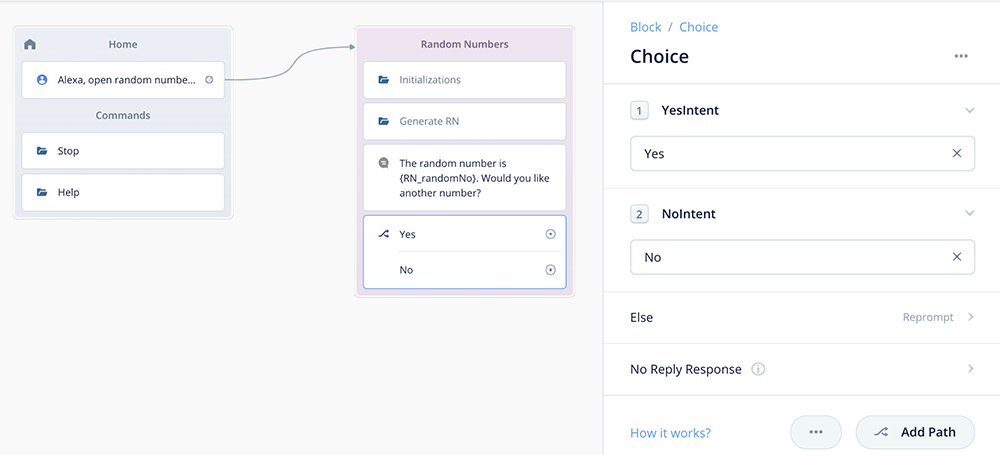
Completed Choice Step
Once the No Reply Response has been added, click on the “Choice” breadcrumb again. The completed Choice step should look similar to this:
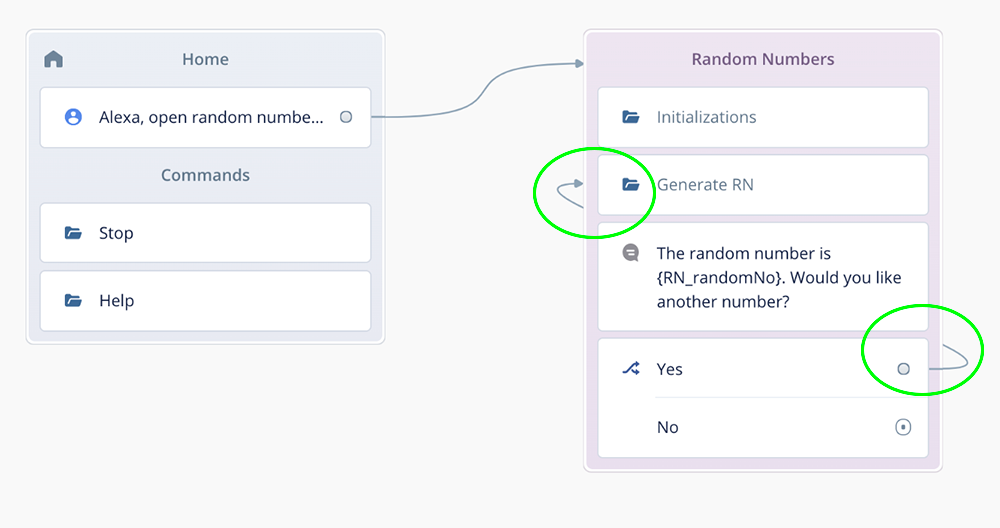
Connect the Yes Port to the Generate RN Flow
Connect the Choice step Yes port to the Generate RN flow as shown in the image below. In this case, if the user answers “yes,” another random number will be generated.
Task 12: FLOW Block: Stop Flow
Add a new Flow block to the Home canvas as shown below. Rename it “Flow-Stop, and give it a color if you wish.
Inside the Flow block, use the drop-down and select the Stop Flow.
Connect the No exit port of the Choice step to the Flow-Stop block.
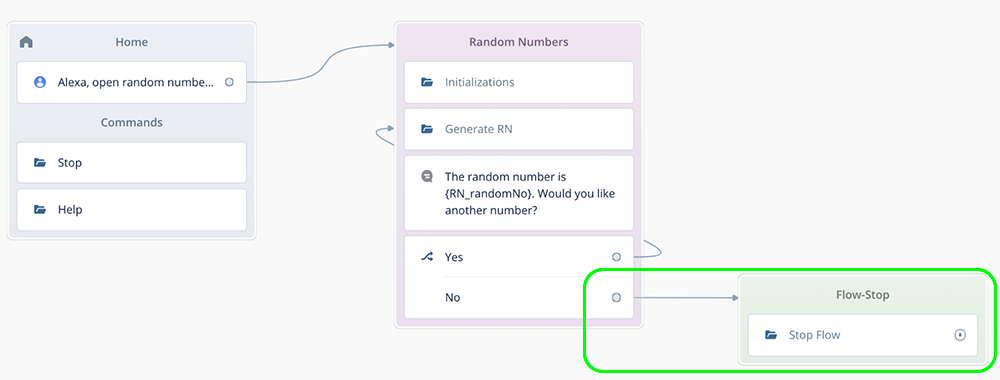
In this case, when the user is asked if they want another random number, and they answer “no,” the skill will flow to the Stop Flow.
Congratulations, the Project is now complete and ready for testing!
Part 2: Voiceflow Prototype Tests
Testing using the Voiceflow Prototype testing tool is ideal for focusing on testing the Custom Code blocks, as you can inspect the variable values as part of debugging.
This set of tasks walks you through a series of tests using the Prototype testing tool to confirm the random numbers are generating correctly.
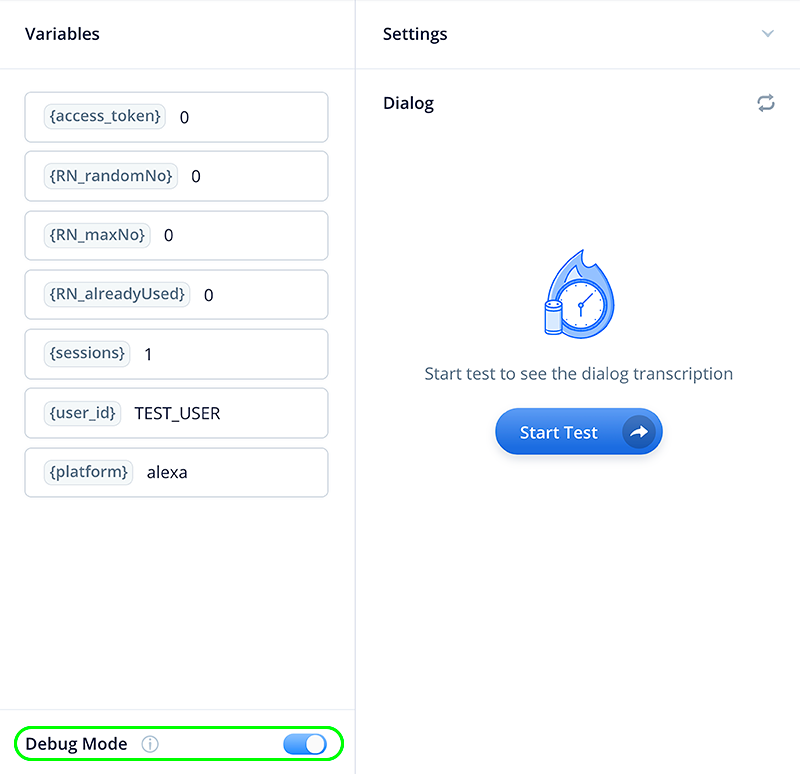
Open the Prototype window and turn on Debug Mode. This will enable viewing variable values.
Note that while testing your own skills, particularly if you have additional and more complex untested features, the Prototype tool can be invaluable for debugging, particularly issues with your code in the Custom Code block. Not only can you inspect the variable values, utilization of the failure ports with error messaging can be very helpful too.
Test 1:
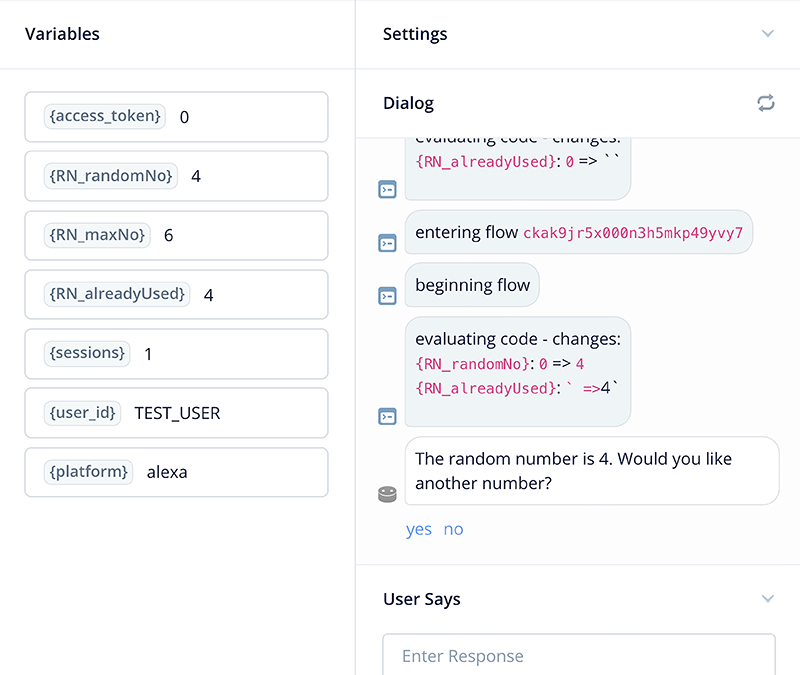
Click “Start Test.”
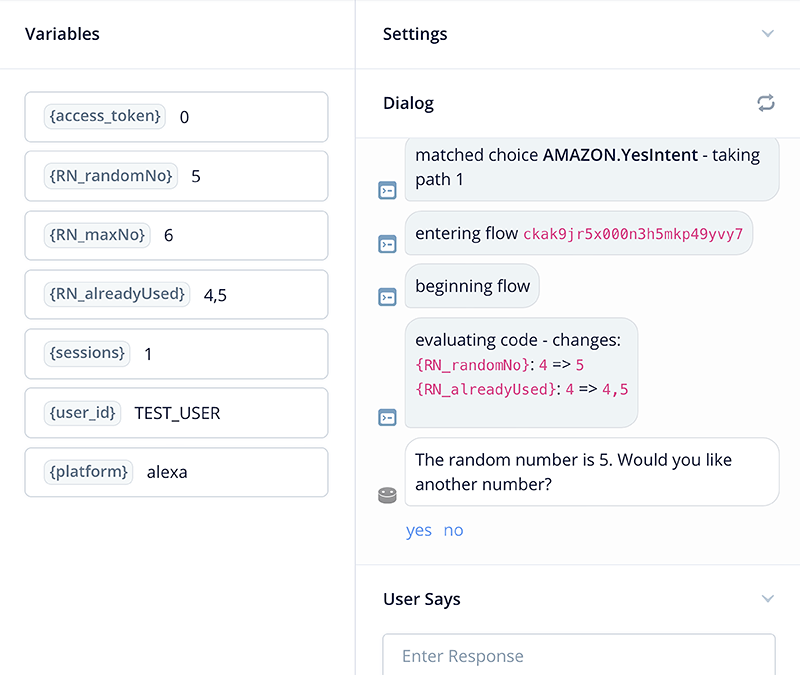
The random number generated was 4, and there are no errors. This test passed. You can also inspect the variable values in the Variables pane.
They should make sense. The random number is 4. The maximum number in the range is is 6. The value 4 has been added to the array for tracking. Also, if you scroll up and down the dialog pane the conversation flow should make sense as well.
Test 2:
A second number is generated, 5. As can be seen in the Variables pane, it has also been added to the array variable for tracking. Testing is successful.
Test 3:
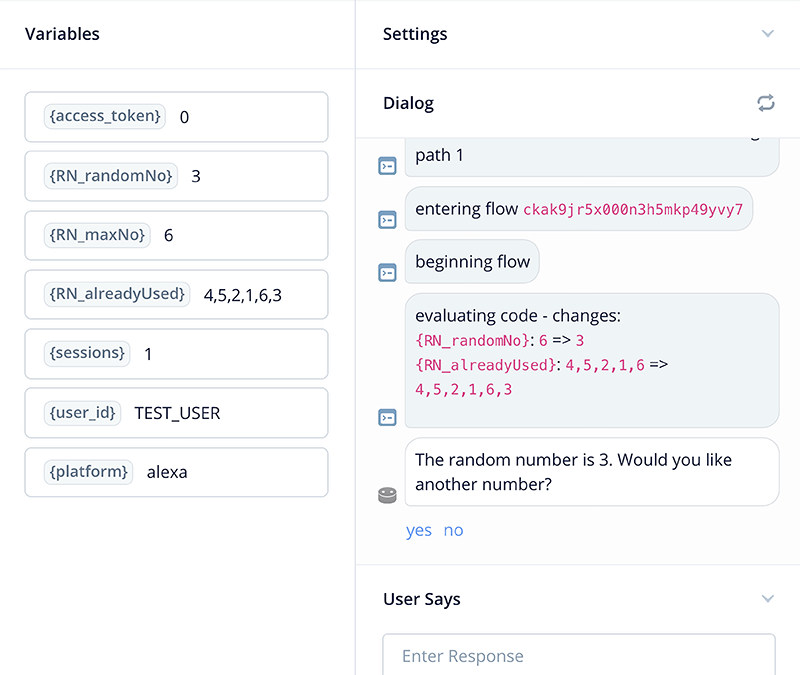
Continue generating random numbers until you have generated six. In this case, you can see the array variable has stored all six (4 5 2 1 6 3), and there have been no repeats. Testing is successful.
Test 4
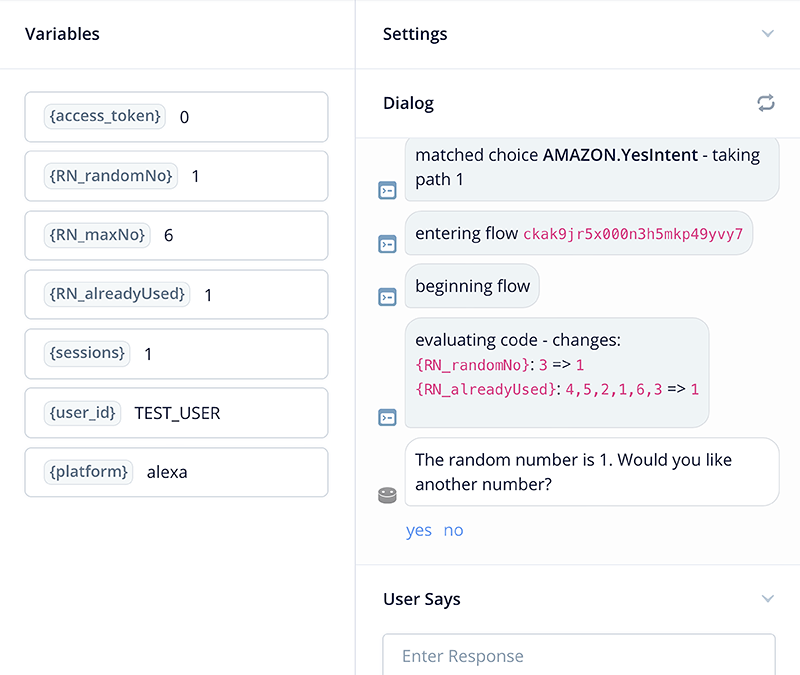
Generate another random number. The result is 1. Because we have the maximum set to 6, tracking the generated random numbers should start over. Notice the array variable has been cleared, and is now storing the number 1.
Note that it is possible that the seventh number could have been 3 as well, and would result in a back-to-back repeat. As discussed in the tutorial, additional code to check for this can be added, if this is a potential issue for your skill’s use case.
Test 5:
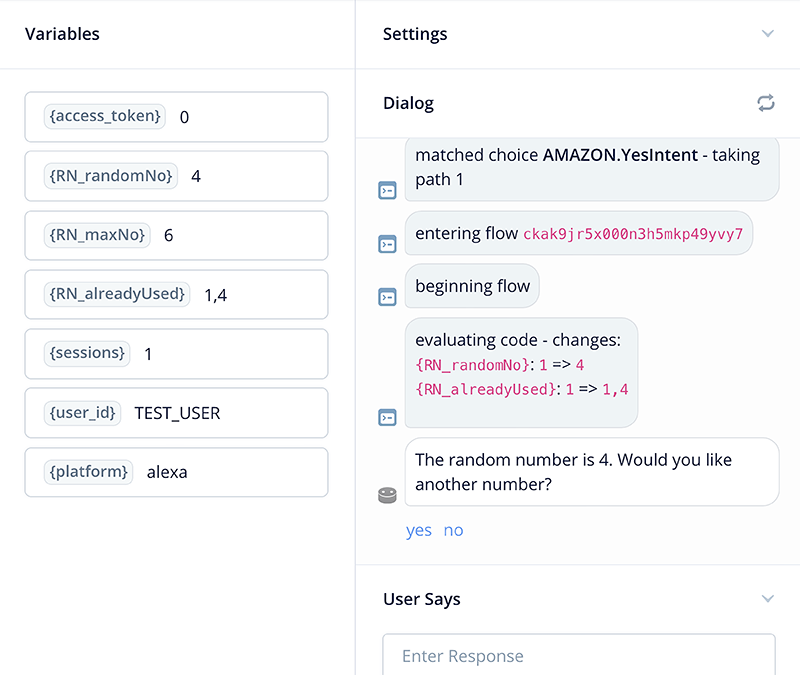
Generate another random number. In our case the result is 4. Inspect the array variable, and notice it continues storing generated random numbers as before. Testing is successful.
Part 3: Alexa Developer Console (ADC) Tests
This set of tasks walks you through a series of tests of your skill on the Alexa Developer Console (ADC), to confirm the random numbers are generating correctly.
The benefits is to confirm your skill, both random number generation, and other features, are running correctly on the Alexa platform. Also for certain skills, such as those with long audio, testing using a device such as an Echo smartspeaker is of value as well.
Upload to Alexa. Test using ADC (can also use an echo device).
Test 1:
Open Random Number Generator. Upon launching the skill should return a random number.
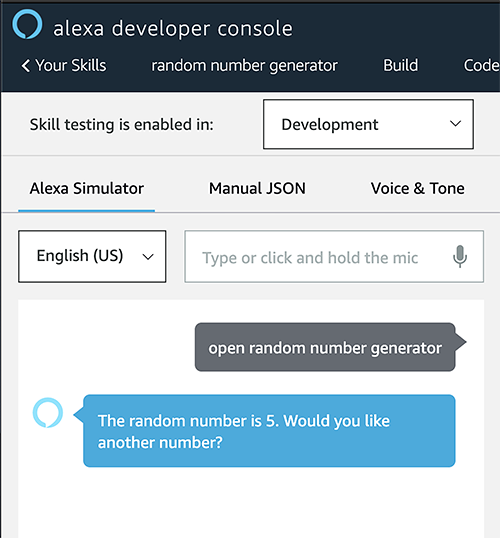
Random number 5 has been returned. Testing is successful.
Test 2:
Answer “yes” to the prompt, and generate several more numbers. Notice the numbers are not duplicates of each other. Testing is successful.
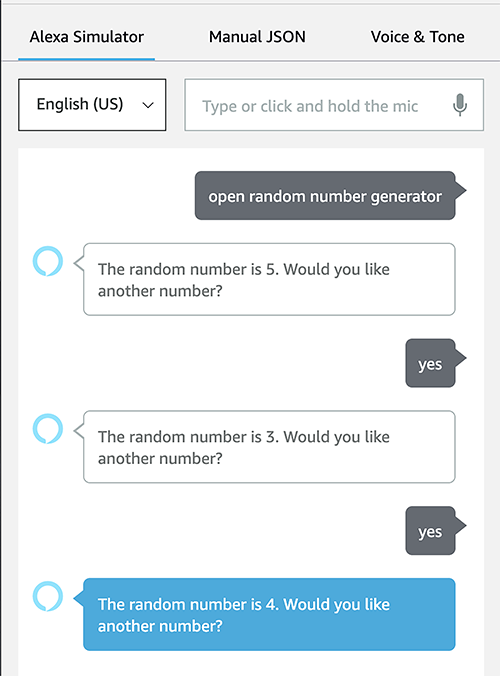
Test 3:
Generate a total of six numbers. In our case, we have 5 3 4 2 6 1. The skill was able to generate six non-repeating numbers. Testing is successful.

Test 4:
Generate a seventh number. Aha! In our case, “1” has been generated. If we look at all 7 numbers, we have 5 3 4 2 6 1 1.
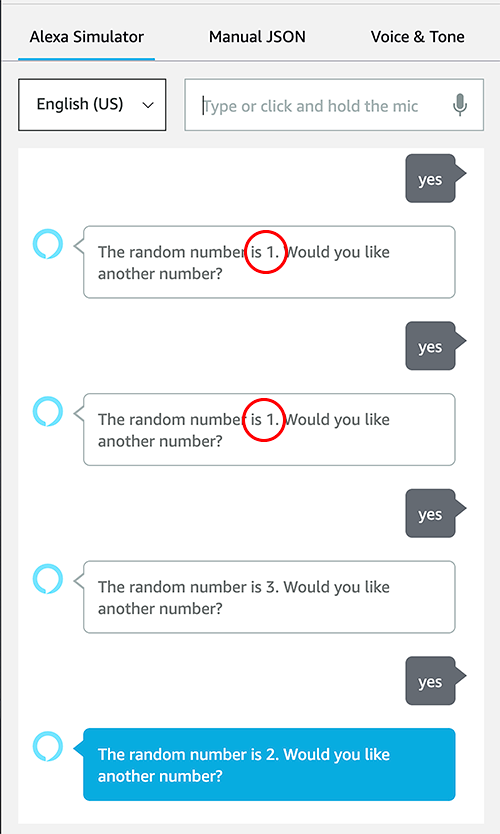
As discussed in the tutorial, this may be desired for some use cases, but not others. If this is a potential issue for your skill’s use case, additional code can be added to avoid this type of back-to-back situation if it is a potential issue for the user’s experience.
Test 5:
Continue generating random numbers and inspect the results.
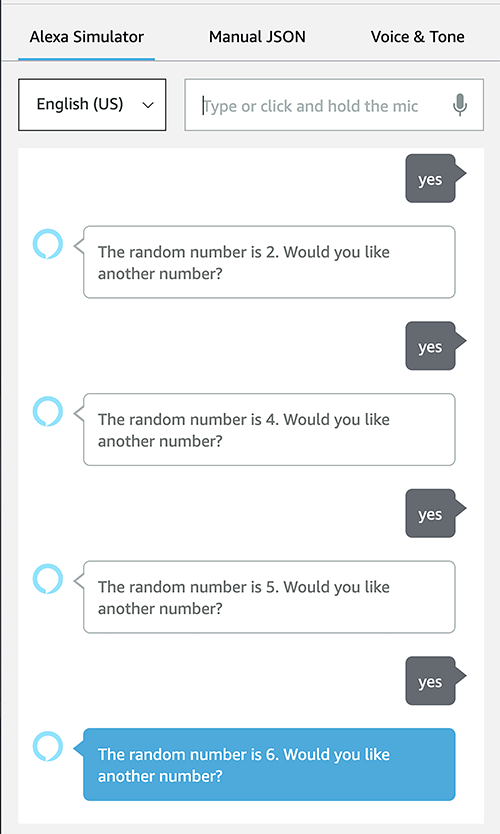
At this point, testing has been successful.
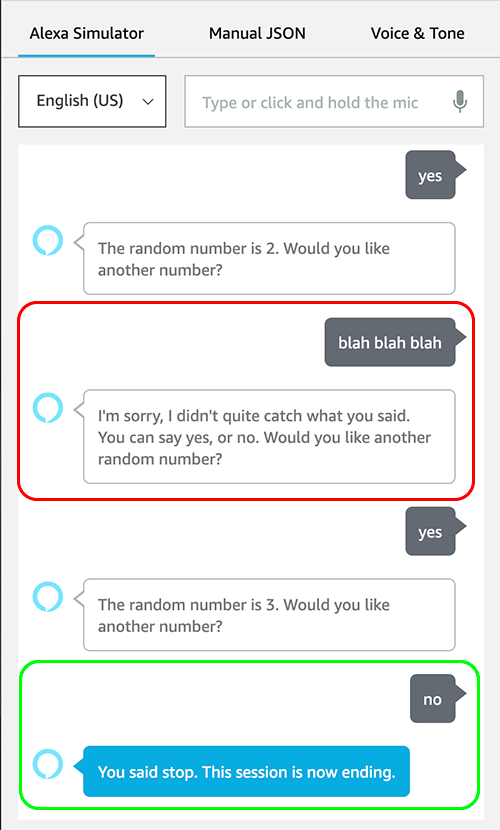
Also, test by saying “blah blah blah” at the prompt, to confirm the “else” configuration is working. As can be seen below , a reprompt plays, and testing is successful.
Continue and test the reprompt and generate another random number, to confirm the skill can recover. As can be seen in the example, 3 was generated.
Finally, test by saying “no,” to confirm the skill will proceed to the Stop flow.
All the tests have been successful.
Conclusion
Generating random numbers can be done using Voiceflow using a variety of techniques, and it is good to know several so that you have options that will best fit your specific use cases.
This tutorial provides a way of generating non-repeating random numbers in Voiceflow projects. It utilizes the Custom Code block. In this case all the numbers in the range will be used before there are repeats.
Thank you for reading, and happy skill building!
Credits
Header photo by www_slon_pics on Pixabay