

Update: Based on preview feedback (3/9/19)
- Added Code block with URL encoding for the search variable. Thank you, Nicolas Arcay Bermejo, for this suggestion.
- Added “Lower” to the URL “Filter by Formula” to mitigate the risk of errors related to uppercase versus lowercase when searching for records in the Airtable. Thank you, Dave Curley and Nicolas Arcay Bermejo, for this suggestion.
Introduction
This tutorial describes how to use Voiceflow to GET a specific record from an Airtable using the Filter by Formula option.
We will create a small test Airtable and configure a test Voiceflow skill. We will include configuring an Interaction block with a list slot type and capturing the user’s choice into a variable.
We will then include the user’s choice in the API call to the Airtable, and retrieve all the associated values from a single record into Voiceflow variables.
We will also illustrate how to test and confirm everything is working. Testing will include reviewing risks associated with uppercase versus lowercase letters, and how we are able to mitigate these risks.
The benefits of using Airtable is being able to easily retrieve sets of interrelated data in records. Using GET, with Filter by Formula, we can fetch a specific record based on user input within a voice skill.
WARNING: Airtable provides a generous free tier. If you are using the free tier, be aware you may need to upgrade to a paid plan should you exceed the thresholds. Likewise, Voiceflow also provides a generous free tier. Be sure review the pricing plans and tier limitations for both.
Level: Intermediate
This tutorial assumes you are familiar with the basics of both creating Airtable bases and Alexa skills using Voiceflow. If you have never used Voiceflow before, it is recommended reviewing the next section, entitled “Prerequisites for Beginners.”
Prerequisites for Beginners
If you haven’t developed an Amazon Alexa skill before, or haven’t used Voiceflow, the following are recommended as prerequisites:
- Set up an Amazon Developer account. It is free:
Amazon Alexa Developer Home Page
2. Set up a Voiceflow Account. They offer a generous free tier from which you can design, develop and publish Amazon Alexa skills:
3. Try some of the Voiceflow University tutorials and practice making a skill or two. There is an introductory video series, along with extensive reference documentation.
Voiceflow Basics Tutorial Series
4. Join the Voiceflow User’s Group on Facebook. The community is very supportive should you have questions or issues when building skills, as well as a lot of tips, techniques and camaraderie.
Reference Documentation
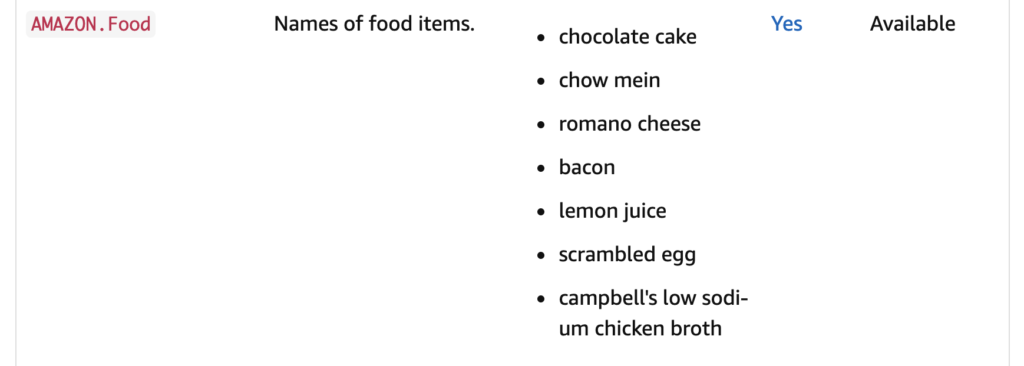
This tutorial includes using an Amazon built-in list slot type, AMAZON.Food. It will be used in the Voiceflow Interaction block.
The demo skill includes prompting the user for the name of a food. The list slot type will provide a way to capture the name of the food requested by the user.
The list of Amazon built-in list slot types are available in the following document in the “list slot type” section:
Amazon Slot Type Reference: List Slot Types
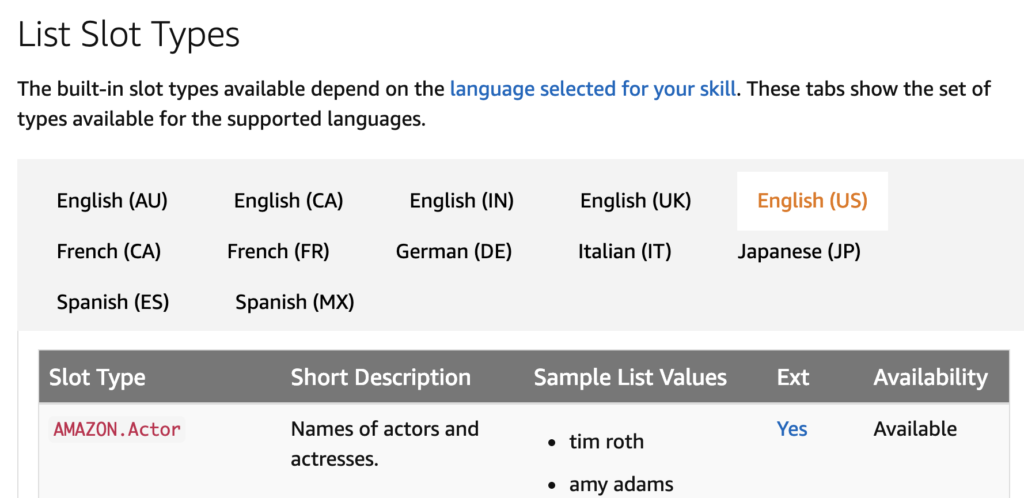
We will be using list slot type for AMAZON.Food.
IMPORTANT: The availability of list slot types varies by language/region. When designing your skill, be sure to check by clicking on the language/region buttons in the reference documentation. For this tutorial, AMAZON.Food is available in all five English regions.
Note: While this tutorial uses an Amazon pre-defined list slot type, these techniques will also work with a custom slot type.
Mock Business Requirements
Let’s suppose a client provides the following business requirements:
Build an Alexa skill which enables health concious grade school kids to ask for information about foods we sell in our school system’s cafeterias.
There will be smart speakers at each food station in the cafeterias. The food is self-serve, and we want to empower our students to be make healthy food choices.
When the user asks about the food, Alexa will recite a fun fact about the food, the serving size, and the number of calories for the serving size.
There will be a total of 350 food items, and should be scalable, as we may add more food choices when funding permits.
The name of this voice skill should be Food Guru.
— Business requirements for Food Guru
Mock Script
You also receive the following example interaction of a “happy path” conversation as part of the business requirements.
Demo Script – Food Guru
Student: Hey Alexa! Open Food Guru!
Alexa: Welcome to Food Guru! What food do you want to learn more about?
Student: I want an apple!
Alexa: Awesome! Apple is my favorite! Fun fact. Apples float because they are 25% air. One apple has 95 calories.
— Demo Script
Test / Demonstration Skill
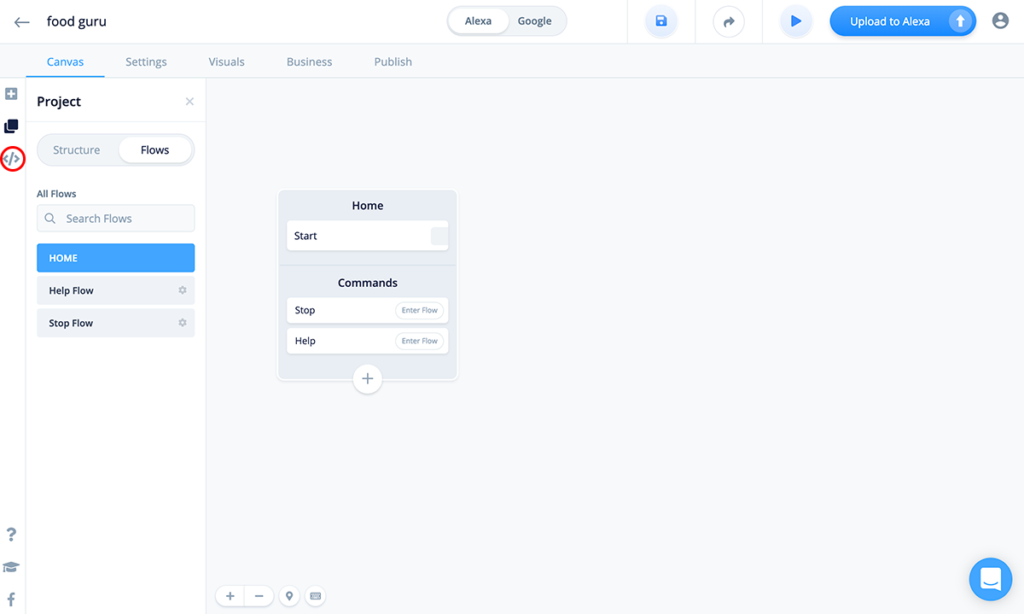
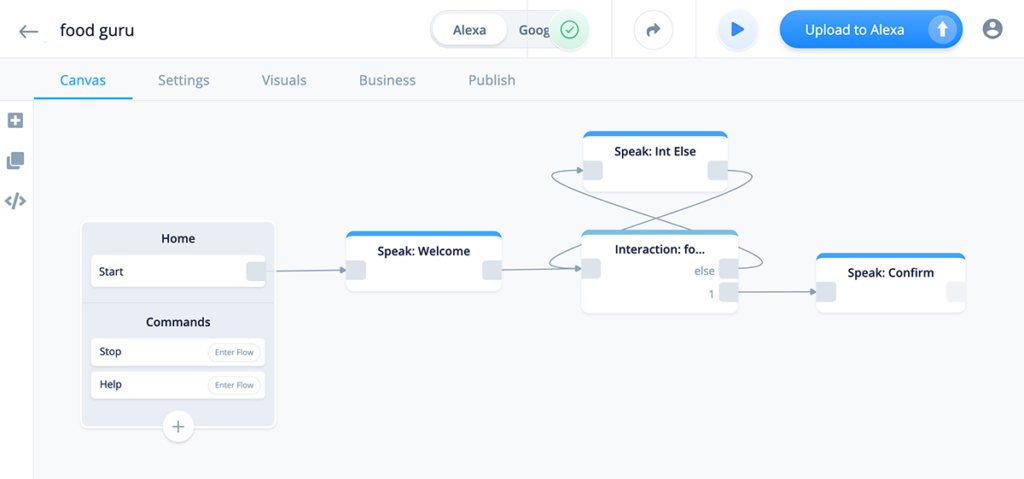
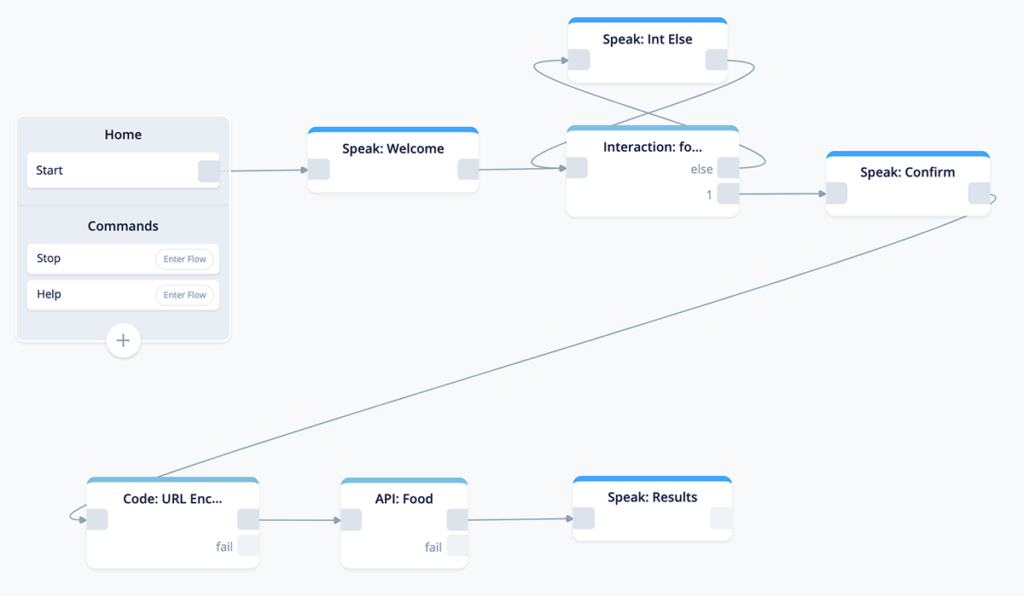
Here is how our completed test / demo skill will look on the Voiceflow project canvas.
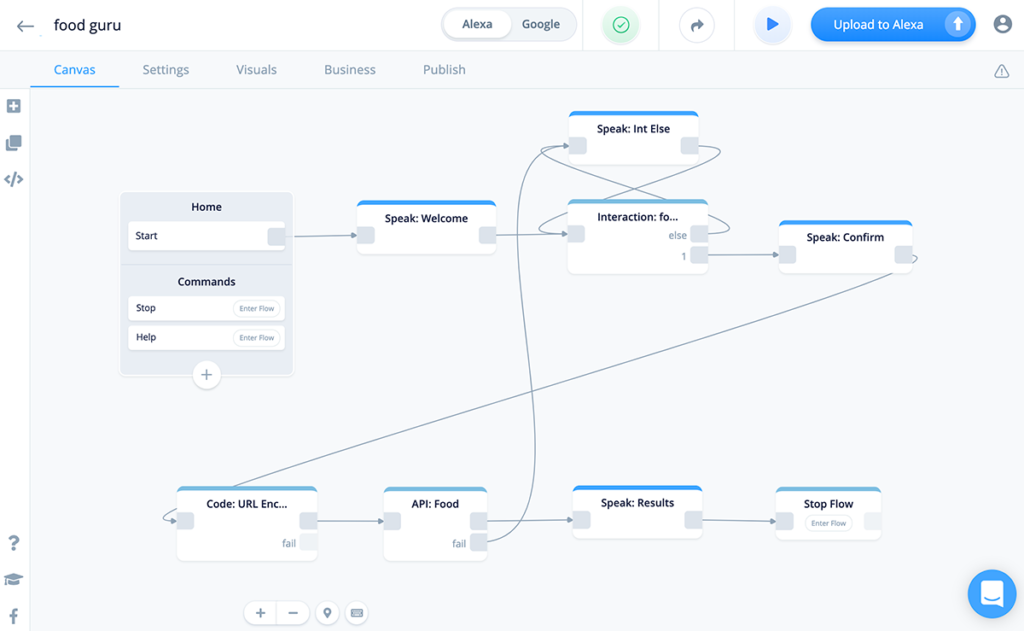
During this tutorial, we will configure each block, from left to right, as well as upload to Alexa for testing. If you wish, you can either drag all of the blocks onto the canvas right away, or add them one at a time and connect them as we proceed through the tutorial.
Task Summary
This tutorial is organized into seven parts.
Part 1 – Build an Airtable base
Task 1: Add a new Airtable base and table
Task 2: Configure the table columns
Task 3: Add five test records to the table
Part 2 – Design Airtable API URL with Filter-by-Formula
Task 1: Locate Airtable API documentation
Task 2: Work with the URL for GET and Filter-By-Formula
Task 3: Work with the Airtable API Header Authorizations
Task 4: Review the API Documentation Example Response
Part 3 – Begin a Voiceflow Project
Task 1: Create a Voiceflow project
Task 2: Add variables
Task 3: Add a Speak block (Welcome)
Part 4 – Add a Voiceflow Interaction Block
Task 1: Add an Interaction block (foodSearch)
Task 2: Add a list slot type to the Interaction block
Task 3: Add intents to the Interaction block
Task 4: Add a choice to the Interaction block
Task 5: Add slot mapping to a variable in the Interaction block
Task 6: Add a re-prompt for the Interaction block
Task 7: Add a Speak block (Interaction Else)
Task 8: Add a Speak block (Confirm)
Task 9: Add a Code block for URL encoding
Part 5 – Add a Voiceflow API Block
Task 1: Add an API block
Task 2: Add a URL endpoint
Task 3: Add an API header authorization
Task 4: Test the API endpoint
Task 5: Add result variable mapping and assign to variables
Part 6 – Complete the Voiceflow Project
Task 1: Add a Speak block (Results)
Task 2: Connect the API Fail port
Task 3: Add a Stop/Flow block
Task 4: Review completed project
Part 7 – Test on Alexa Developer Console (ADC)
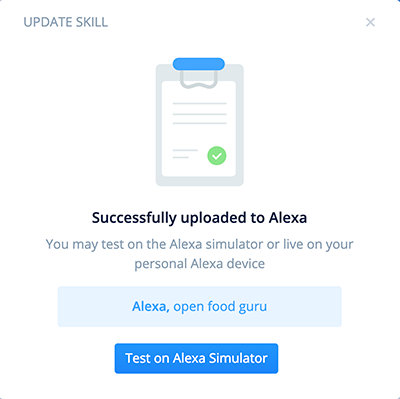
Task 1: Upload to Alexa
Task 2: Test Case 1
Task 3: Test Case 2
Task 4: Test Case 3
Task 5: Test Case 4
Part 1 – Build an Airtable base
This set of tasks walks you through building a small Airtable base. It will be named “FoodGuru.” The base will have a table named “Foods.”
This table will have some information about five different foods. Each food will be a record with additional information (total of four columns).
User’s will be able to ask for the name of a food, which will be stored in column 1. The other columns will store the serving size, the number of calories, and a fun fact about the food item.
Task 1: Add a new Airtable base and table
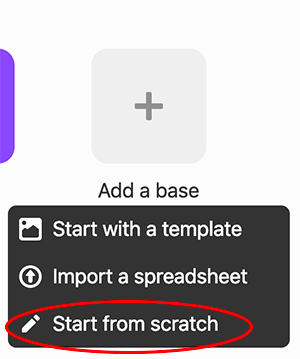
In your Airtable dashboard, add a new base.
Select the “Start from scratch” option.
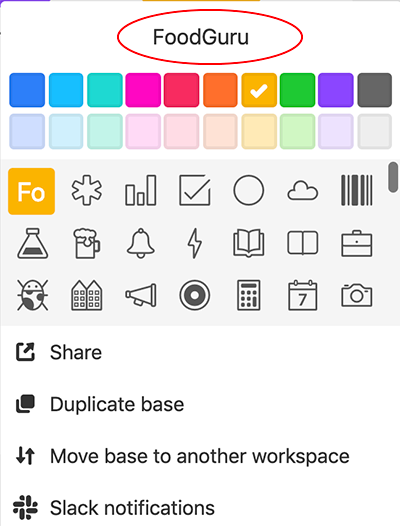
Name your new base “FoodGuru”.
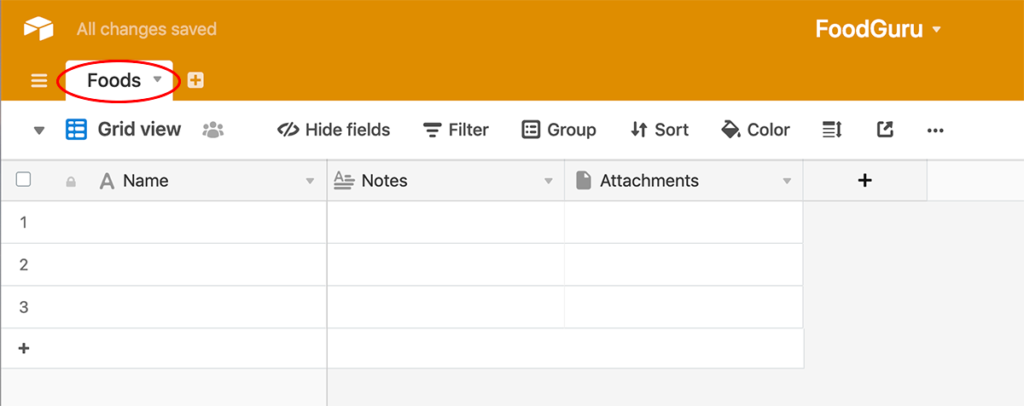
The default table name is “Table 1”.
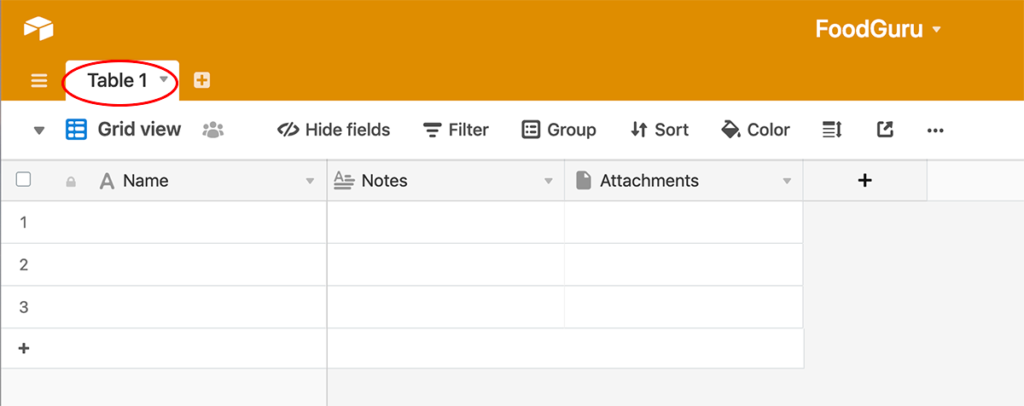
To help keep things clearer, let’s rename it to “Foods”.
Task 2: Configure the table columns
Column 1
The default column name for the first column is “Name”.
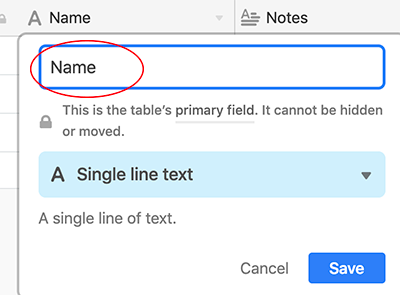
Change to “Food.”

This column will store the names of foods (apple, avocado, etc.). The column’s data type is already set to “single line text” to match the values we plan to use. Also, this is the table’s primary key, and should be unique.
Once the Alexa skill is built, we will be searching for records based on a search term in this column.
Columns 2 and 3
Change the column names for columns 2 and 3. Current names:
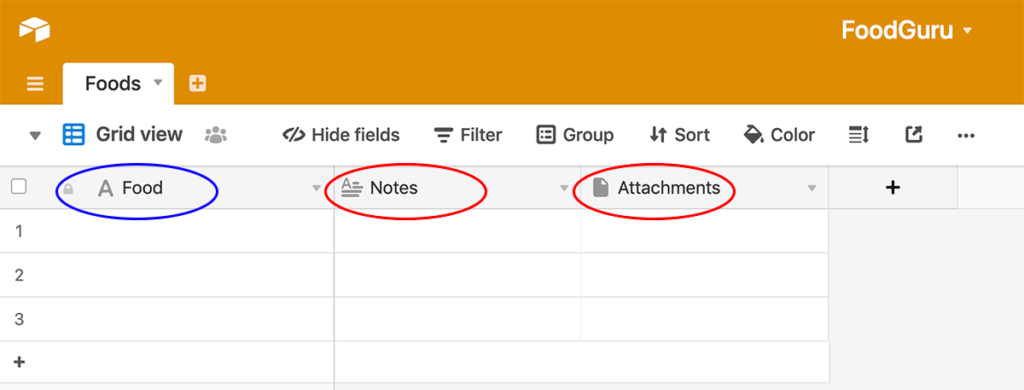
New name and data type for column 2:
ServingSize will be values such as “one,” “quarter cup,” “five ounces” etc.
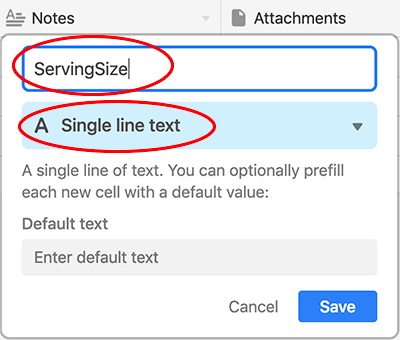
New name and data type for column 3:
The Calories column will store the number of calories for each food record.
Column 4
This is the table so far.
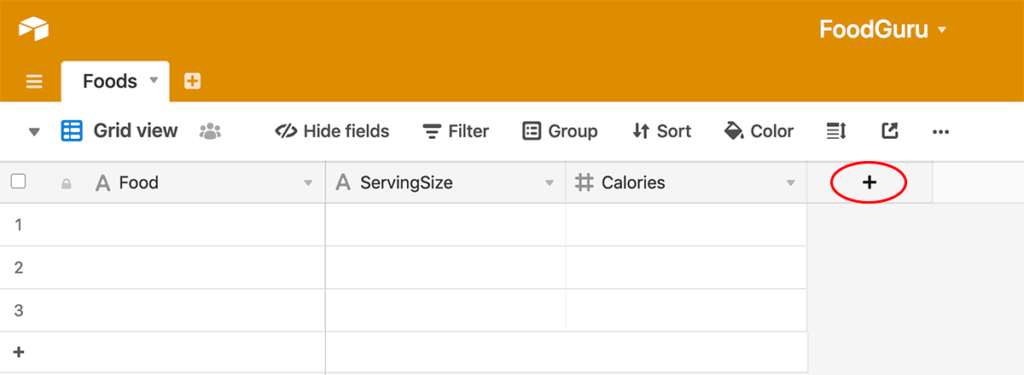
We want to add a fourth column. Click the “+” and add the following column:

This will store a “fun fact” about the food. Data type “Long text” is appropriate, as a fact might potentially be long.
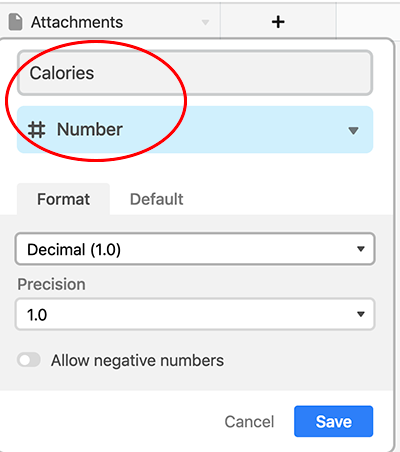
Completed Table
After editing and adding the columns, the table should look similar to this:
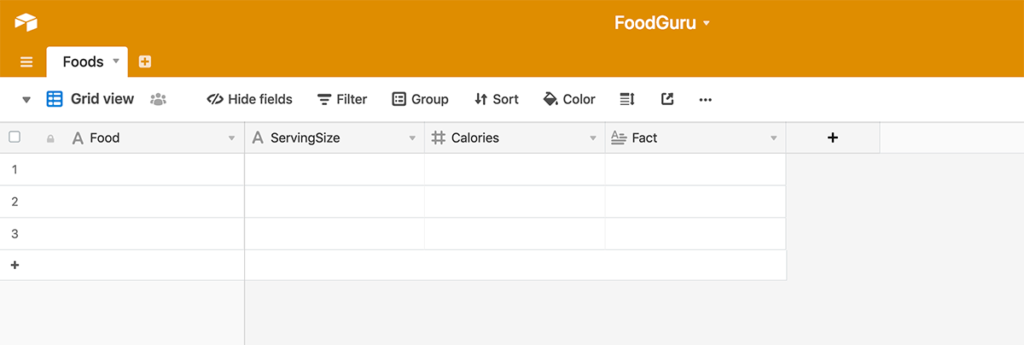
We are ready to add some test records.
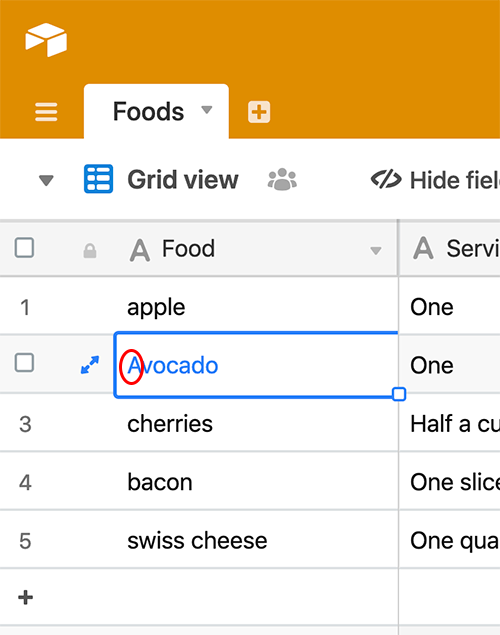
Task 3: Add five test records to the table
Add five test records as shown below:
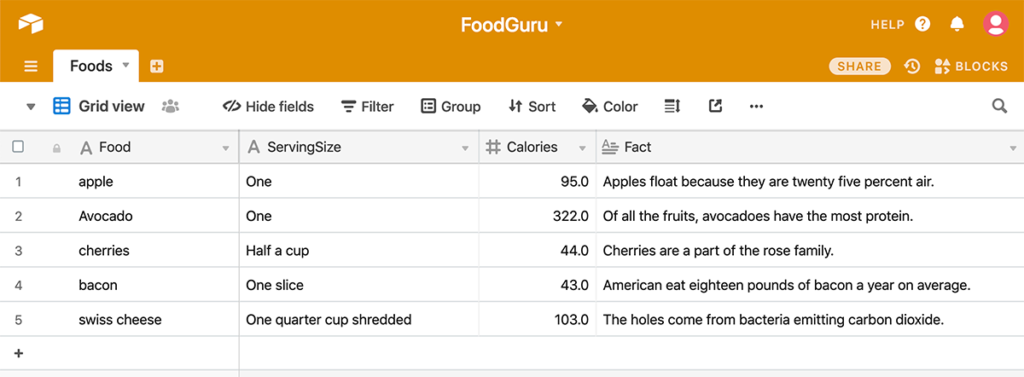
If you are following along in the tutorial, you can copy and paste the values from here:
apple
One
95
Apples float because they are twenty five percent air.

Avocado
One
322
Of all the fruits, avocadoes have the most protein.

cherries
Half a cup
44
Cherries are a part of the rose family.

bacon
One slice
43
American eat eighteen pounds of bacon a year on average.

swiss cheese
One quarter cup shredded
103
The holes come from bacteria emitting carbon dioxide.
IMPORTANT: We are including two special test cases related to uppercase versus lowercase.
The first will be that the first letter of “Avocado” is capitalized in the Airtable. This is because the search will be case-sensitive, and “avocado” is all lowercase letters in the Amazon list slot type AMAZON.Food.
The second will be that the first letter of “swiss cheese” is NOT capitalized in the Airtable. However “Swiss cheese” is capitalized in the Amazon list slot type values.
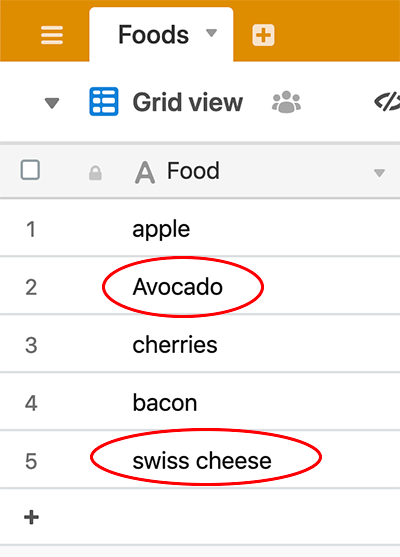
There is a risk is of a mis-match between the value coming from the Amazon list slot type, and the corresponding value in the Airtable due to uppercase versus lowercase, which may result in the record not being found. Later in the tutorial, we will mitigate this risk in the configuration.
Note: This tutorial is using a very small table for demo and testing purposes only. If this were a real skill, the plural values for many of these foods would also be included. For example, “apples,” “avocadoes” etc.
Our Airtable is ready for use.
Part 2 – Design Airtable API URL with Filter-by-Formula
This set of tasks walks you through locating the API documentation for your Airtable, working with the URL to configure a “Filter by Formula” option, and reviewing the authorizations that are needed as part of an API call.
Task 1: Locate Airtable API documentation
A nice feature about Airtable is that they provide custom API documentation for each individual table.
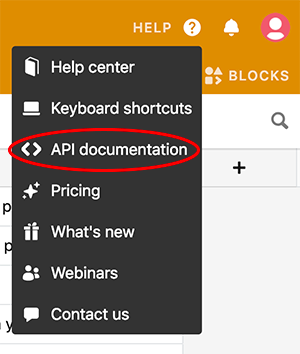
Click on either “help” or the small question mark inside the circle, in the upper right corner of the Airtable “Foods” table.

In the dropdown, select “<>API documentation”.
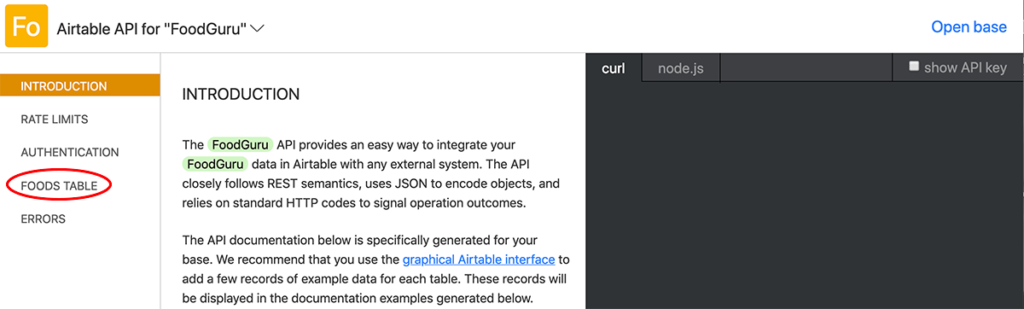
Custom API documentation for Airtable base “FoodGuru” will open up. Select “Foods Table” in the left hand pane. This is custom documentation for your test table.
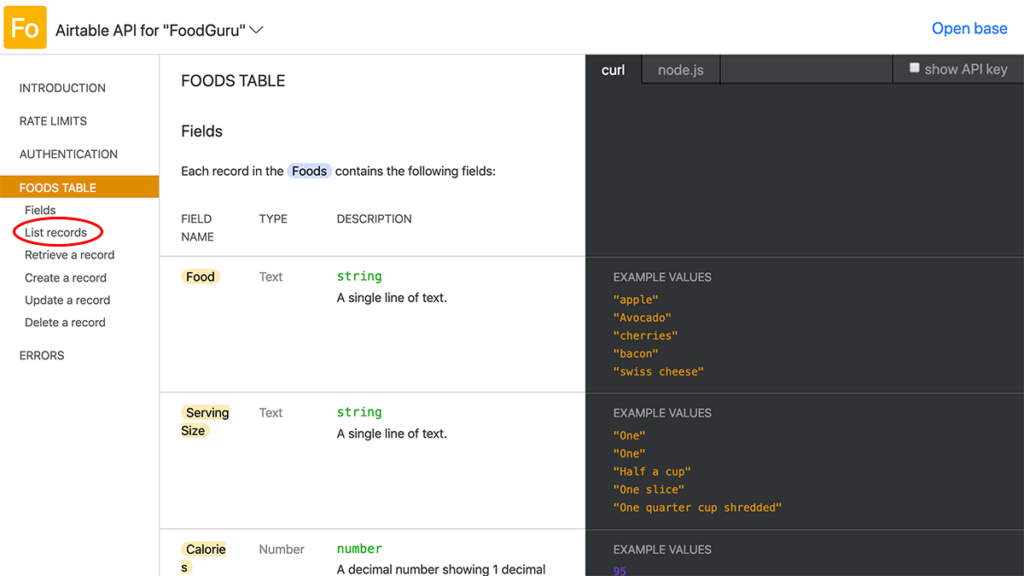
A submenu will open up. Select “List Records” in the “Foods Table” submenu.
In the middle pane, there is general information about how to use a GET request list records in the “Foods” table.
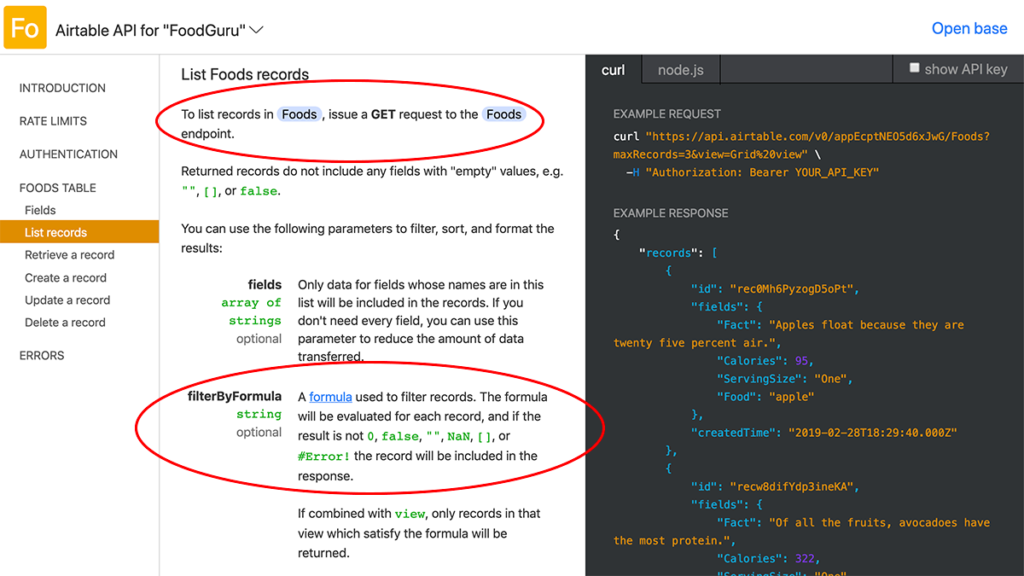
There is also general information about the use of “Filter by Formula”.
For this tutorial, we will be performing a simple query using a search term in a single column.
However more complex formulas can be developed. To learn more about formulas, use the blue “formula” link for additional options, or review the documentation here:
Airtable Formula Field Reference
Let’s focus in the Example Request / Response pane on the right side, in the “curl” tab.
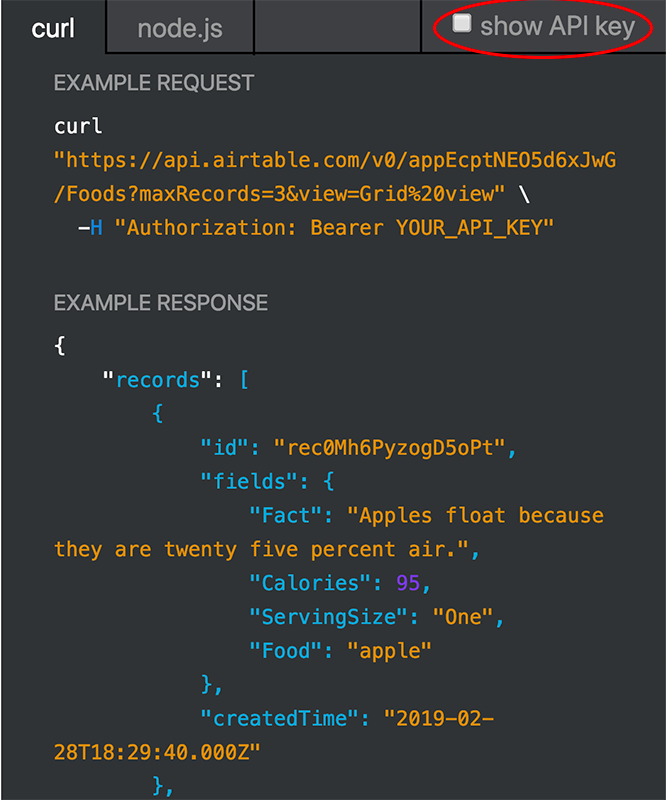
There are three things to note in the above example request / response.
- First is the “curl”. We will work with this URL and append a “Filter by Formula” option.
- Second is the Header authorization.
- Third is the Example Response, and what it looks like.
We will work with each of these during the next three tasks.
Task 2: Work with the URL for GET and Filter-By-Formula
In the “Example Request” let’s focus on the curl:
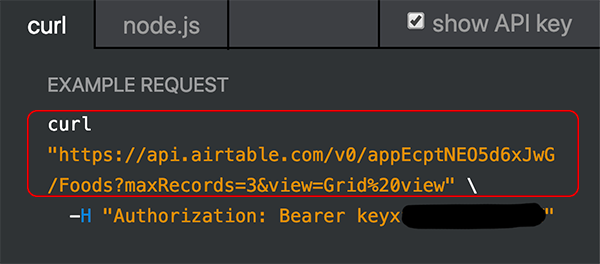
For your demo skill, copy and paste the URL in between the quote marks to Notepad or something similar. For this tutorial’s demo skill, the URL is this:
https://api.airtable.com/v0/appEcptNEO5d6xJwG/Foods?
maxRecords=3&view=Grid%20view
Next, delete everything after the question mark (?). We will only be retrieving one record, and we want all the columns. The demo skill URL now looks like this:
https://api.airtable.com/v0/appEcptNEO5d6xJwG/Foods?This would normally retrieve all the records in the table. However we want to retrieve only one record, based on a search value in the “Food” column. To do this we will use the following “Filter by Formula” option.
filterByFormula=Lower(Food)=Lower("{foodSearch}")Let’s break this down.
- “filterByFormula” is defined as an option in the documentation for List records we reviewed earlier.
- “Food” is the name of the first column.
- “Lower(Food)” changes the values being searched in the Food column to all lowercase letters. For example, “Avocado” versus “avocado.” This will reduce the risk of a record not being found due to uppercase / lowercase differences.
- “{foodSearch}” is the variable name we are going to use in Voiceflow. It is the search term. Before the API block is called, the skill will populate this variable with the name of a food specified by the user.
- “Lower(“{foodSearch}”)” converts the search term to all lowercase letters. This is being done because some values in the Amazon list slot types have uppercase letters. For example, “Swiss cheese” versus “swiss cheese.” By making the values in both sides of the equation all lowercase, this mitigates the risk of an unintended mis-match.
- The second equal sign (“=”) means that we will search the Airtable Food column for a value equal to the variable. The resulting formula will retrieve that record if found.
To build our URL, append the Filter-by-Formula after the question mark in the URL we are working on, as shown below.
https://api.airtable.com/v0/appEcptNEO5d6xJwG/Foods?
filterByFormula=Lower(Food)=Lower("{foodSearch}")
The above will be used in the Voiceflow API block for the demo skill. For your test skill, be sure to have your version saved off in Notepad or something similar.
Task 3: Work with the Airtable API Header Authorizations
Airtable requires the use of a header authorization when accessing a table via an API.
In the Example Request pane of the API documentation, review the following.
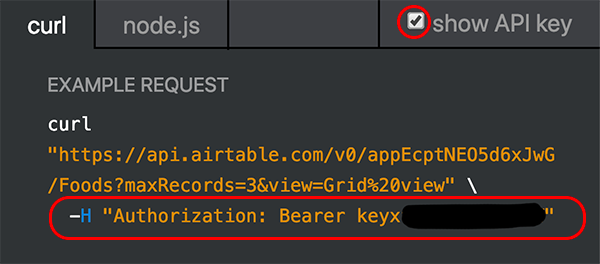
First, you will need your secret API key. The easiest way to access it is to check the “show API key” checkbox.
Second, you will need the text for “Authorization.”
These will be added to the Voiceflow API block later in the tutorial as paired Header values.
Headers (Pair)
key: Authorization
value: Bearer key999999999999
You can save these to a text document. Or you can plan to come back to the Example Request / Response page for your Airtable API documentation later, and copy and paste directly into the Voiceflow API block.
Task 4: Review the API Documentation Example Response
Another part of the Example Request/ Response to consider are the field return values.
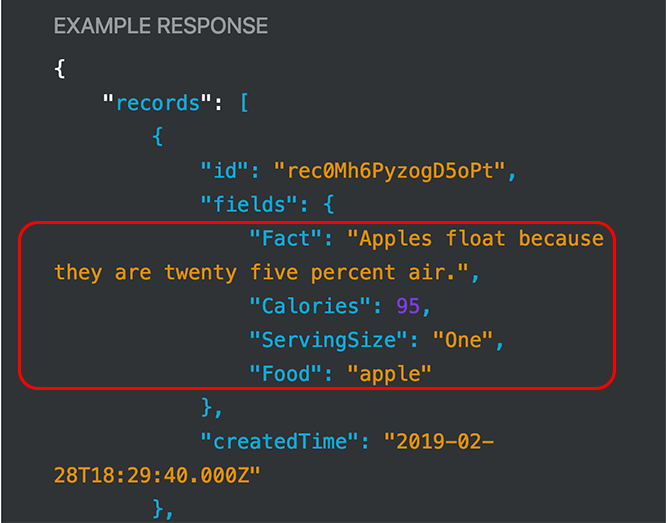
In the above example, all four columns of the table are represented.
Later, when we are configuring the Voiceflow API block, we will be able to test the Airtable URL endpoint. When we do so, we will be able to compare the test results with the above example response. This is of particular value if troubleshooting is needed.
Part 3 – Begin a Voiceflow Project
This set of tasks walks you through initiating a Voiceflow project, adding variables we will need, and configuring the first Speak block.
Task 1: Create a Voiceflow project
Log into your Voiceflow dashboard and begin creating a new project. Our demo skill is named “food guru”, however use whatever you like if you are following along with your own test skill. Also select the appropriate language/Region which fits your needs.
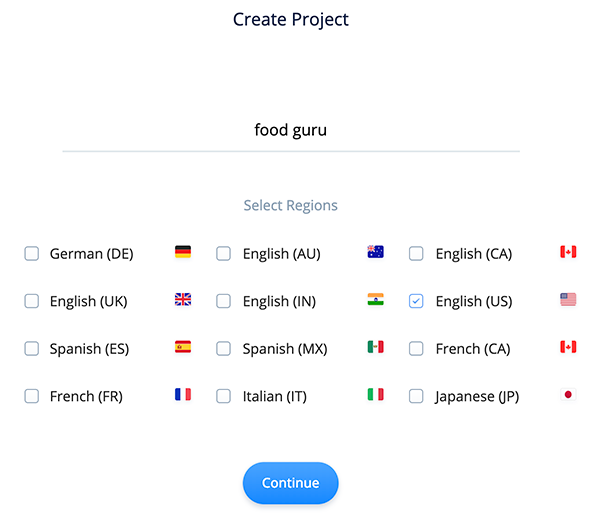
While creating the new project, select the Blank template.
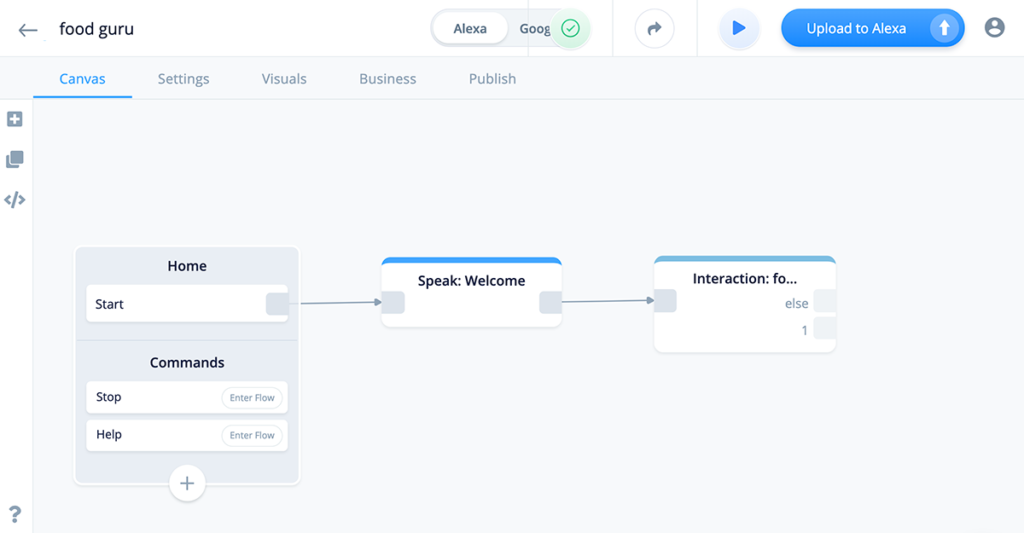
Once the project is created, the project canvas should look similar to this:
Task 2: Add variables
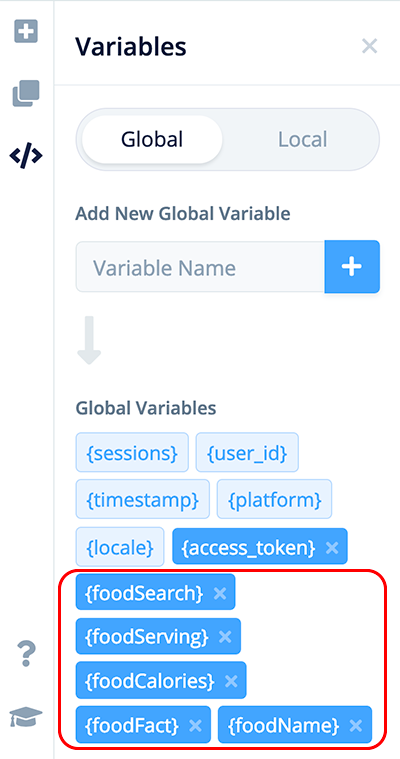
Click on the “</>” icon in the left menu bar to open the variables panel.
There are two types of variables, Global and Local. For your own projects, use the type of variables based on your design requirements. For this small test project, you can select “Global.”

Add the following five variables:
foodServing  // Food portion size
foodCalories // The number of calories for the food portion
foodFact     // A fun fact about the selected food
foodName     // Name of the food selected by the user and
             // recited by Alexa
foodSearch   // Name of food captured in the Interaction block
             // and used as a variable in the API block URL
This is how the variables should appear in your Variables panel:
Task 3: Add a Speak block (Welcome)
Add a Speak block to the canvas as shown below. Connect it to the Start block. Rename it “Speak: Welcome” for clarity.

Add the following text to be recited by Alexa:
Welcome to food guru! What food do you want to learn more about? 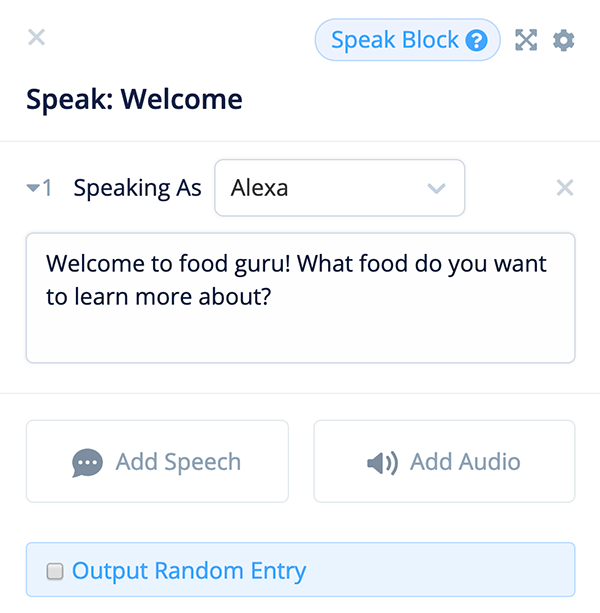
This text both welcomes the user, and prompts them with a question.
Part 4 – Add a Voiceflow Interaction Block
This set of tasks walks you through adding an Interaction block to handle capturing the user’s reply and storing the value in the {foodSearch} variable.
We will be working with a list slot type (AMAZON.Food), adding intents, adding a choice, and mapping the user’s response to a variable.
We will also add a re-prompt message, a Speak block to handle exceptions, and a Speak block to explicitly confirm the user’s reply resolved and was stored in the variable.
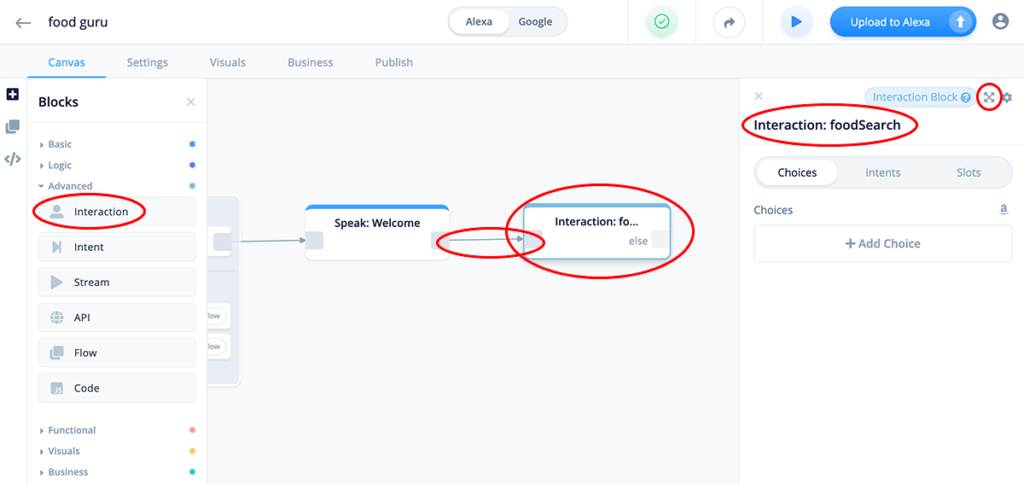
Task 1: Add an Interaction block (foodSearch)
Add an Interaction block to the canvas. Connect it to the “Speak: Welcome” block, and rename the block “Interaction: foodSearch.” Click on the “X” in the upper right corner of the block pane to expand it.
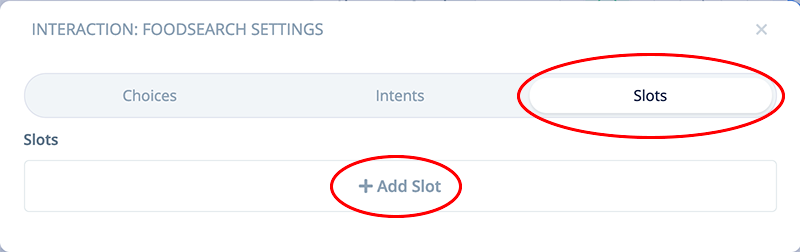
Task 2: Add a list slot type to the Interaction block
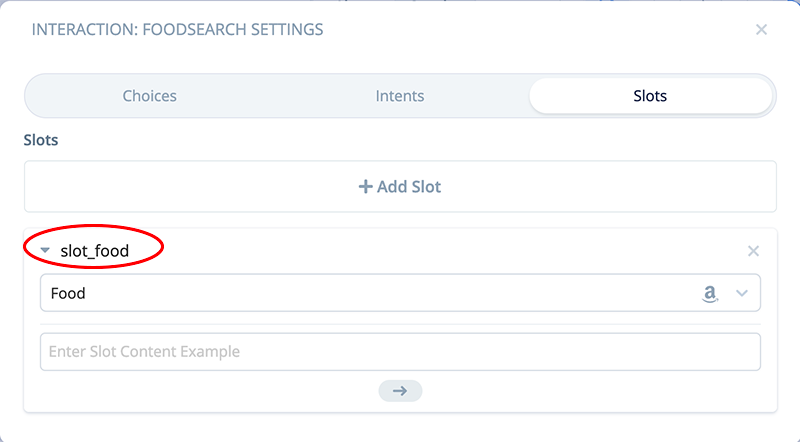
Let’s begin configuring the Interaction block by clicking on the “Slots” tab, and then clicking on the “+ Add Slot” button:
Initially, a row will be added named, “slot_one.”
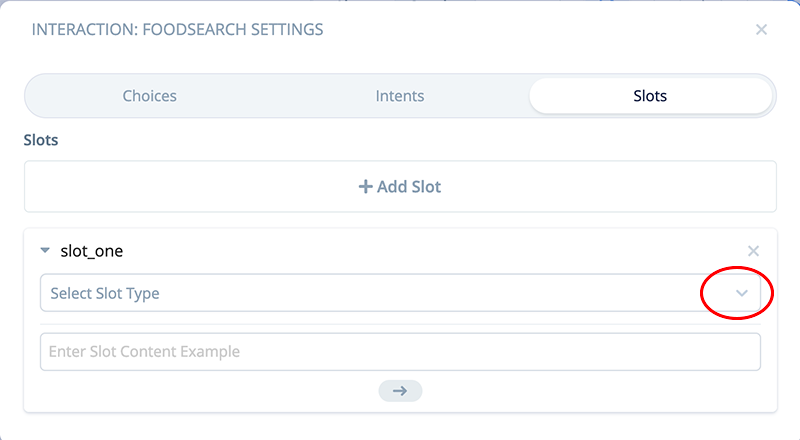
Twirl open the “Select Slot Type” field.
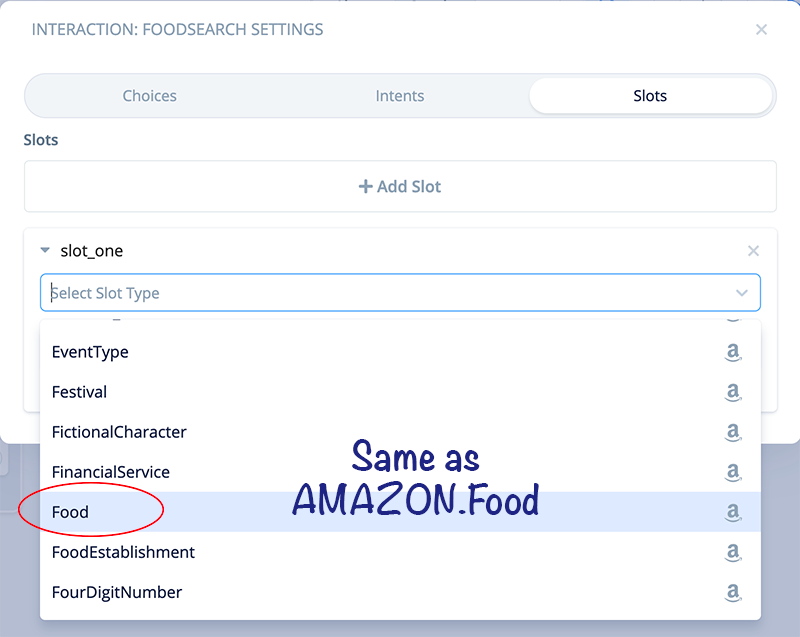
A drop down will open, and display a long list of Amazon pre-built slot types. Find and select the one entitled “Food.” This is the same as the AMAZON.Food list slot type.
Once selected, “Food” should display for “slot_one”

Rename “slot_one” to “slot_food,” to help clarify the purpose of the slot. In larger projects, you might utilize many pre-built and custom slots.
NOTE: In your projects, you can also build a custom slot type if an Amazon prebuilt list slot type doesn’t fit your needs. The techniques for configuring the API block as described in this tutorial should work the same.
The Slots configuration for the Interaction block is completed.
Task 3: Add intents to the Interaction block
Click on the Intents tab of the Interaction block. Once selected, click on the “+ Add Intent” button.

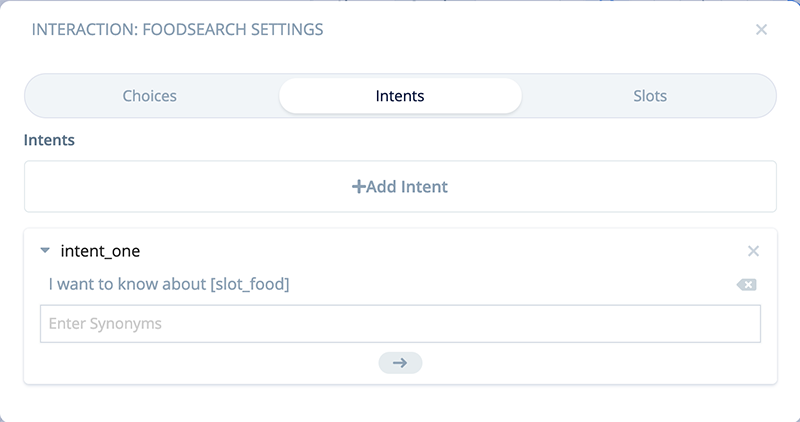
Initially, a row will be added named “intent_one.”
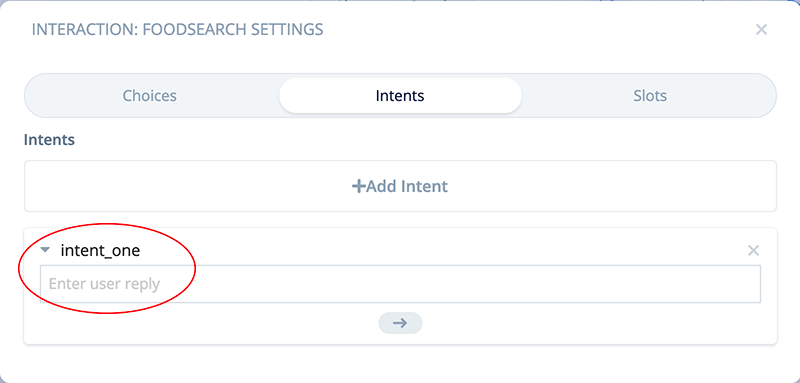
We are going to add several intents. For this tutorial, we will have just a couple example intents. In a real project, you would probably add quite a few.
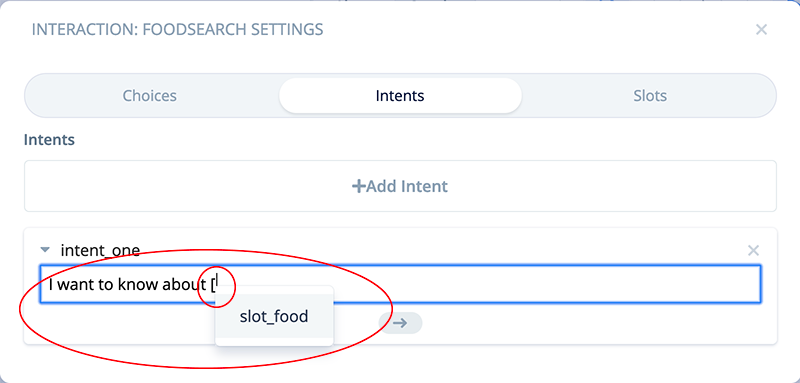
For this test skill, a user might say “I want to know about bacon.”
To generalize this, let’s add the intent “I want to know about [slot_food]”.
While adding this, suggested slot types will display upon typing the “[“. When you see “slot_food” in the autocomplete, select it.
Upon completing the intent, it should look similar to this:
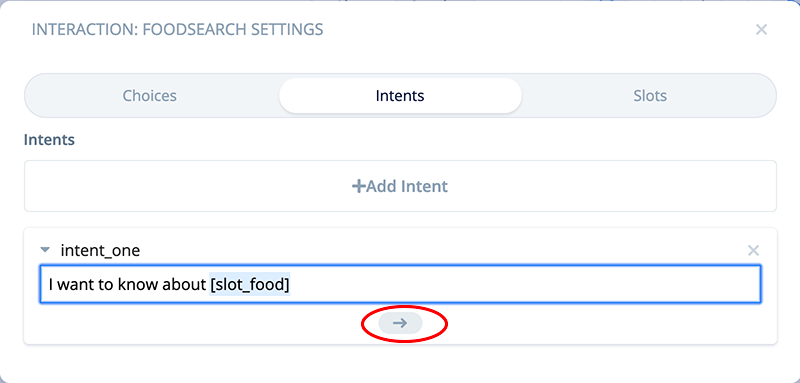
Click on the arrow button. This will both commit the first intent, and open up a second row to add a second intent.
Add additional intents as shown below:
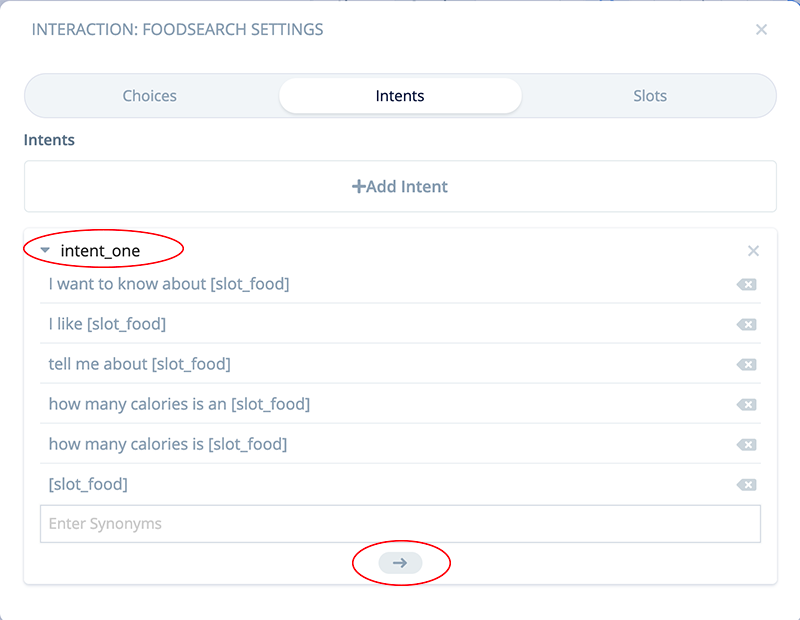
TIP: Do not forget to click on the arrow button to commit adding your last intent (I miss the last one all the time, and it is a fuss to troubleshoot).
Rename “intent_one” to “intent_food” for clarity.
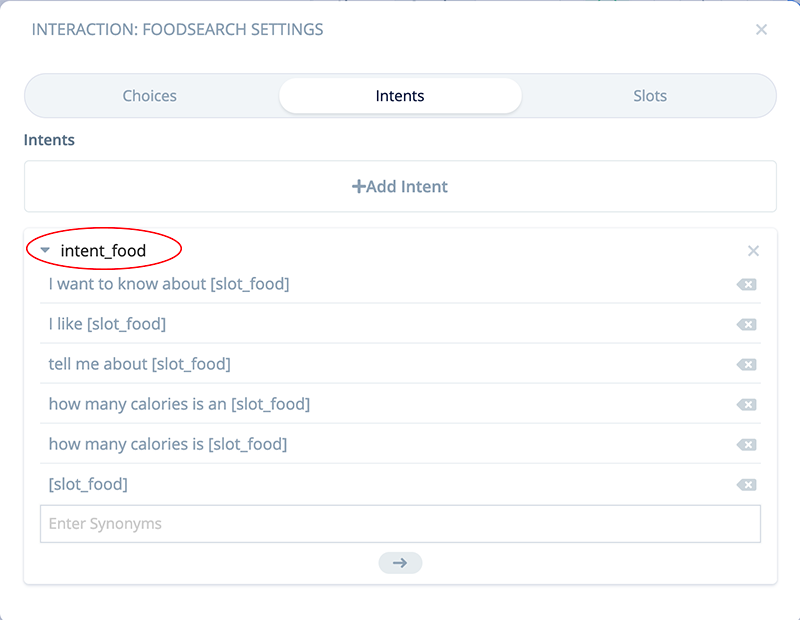
The Intents configuration for the Interacton block is now completed.
Task 4: Add a choice to the Interaction block
In this task let’s add a choice to the Interaction block. Click on the Choices tab. Once selected, then also click on the “+ Add Choice” button.
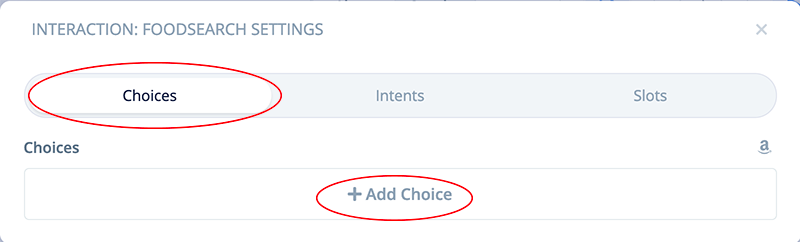
Twirl open the drop down for the “Select Intent” field.
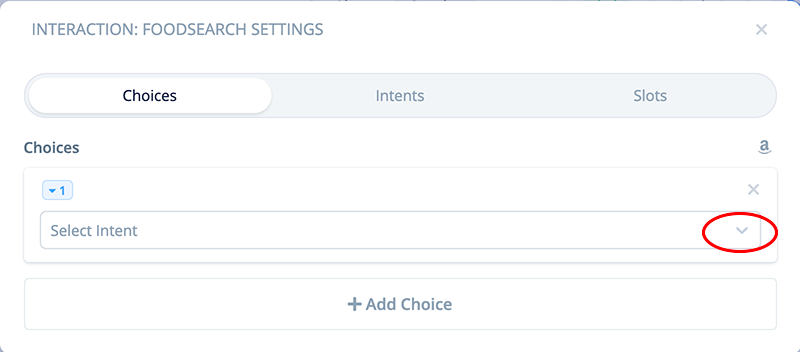
In the drop down, find and select “intent_food” which was created in the previous task.

Once selected, the Choices tab should look like this:
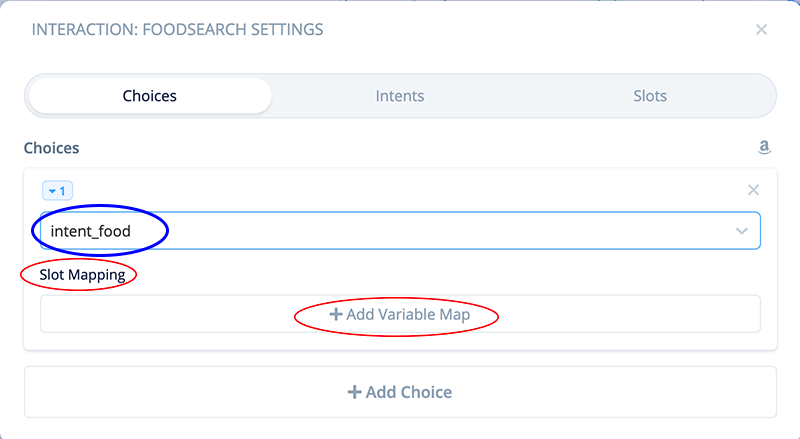
Remain on the Choices tab. The next step will be to add a Slot Mapping.
Task 5: Add slot mapping to a variable in the Interaction block
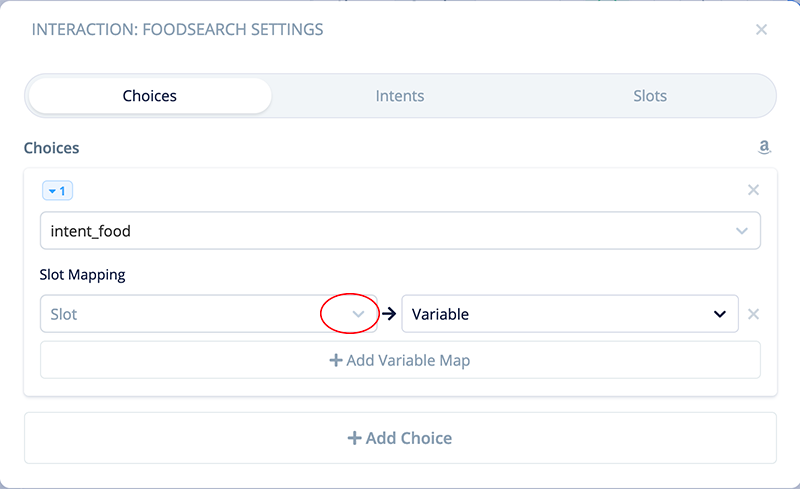
We are still working in the Choices tab of the Interaction block. In the “Slot Mapping” section, click on the “+ Add Variable Map” button.
Twirl open the drop down in the “Slot” field.
In the drop down, find and select “[slot_food]”. We had created this slot based on the AMAZON.Food list slot type.
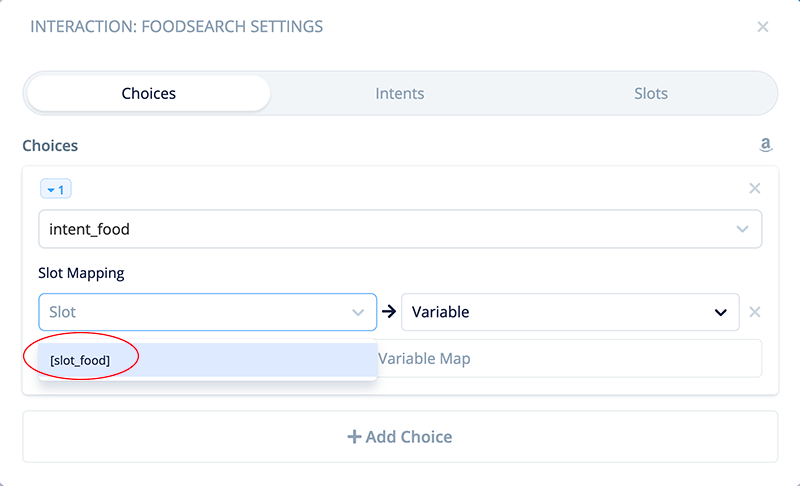
On the left side, “[slot_food]” has been selected. Our next step is to map it to a variable on the right side. Twirl open the drop down for the “Variable” field.

In the drop down, find and select the variable {foodSearch}.
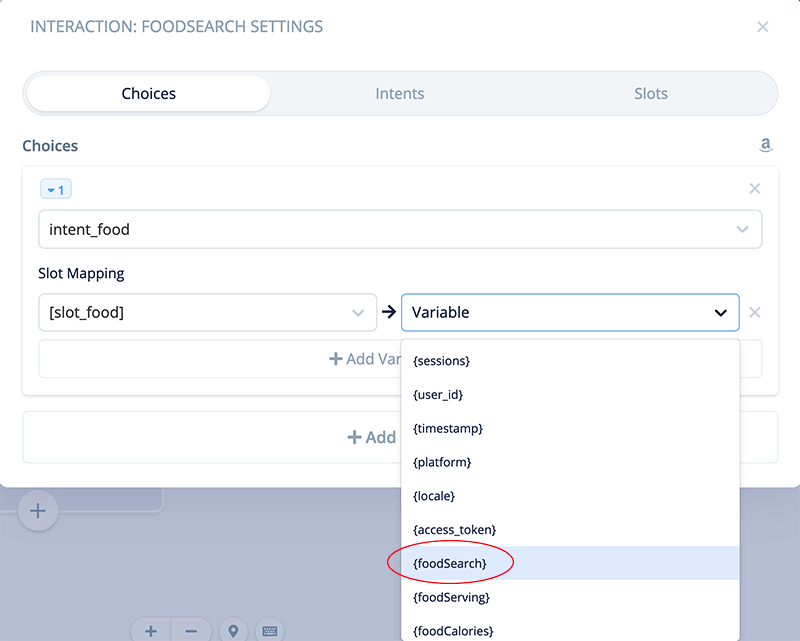
Once the variable has been selected, the Slot Mapping has been configured.
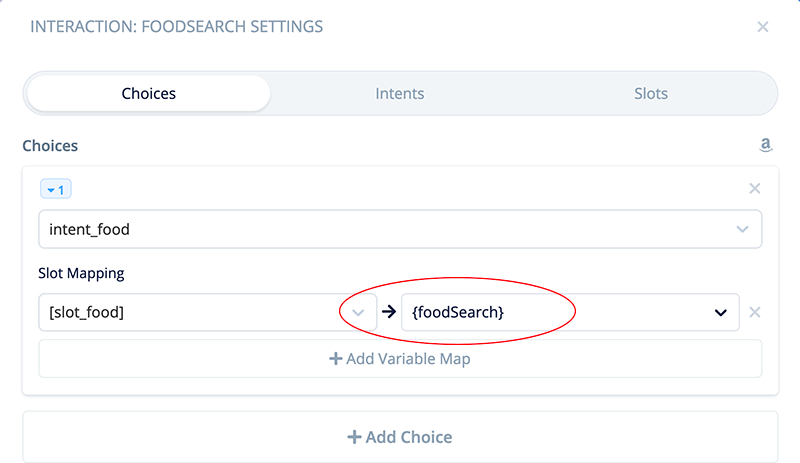
The Choice tab for the Interaction block is now complete.
To summarize, the user’s food choice will be captured into slot_food, and then mapped into the {foodSearch} variable.
Task 6: Add a re-prompt for the Interaction block
In this next step, we are going to add a custom re-prompt. This is used when the user remains silent when prompted with a question.
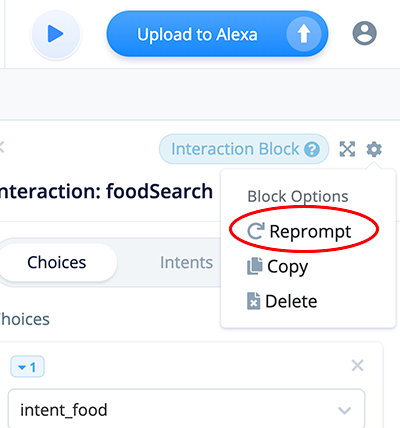
Collapse the Interaction block. In the right hand pane for the Interaction block, click on the gear icon in the far upper right part of the pane.
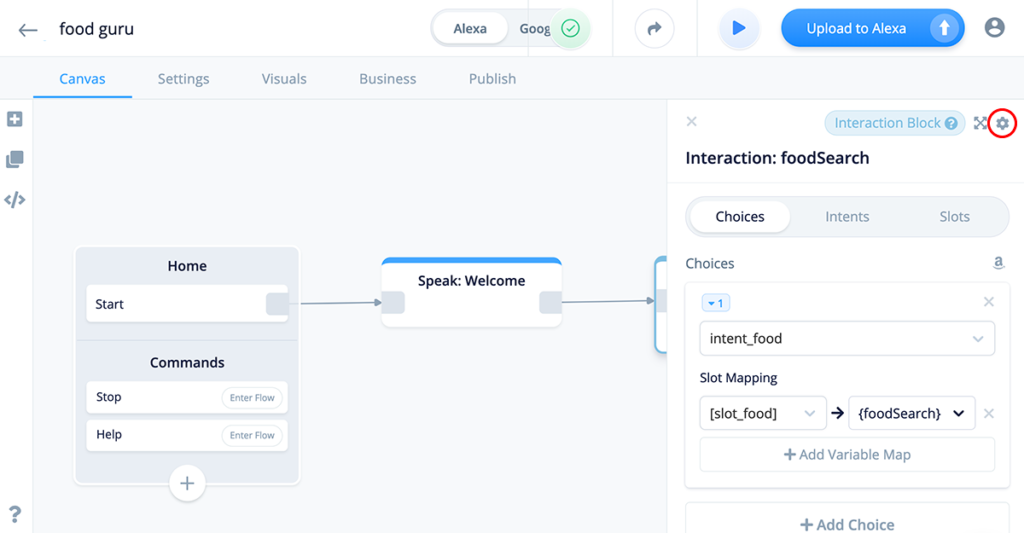
In the gear option, select “Reprompt.”
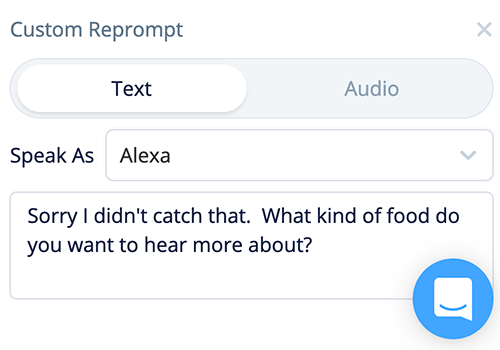
In the Text box, add the following text:
Sorry I didn't catch that.  What kind of food do you
want to hear more about?
Close the Interaction block. The canvas should look similar to this:
Notice there are two exit ports for the Interaction block. In the next task we will configure the Else port.
Task 7: Add a Speak block (Interaction Else)
In this task, we will configure a Speak block to handle unexpected replies from the user. Specifically, it will handle replies which do not resolve and match a value in the AMAZON.Food list slot type.
This Speak block will also be shared with the API block’s “Fail” port, to handle replies which do not exist in the Airtable database.
In other words, it will serve two purposes. However, if you wish, you may want to have two separate Speak blocks with different messages.
In both cases, the user will be re-prompted to try again.
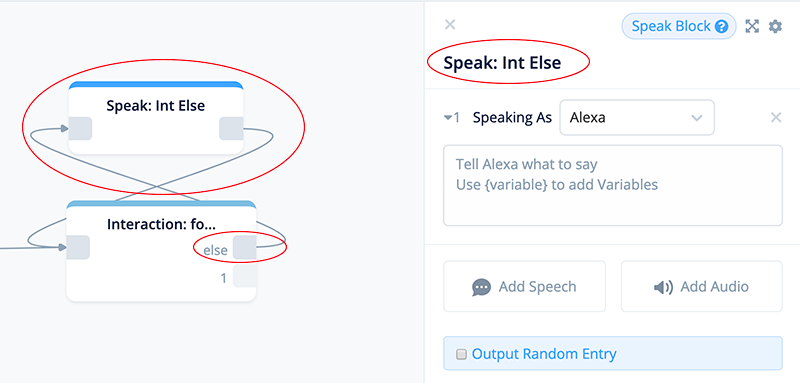
Add a new Speak block to the canvas as shown below. Rename it “Speak: Int Else.” Connect the in and out ports as shown below as well.
Add the following text:
I'm sorry I don't have that food in my database.
Can you pick another food?
Once completed, close the block. In the next task we are going to add another Speak block to handle successful interactions and connect it to the other exit port.
Task 8: Add a Speak block (Confirm)
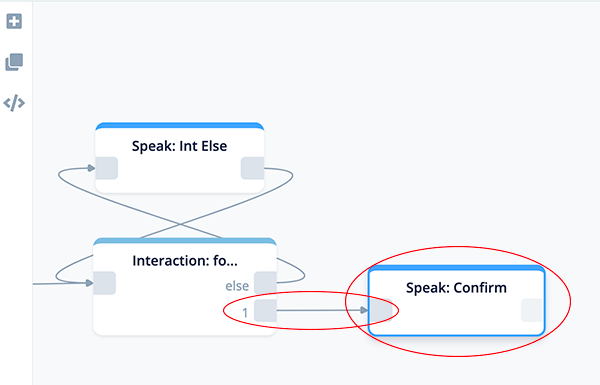
Add a new Speak block as shown below. Connect it to the node 1 port from the Interaction block.
This is the path that will be followed when a value is successfully captured from the user, processed, and successfully stored in the {foodSearch} variable.
Also change the name of the block to something meaningful, such as “Speak: Confirm.”
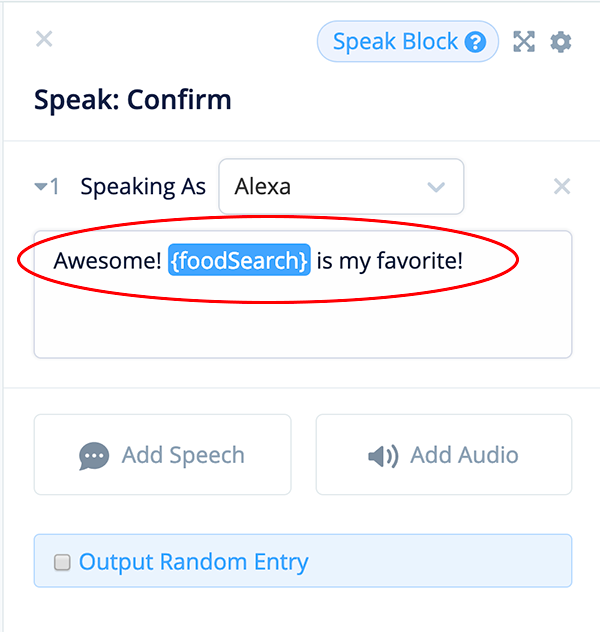
Add the following text to the Speak block. This text includes the variable {foodSearch}. For example, if the user replies “apple,” Alexa will in turn reply by saying “Awesome! apple is my favorite!”
Awesome! {foodSearch} is my favorite!NOTE: You can copy and paste the text, and it will work fine. However if you want to see the variable highlighted in blue color, you can trigger it by typing the first bracket “{“, which will provide an autocomplete prompt. If you select the variable name in this manner, the variable will be highlighted blue.
Once the text is added, close the Speak block.
Discussion: This block is optional and might not be needed in your skill designs. The benefit of having it is for troubleshooting the value coming out of the Interaction block, before it gets passed into the API block’s URL.
The canvas should now look like this:
Task 9: Add a Code block for URL Encoding
In our demo skill, we are capturing a user’s choice in the Interaction block and then retrieving a corresponding value from list slot type AMAZON.Food.
Then, we are storing the value from AMAZON.food in a variable.
Later in the process, we will be including the variable in a URL. The variable will be a search term for finding and retrieving a record from an Airtable.
There is a risk that some values in the AMAZON list slot types might have special characters. Special characters might interfere with the API’s ability to find and retrieve a record, resulting in an unintended failure.
To mitigate this risk, we will use a Code block and a bit of Javascript to encode the values in the variable.
We will use the following function. This is also a link which provides more information regarding use and syntax:
JavaScript encodeURIComponent() Function
This article provides a brief explanation about URL encoding:
Brief Introduction to URL Encoding
Add a Code block to the project canvas and connect it to the Speak: Confirm block. Rename the block to “Code: URL Encoding” for clarity.
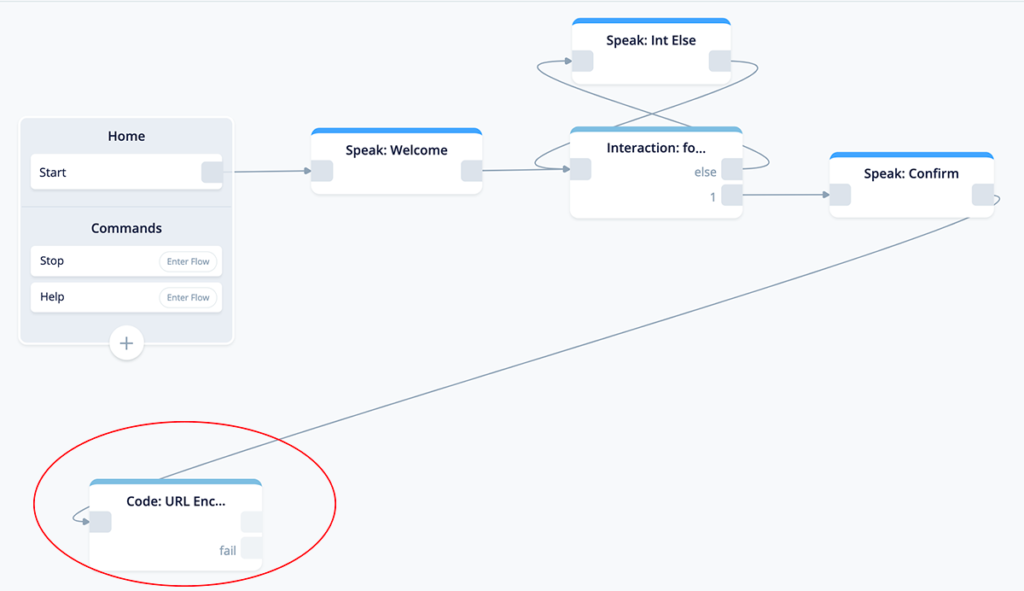
Add comments and the following function in the code block:
//foodSearch will be used in the Airtable URL
//Encode foodSearch in case there are special characters
foodSearch = encodeURIComponent(foodSearch)
The above code will update the foodSearch variable in case there are any special characters, making it URL-friendly.
Part 5 – Add a Voiceflow API Block
This set of tasks walks you through configuring an API block that will fetch a record from an Airtable. The URL will include the “Filter by Formula” option, and also include variable {foodSearch}, which we had configured earlier.
Task 1: Add an API block
Add an API block to the canvas, and connect it to the “Code: URL Encoding” block, as shown below. Also, rename the block to “API: Food” for clarity.
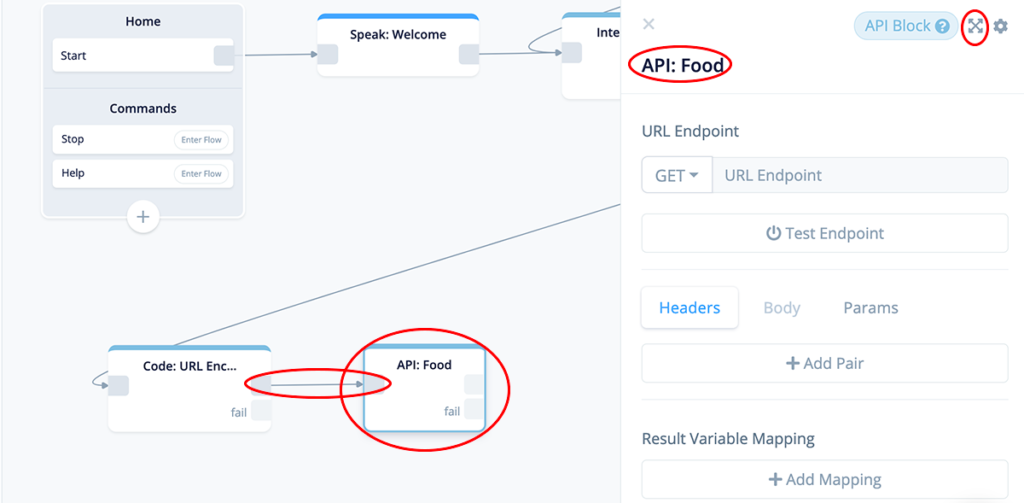
Click on the “X” in the upper right corner to expand the block.

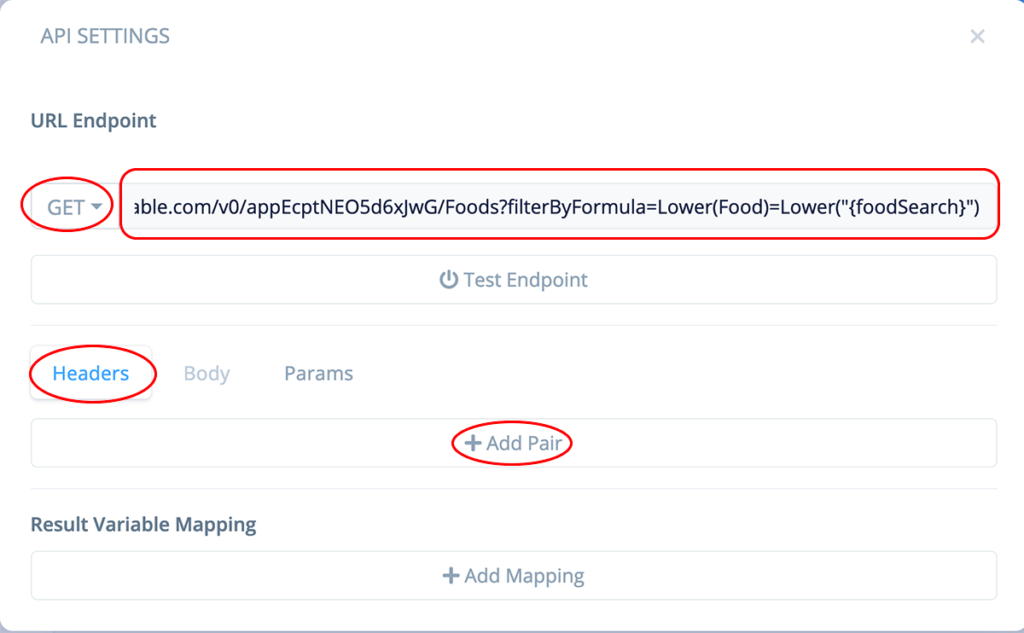
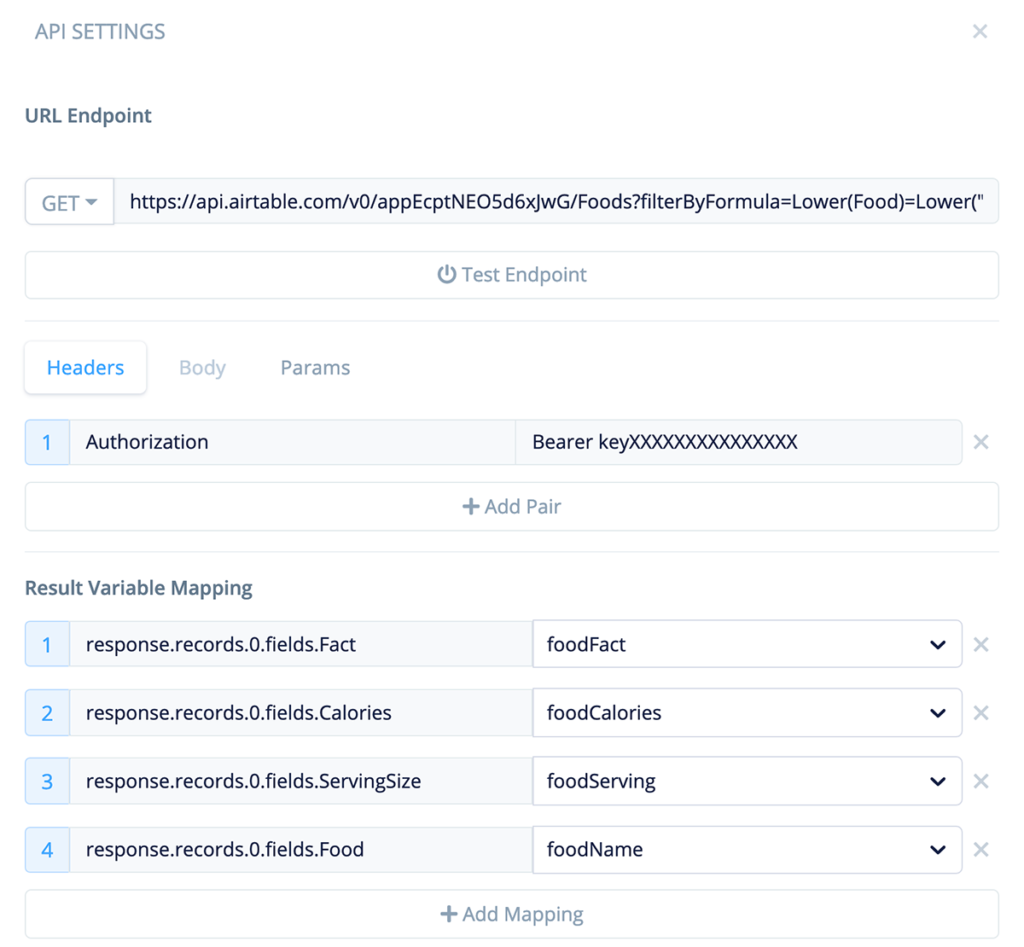
Task 2: Add a URL endpoint
The API block is going to perform a GET using the URL we developed earlier.
For the demo skill, the URL looks like the one below. If you are following along with your own test skill, the middle portion will be different.
https://api.airtable.com/v0/appEcptNEO5d6xJwG/Foods?
filterByFormula=Lower(Food)=Lower("{foodSearch}")
As you may recall, this URL includes the “Filter by Formula” option that was appended after the question mark (?).
“Food” is the name of the first column in the table, and {foodSearch} is the value we will search for in the first column. “Lower” converts the values on both sides of the formula to lowercase.
Add the URL for your own skill in the URL Endpoint field. Make sure GET is selected. It will look similar to this:
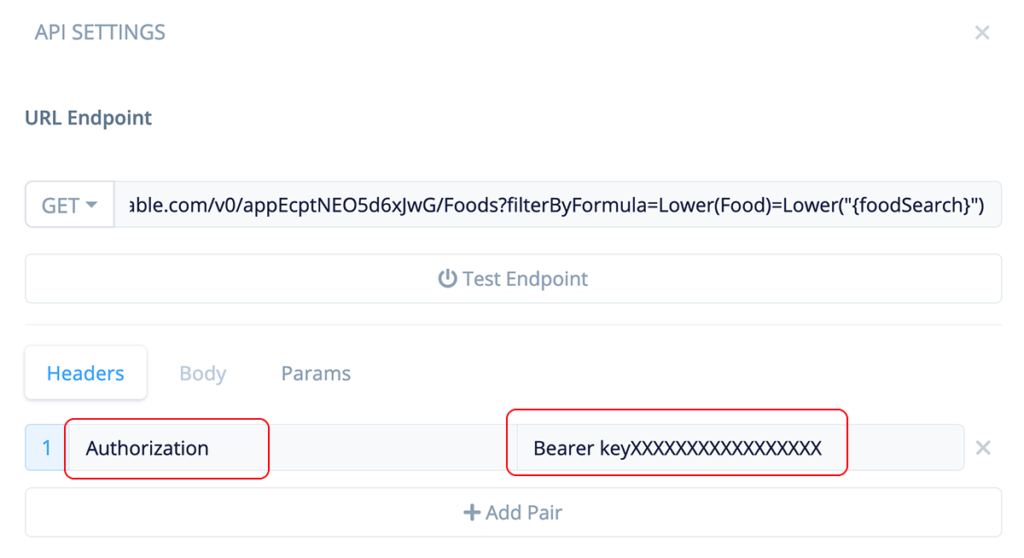
Task 3: Add an API header authorization
Click on the “Headers” tab, and then click “+ Add Pair.” This will open up a row, with fields named “key” and “value.”

Add “Authorization” in the “key” field, and add your secret API key in the “value” field.
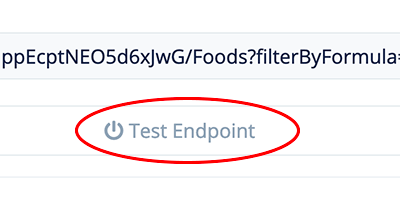
Task 4: Test the API endpoint
Now that the URL endpoint and Header are configured, we can test the API endpoint.
This will both validate there are no errors, and also provide what is needed to configure the results mapping. The results mapping will enable populating the Voiceflow variables with the additional information from the Airtable record.
Click the Test Endpoint button:
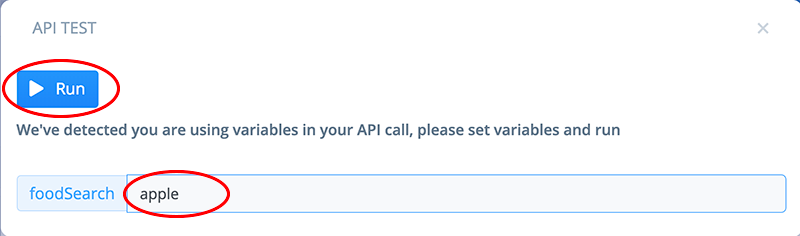
A new window will open which we can use to run the test. But before doing so, we need to specify a value for the variable {foodSearch}.
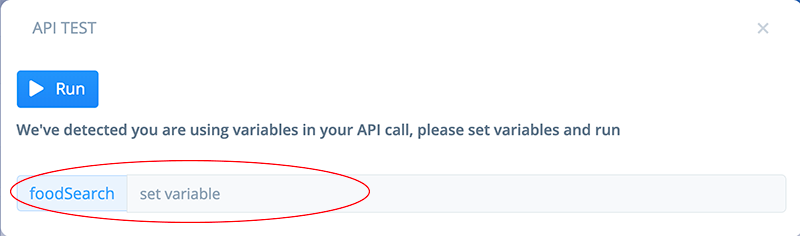
For our test, enter the value “apple” in the variable field. This is the primary key for the first record in the table. Next, click the “Run” button.
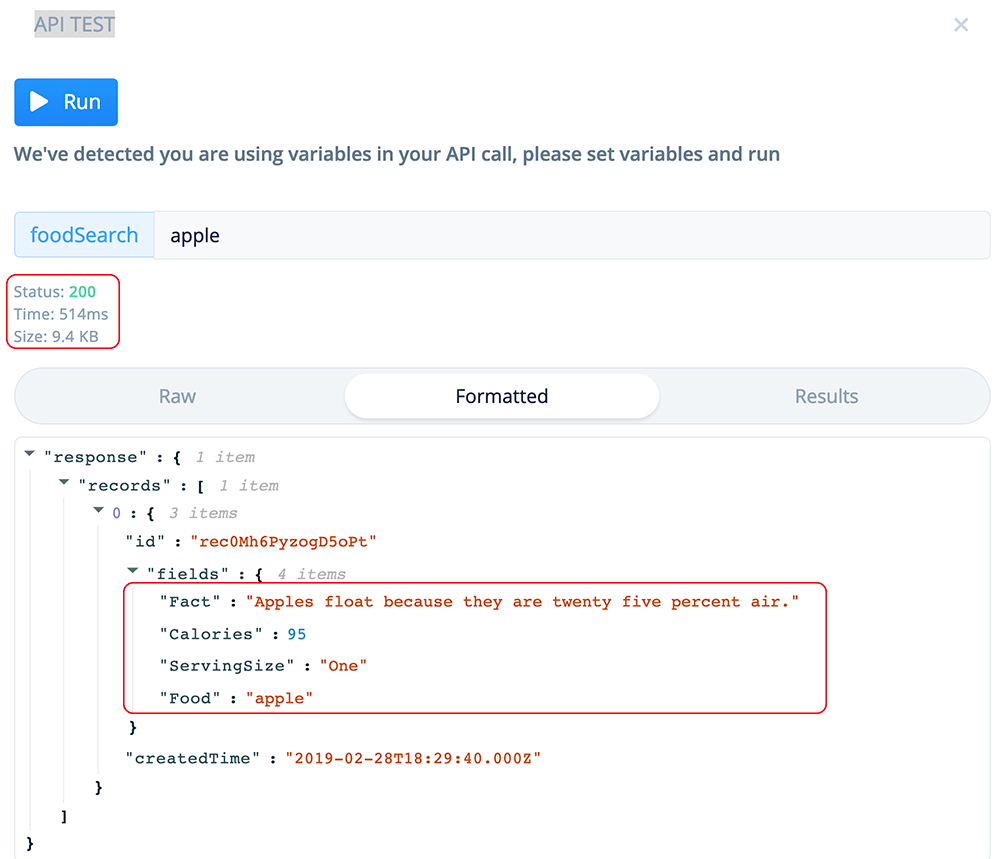
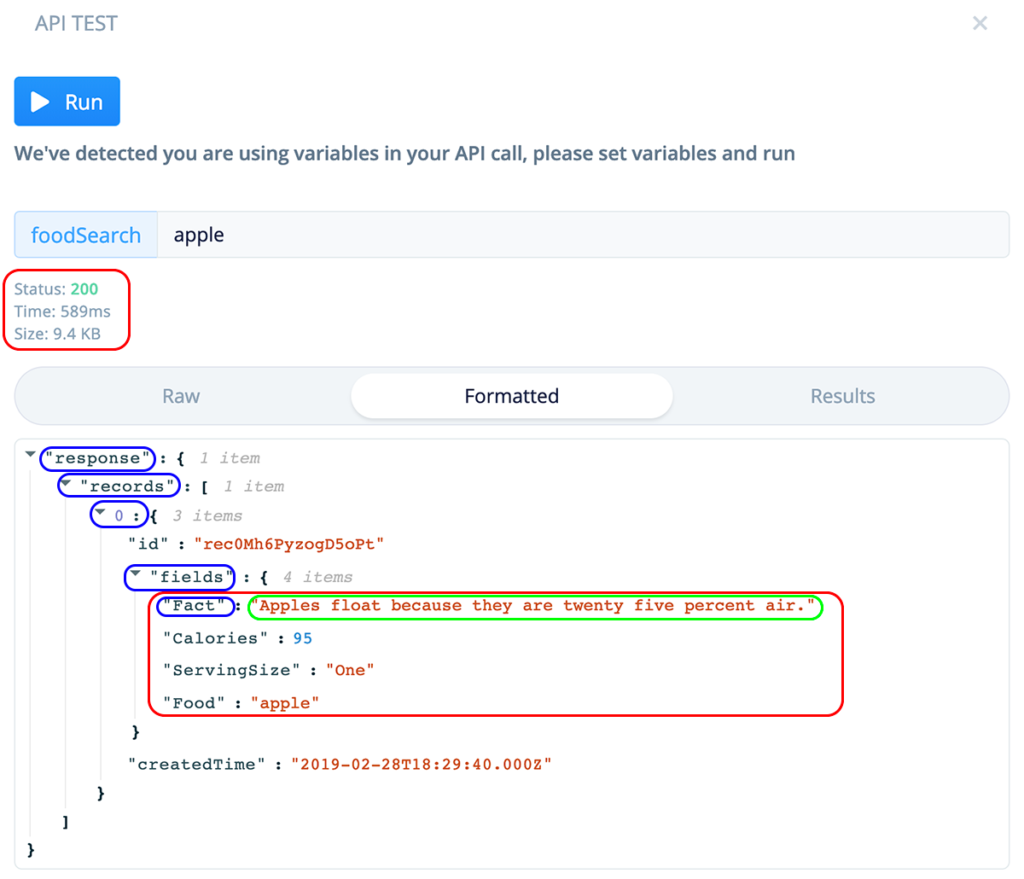
Assuming there are no errors, your results should be similar to below.
These results should be very similar to the example response provided in the Airtable API documentation we reviewed earlier, in Part 2, Task 4.
So, what is happening? The test is to make a call to the Airtable base “FoodGuru”, table “Foods”, pass in “apple” for the variable {foodSearch}, and find “apple” in the “Food” column.
Let’s break down the results of the test.
- Status 200 acknowledges that the request was received, and a response with a body is expected.
- Because the fetch was filtered using “Filter by Formula,” only one record is made available for this particular formula configuration.
- The formatted tree structure is the response. The innermost values are the columnar values for the retrieved record. These include the column names and the retrieved values.
If you are not getting desired results and unexpected status code responses (such as 4xx or 5xx), you may wish to begin troubleshooting by looking up the status code in the following website or other similar resources.
W3C HTTP Response Status Codes
This tutorial doesn’t cover diagnosing these types of errors, however this is a good starting point for troubleshooting.
Now that we have a response in our successful test results, we are interested in capturing the retrieved values into variables. This will enable Alexa reciting them to the user later in the process flow.
Keep this window open, as we will configure the variable mapping in the next task.
Task 5: Add result variable mapping and assign to variables
In the Test API Endpoint results screen, hover over the first returned value. In the example below, it is the value for Fact, “Apples float because…” When you hover over it, a small clipboard icon will appear.

Click on the clipboard icon. This will copy the path to this value into your computer’s clipboard. A small green checkmark will appear once it is copied.

Paste the result into Notepad or a similar tool. There are a total of four fields we wish to copy and paste. Repeat the copy/paste steps for the other three variables as well.
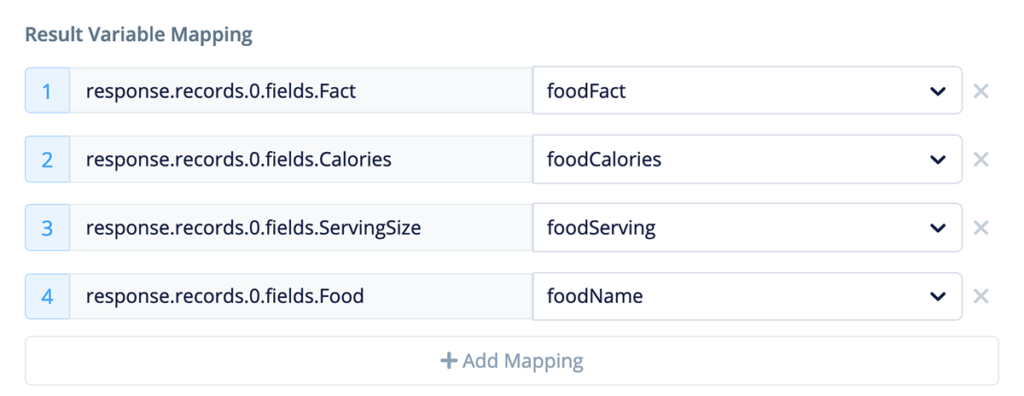
response.records.0.fields.Fact
response.records.0.fields.Calories
response.records.0.fields.ServingSize
response.records.0.fields.Food
Close the test results window and return to the expanded API block, and in the Results Variable Mapping section, click “+ Add Mapping.”
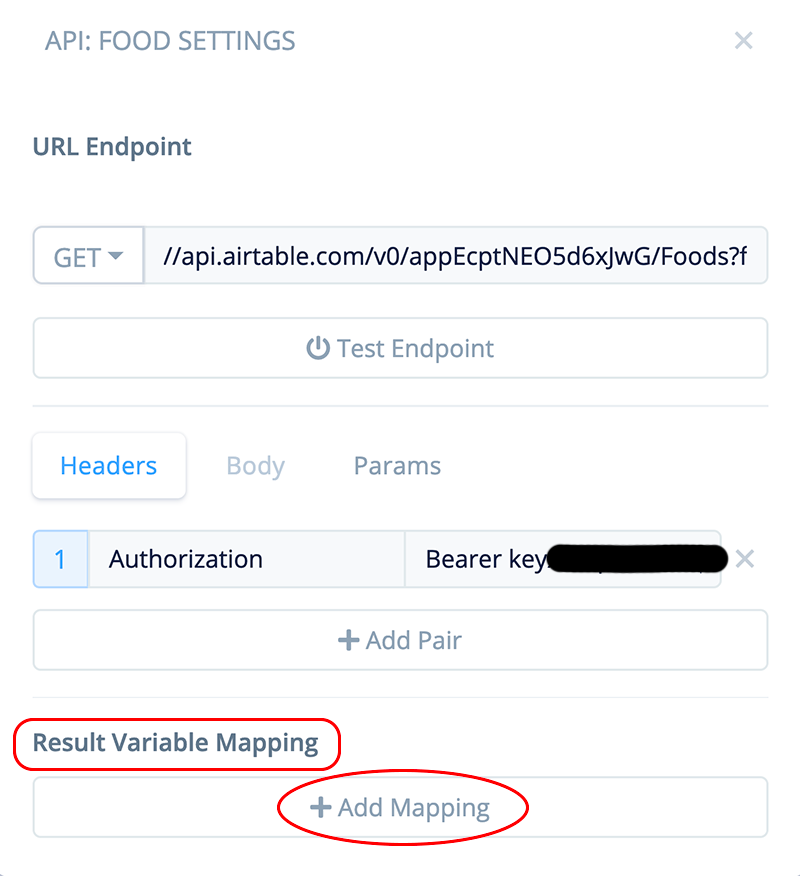
This will open up row 1.

Working from the top down, copy and paste from Notepad the result mapping for column “Fact” into the “object path” field.

Next, twirl open the drop down for the “Variable” field, and select the {foodFact} variable.
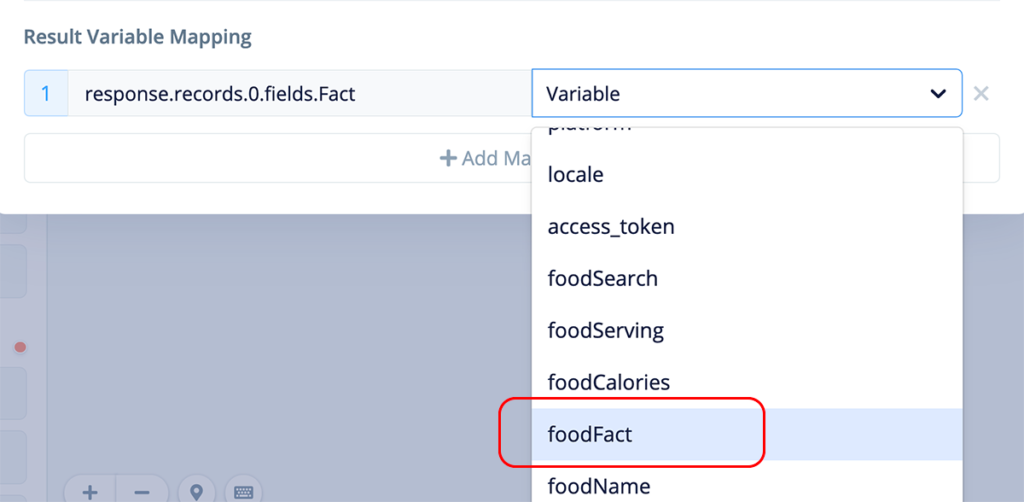
The mapping for the first variable is complete.

Discussion: If you take a moment to review the above, notice how the mapping provides a path to the value in the “Fact” field in the Airtable (blue ovals, as shown in the image below).
This will result in the value “Apples float because they are twenty five percent air.” being mapped from that record into the {foodFact} variable (green oval).
Click “+ Add Mapping” again, and repeat the process of mapping the other three variables in the same manner.
Note: We want to also map the name of the food from column 1, into the {foodName} variable. It is the same value that is in the {foodSearch} variable. However we want Alexa to be able to recite the name of the food as it comes from the database. The reason is because the {foodSearch} variable may have been URL encoded with special values.
Once complete, the lower part of your API block should be similar to this:
The API block configuration is now complete, and the API Endpoint test was successful.
Part 6 – Complete the Voiceflow Project
This next set of tasks adds another Speak block to enable Alexa reciting the results during testing, as well as connecting the API block failover port.
Once this set of tasks are complete, we can then proceed to testing on Alexa.
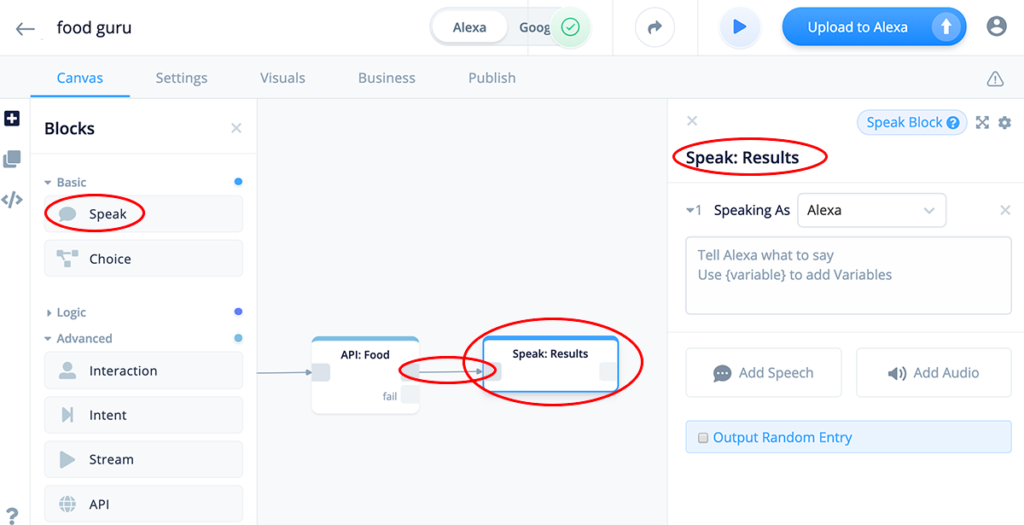
Task 1: Add a Speak block (Results)
Add a Speak block to the canvas and connect it to the output port of the API block. Also rename your block “Speak: Results” for clarity. This block will recite the results of the values retrieved into the variables by the API block.
Add the following text:
Fun fact. {foodFact}. {foodServing} {foodName} has
{foodCalories} calories. 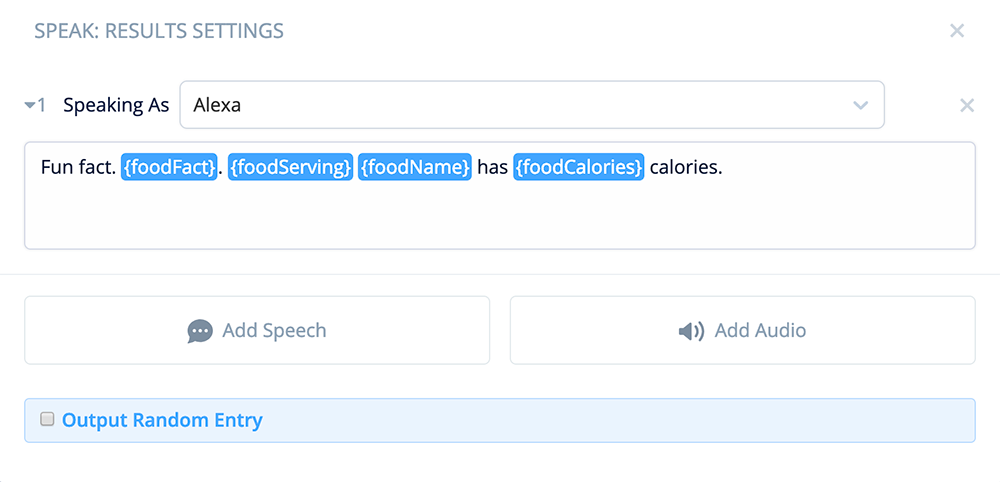
Expected results: When the test is run, and the user replies “apple,” we will anticipate Alexa reciting the following for this block:
“Fun fact. apples float because they are twenty five percent air. One apple has 95 calories.”
The test skill should now look similar to this:
Task 2: Connect the API Fail port
Connect the “fail” port of the API block to the entry port of the “Speak: Int Else” block.
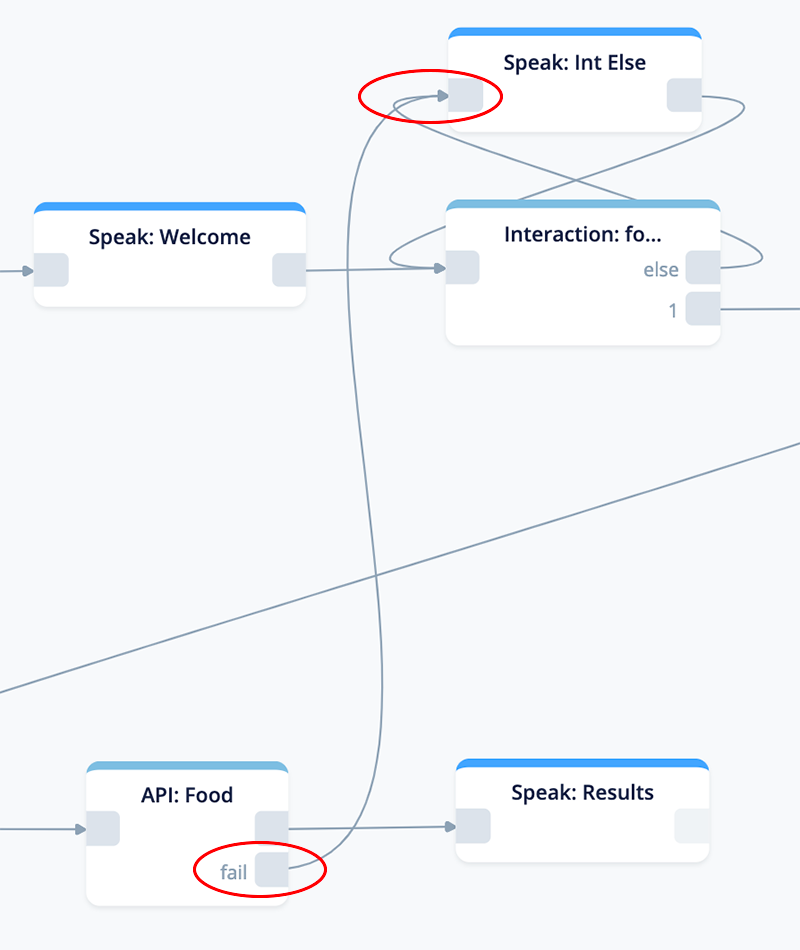
This is an important failover that needs to be managed.
If the user asks for a food that happens to exist in AMAZON.Food, but does NOT exist in your Airtable database, the API will fail to retrieve and filter a record. When this occurs, the skill will flow to the “Speak: Int Else” block and re-prompt the user.
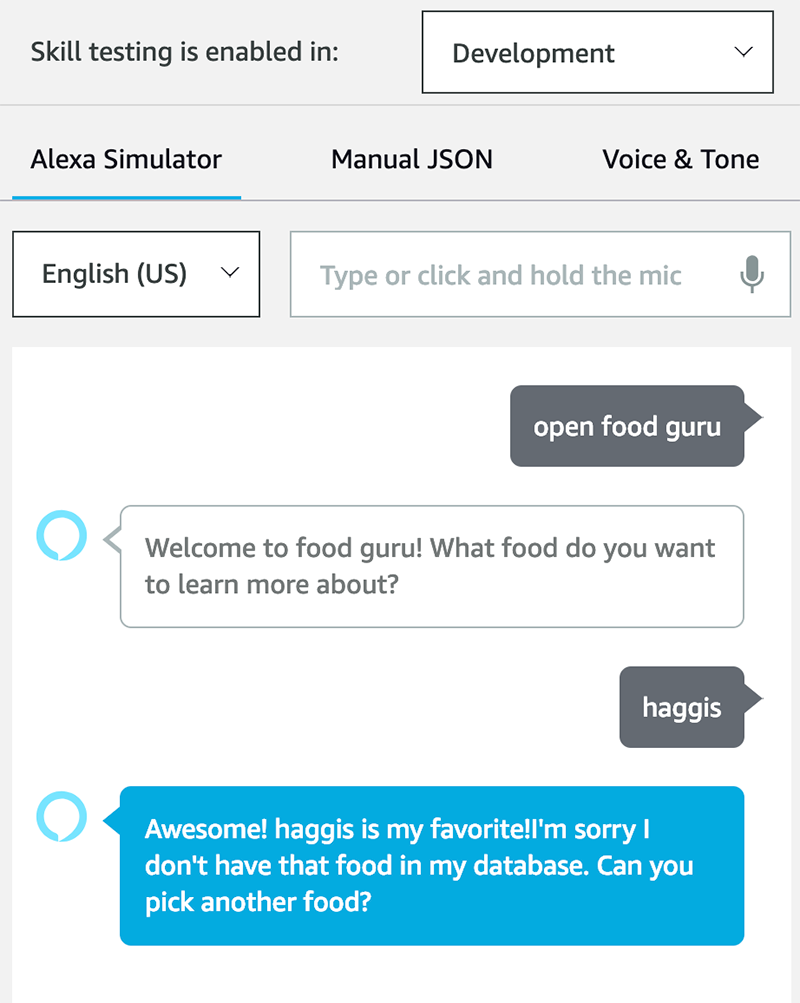
For example, let’s suppose the user asks for “haggis.” Haggis exists in “AMAZON.Food”. However it is not in the Airtable database. When the API fails, the user will be informed the requested food is not in the database, and to either try again or ask for a different food.
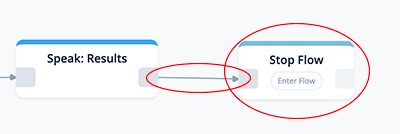
Task 3: Add a Flow/Stop Block
For completeness, add a Flow block, associate it with the Stop flow, and connect it to the Speak: Results block.
Task 4: Review completed project
Our test project is complete, ready for uploading to the Alexa Development Console (ADC) and is ready for testing.
Part 7 – Test on Alexa Developer Console (ADC)
There are many ways to test an Alexa skill. We have already run one internal test, which was to test the URL endpoint. This confirmed Voiceflow is able to access your Airtable and bring back a record.
This skill includes an Interaction block. As such, it is recommended testing verbally (using your voice), when testing using ADC, rather than typing the user replies.
This enables checking that Alexa is correctly resolving your verbal utterance into text. A second way to test is with an Echo device, again, using verbal interactions.
A key test is to make sure that the food that the user asks about is utilized by the interaction block and list slot type (AMAZON.Food) and stored in a variable.
When this is successful, the first speak block will confirm by reciting what is in the variable. If this test fails, the Speak: Int Else” block will be recited.
A second key test is making sure the value in the variable can successfully be found in the Airtable.
One possible outcome is that the record is simply not in the Airtable. Technically this is not necessarily an error from a technical or configuration perspective. If your food skill is supposed to be only about vegetables, and the user asks for “hot dog,”it may be more a matter of communication regarding the purpose of the skill, rather than an error. In these cases, the user can be provided with additional information and then be re-prompted to try again.
There may be failures do to spelling differences, or plural/singular forms of the food name may need to be added. To summarize, if the value from AMAZON.Food doesn’t match the key value in the Airtable, there will be a failure. Our demo skill will re-prompt the user in these cases.
As such, it is recommended to test as many of your records in your Airtable as time and budget allows, to ensure they will be successfully retrieved.
Task 1: Upload to Alexa
Upload your completed test skill to the Alexa Developer Console (ADC).
Task 2: Test Case 1
For this first test case, let’s test the “happy path.”
Access the ADC test screen. Enable testing in “Development” mode if it is not already enabled, and confirm your language/region.
Click and hold the small microphone and verbally invoke the skill.
“open food guru”
Release the microphone button. When Alexa asks what kind of food you want to learn more about, click and hold the microphone again, and verbally say “I want to know about apple.”
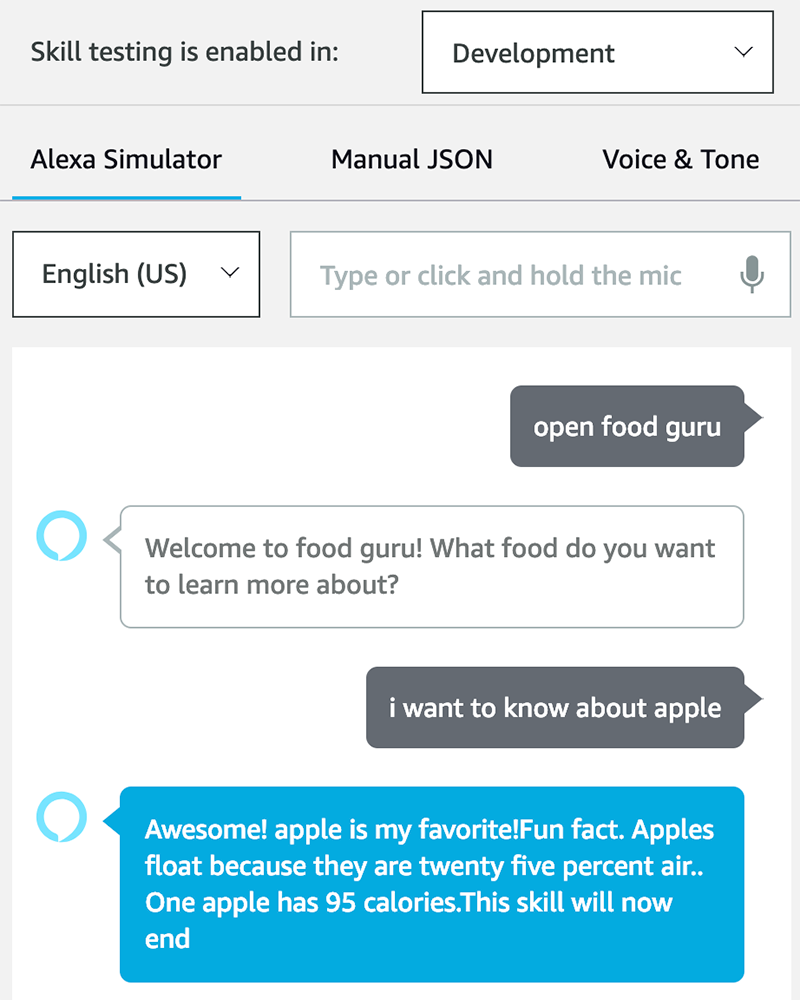
It you get results similar to the above, congratulations! Testing was successful.
Repeat the test using an Echo device if you have one available. This method is easier to test when it comes time to test many, if not all, records in your Airtable.
Task 3: Test Case 2
For this test case, let’s see what happens if the value in the first column of Airtable (specifically, the “Food” column), is capitalized, while the value coming from the AMAZON.Food list slot type is not capitalized. In short, we are working with “Avocado” in the Airtable record versus “avocado” from the list slot type.
Repeat the test, but this time say “I want an avocado.”
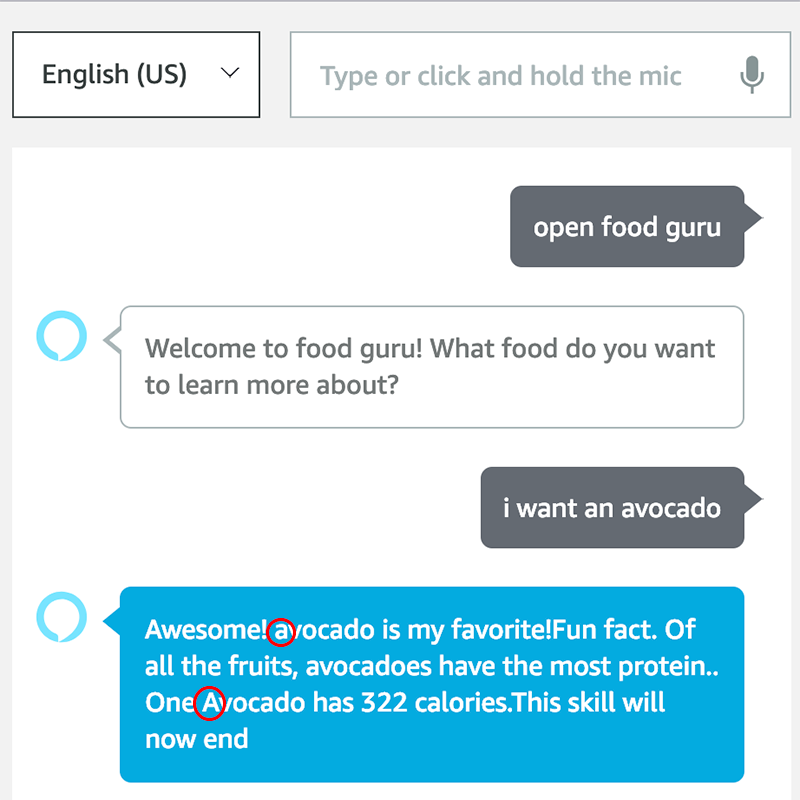
In the results, notice the first letter of “avocado” is lowercase (first small red circle). This value is captured by the “Speak: Confirm” block, just after the Interaction block. “avocado” is the value coming from the AMAZON.Food list slot type.
Now, also notice the first letter of “Avocado” is capitalized (second small red circle). This is the value coming from the Airtable record:
Normally this mis-match would fail due to uppercase versus lowercase. However because we used the “Lower” command in the filter by formula configuration in the URL, the match was successful, and Voiceflow was able to retrieve the record.
https://api.airtable.com/v0/appEcptNEO5d6xJwG/Foods?
filterByFormula=Lower(Food)=Lower("{foodSearch}")
For this test, the lowercase of “Avocado” was the search criteria in the “Food” column in the left hand side of the formula. This resulted in a match to “avocado” in the {foodSearch} value coming from the AMAZON.Food list slot type.
Task 4: Test Case 3
For this test case, let’s ask for a food name that is a valid food, but is not in our Airtable. Our expectations is that our “Speak: Else Int” block will inform the user, and prompt them to ask for another food.
The second part of the test will for the user to then specify a food that indeed exists in the Airtable, and Alexa processes the user’s request successfully.
Invoke the skill, and ask for “haggis,” which is not in the Airtable.
If the result is similar to above, this part of the test is successful. Alexa informed the user the food is not in the database, and asked the user to pick another food. Technically, the flow followed the API fail port to the Speak block in order to re-prompt the user.
While the skill is still open, ask for “cherries,” which is in the database.
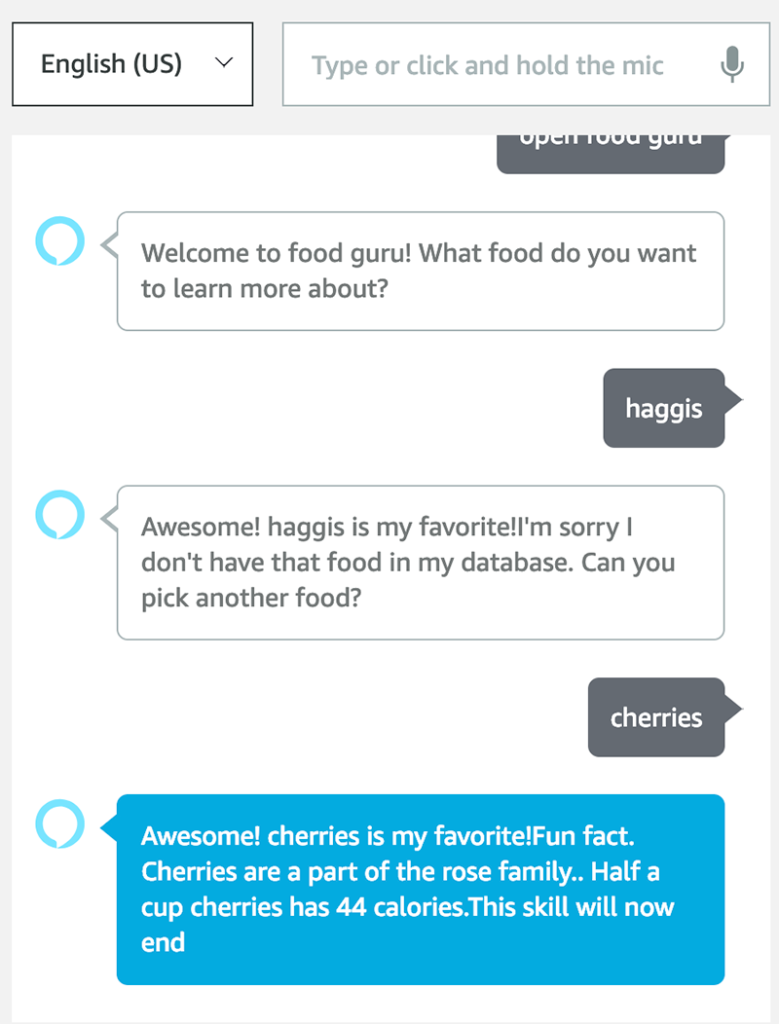
if the result is similar to the above, Alexa successfully re-prompted the user and recited the desired information to the user.
Task 5: Test Case 4
For this test case, let’s see what happens if the value in the first column of Airtable (specifically, the “Food” column), is not capitalized, while the value coming from the AMAZON.Food list slot type is capitalized. In short, we are working with “swiss cheese” in the Airtable record versus “Swiss cheese” from the list slot type.
Invoke the skill, and ask for “swiss cheese.”
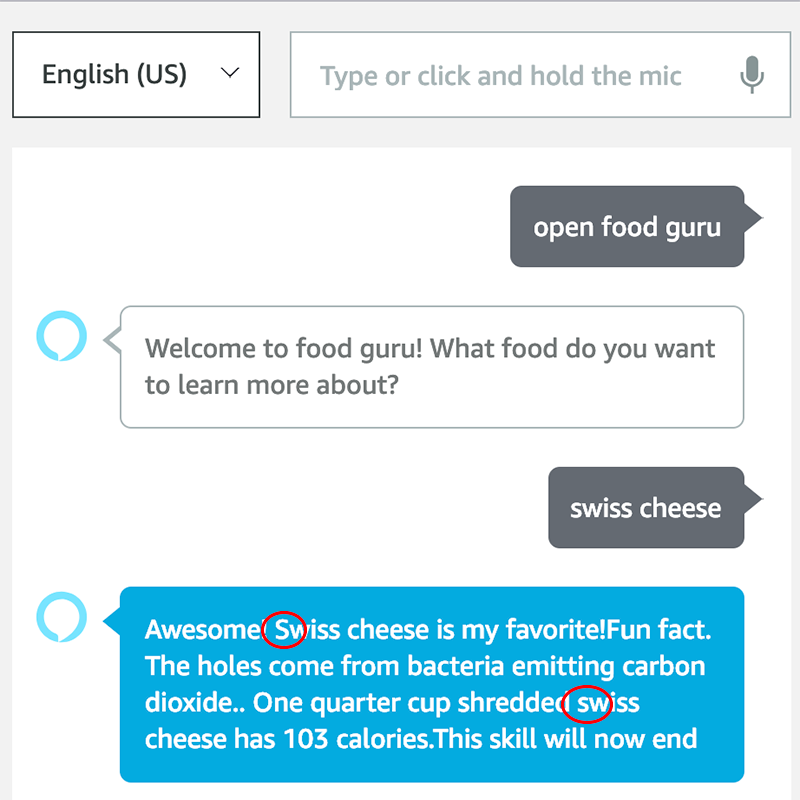
If you got the same results, the test was successful.
Notice that the first letter of “Swiss cheese” is capitalized (highlighted in the first small red circle). “Swiss cheese” is capitalized coming out of the AMAZON.Food list slot type.
Likewise, notice the first letter of “swiss cheese” is not capitalized (highlighted in the second small red circle). In this case, this value is coming from the Airtable:
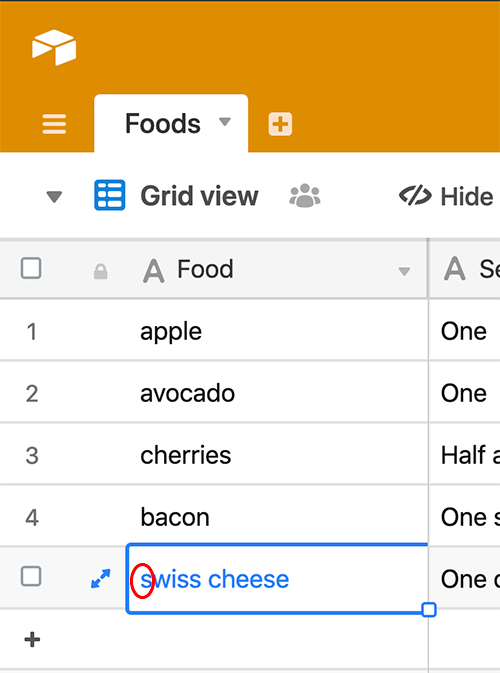
This is similar to the test case for “Avocado,” except the capitalization is occurring in the variable value from the list slot type (AMAZON.Food).
Normally this mis-match would fail due to uppercase versus lowercase. However because we used the “Lower” command in the filter by formula configuration in the URL, the match was successful, and Voiceflow was able to retrieve the record.
https://api.airtable.com/v0/appEcptNEO5d6xJwG/Foods?
filterByFormula=Lower(Food)=Lower("{foodSearch}")
For this test, “swiss cheese” is the primary key for the record in the “Food” column in the left hand side of the formula. In turn, the lower case of “Swiss cheese”, in variable {foodSearch} is used. This resulted in a match, and the test was successful.
If all your tests have passed at this point, congratulations, you have completed the tutorial, and you have learned how to configure a Voiceflow interaction block and the API block to retrieve a record from an Airtable.
Conclusion
In this tutorial we learned how to configure a Voiceflow API block to retrieve a single record from an Airtable based on a user’s input.
We started with a Mock business requirement, which is to provide some information to grade school students about different food options in school cafeterias. Smart speakers would be mounted at each food station. Students would be able to inquire about the food being offered, enabling them to learn more about the foods, and in turn empower them to make healthy food choices.
Initially, we built a small test Airtable, added five records, and then defined the URL for accessing a record using a “Filter by Formula” option.
We also configured a Voiceflow test skill. This included an interaction block. The Interaction block used an Amazon list slot type to capture the user’s input into a variable. The variable was then included in the API call. The API call was configured in a Voiceflow API block.
A lesson learned is that the Amazon pre-build list slot types can sometimes be fickle. it is not safe to assume all the values in a list slot type are lowercase, for example, which can result in unintended failures. Using “Lower” in the “Filter by Formula” mitigates this risk.
Likewise, of the many prebuilt Amazon list slot types, some might have special characters which might cause the API call to fail. To mitigate this risk we added a code block and a bit of Javascript which will encode the variable value when it is used in a URL.
Overall, the benefit of these techniques is being able to store interrelated data in Airtable database records, and being able to access individual records based on user utterances. While this skill leveraged the Amazon pre-built list slot types, these techniques can work with your custom slots as well.
Thank you for reading, and happy skill building!
Credits
Header photo by Godisable Jacob on Pexels.