
Level: Intermediate
This tutorial introduces the new Voiceflow locale variable, and a technique for using it to control which voice and text are used. The locale variable makes it possible to detect a user’s language and region, and use this for tailoring the interaction.
This tutorial assumes you are familiar with the basics of creating Alexa skills using Voiceflow. If not, review the prerequisites and try some of the introductory tutorials noted in the next section.
Prerequisites for Beginners
If you haven’t developed an Amazon Alexa skill before, or haven’t used Voiceflow, the following are recommended as prerequisites:
- Set up an Amazon Developer account. It is free:
Amazon Alexa Developer Home Page
2. Set up a Voiceflow Account. They offer a generous free tier from which you can design, develop and publish Amazon Alexa skills:
3. Try some of the Voiceflow University tutorials and practice making a skill or two. There is an introductory video series, along with extensive reference documentation.
Voiceflow Basics Tutorial Series
4. Join the Voiceflow User’s Group on Facebook. The community is very supportive should you have questions or issues when building skills, as well as a lot of tips, techniques and camaraderie.
Introduction
The locale property in an Amazon Alexa skill identifies the region and language preference of a customer.
For example, a customer may be in the U.S. and prefers to use English when talking with Alexa. Likewise, a customer may be in the U.K, and also use English when talking with Alexa. The difference, however is that accents, the voice used and word choices can be different.
In Voiceflow, the locale property is now available in the form of a global variable when building skills. This makes it possible to refine how a skill interacts with the user based on their region and language preferences.
Here are some example aspects of your skill that you can control using the locale variable:
- Which sub flows are run.
- Which APIs are called when retrieving data.
- Which Alexa Polly Voice is used.
- Which SSML tags are used.
- How variables are populated.
- Which text is spoken.
- Which units of measure are used.
- Which currency type is used.
- Which audio clips are played.
This tutorial illustrates how to use the Voiceflow locale variable for two regional alternatives, namely voice options and several alternate word options for English – US users versus English – UK users.
Locale Property, Valid Values
The locale property is an individual user’s geographical region and language preference. It is associated with a customer’s account, and is included in the request sent by Alexa when accessing your Alexa skills.
The following quote from the Amazon reference documentation illustrates the relationship between users, their devices, and your Alexa skills:
“Users who interact with Alexa in a particular language can use skills that support that language. For example, a user might set their Alexa device to use German. That user can enable and use any published skills available in their region that support German.”
Develop Skills in Multiple Languages
The valid values are reproduced below for copying and pasting when creating IF conditions using the locale variable. The first part of the code is the language, and the second part of the code is the region. For example, the value “en-GB” represents the english language and the UK region.
Code          Language (Region)
en-AU      // English (AU)
en-CA      // English (CA)
en-GB      // English (UK)
en-US      // English (US)
en-IN      // English (IN)
fr-CA      // French (CA)
fr-FR      // French (FR)
de-DE      // German (DE)
it-IT      // Italian (IT)
ja-JP      // Japanese (JP)
es-ES      // Spanish (ES)
ex-MX      // Spanish (MX)
Voiceflow Locale Variable
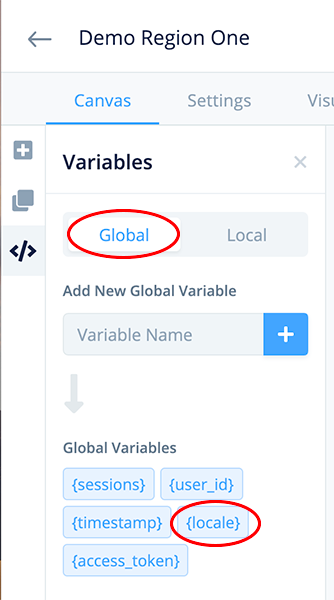
Variables are located in the left hand pane of the Voiceflow project canvas. The locale variable is a global variable. It will be automatically populated with the user’s locale when the skill is run.
Demonstration Skill
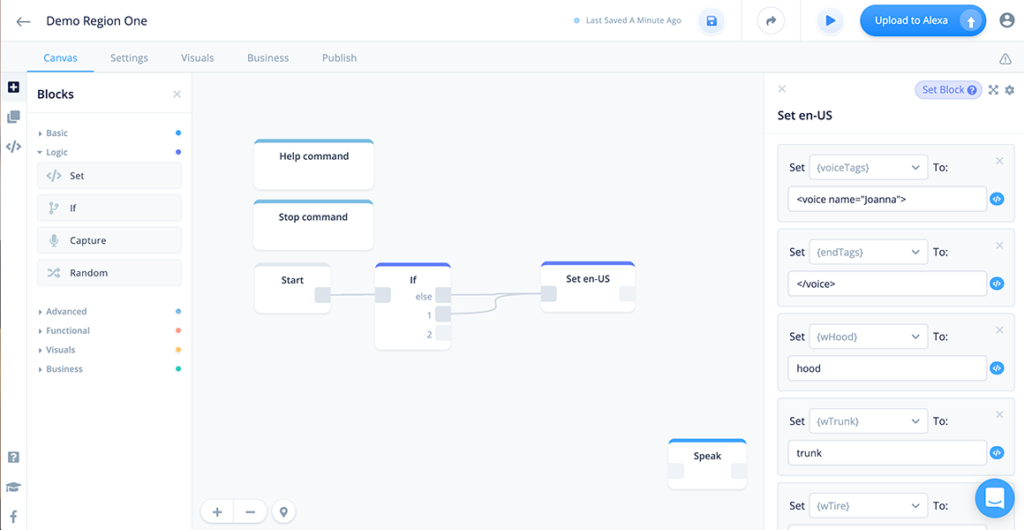
This demo skill provides an example of how to use the locale variable. Here is how our demo skill will look on the Voiceflow project canvas:
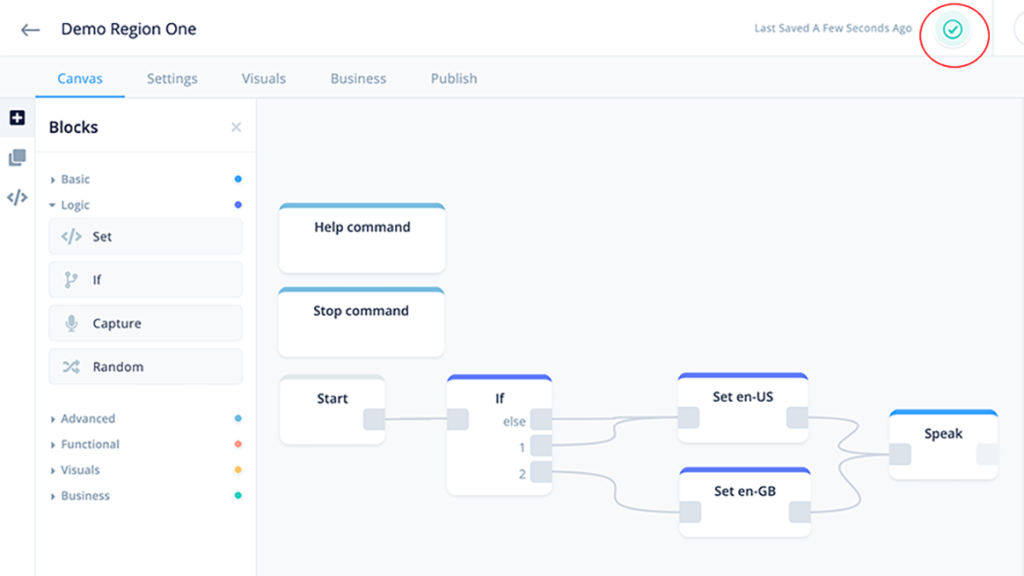
The demo skill will first check the locale variable in the IF block. If the locale is en-US, the skill will flow out of node 1 to a SET block. This SET block will then set several variables that are specific for that locale.
Likewise, if the locale is en-GB, the skill will flow out of node 2 to the SET block that will set the same variables which are specific for en-GB.
Afterwards, either SET block will flow to the SPEAK block, and during testing we will show how Alexa speaks differently, based on the locale.
If you wish, you can either drag all of the blocks onto the canvas right away, or add them one at a time and connect them as we proceed through the tutorial. TIP: Just drag out one SET block. After it is configured for the en-US values, we can copy it and edit it to make the en-GB SET block, which will save a bit of time.
Task Summary
Part 1 – Configure the demo skill
- Initiate a new project for US and UK
- Configure the Variables
- Configure the IF Block
- Configure the SET Block for en-US
- Configure the SET Block for en-GB
- Configure the SPEAK Block
Part 2 – Test on the Alexa Developer Console
- Test the en-US Configuration
- Test the en-GB Configuration
Part 1 – Configure the demo skill
Initiate a new project for US and UK
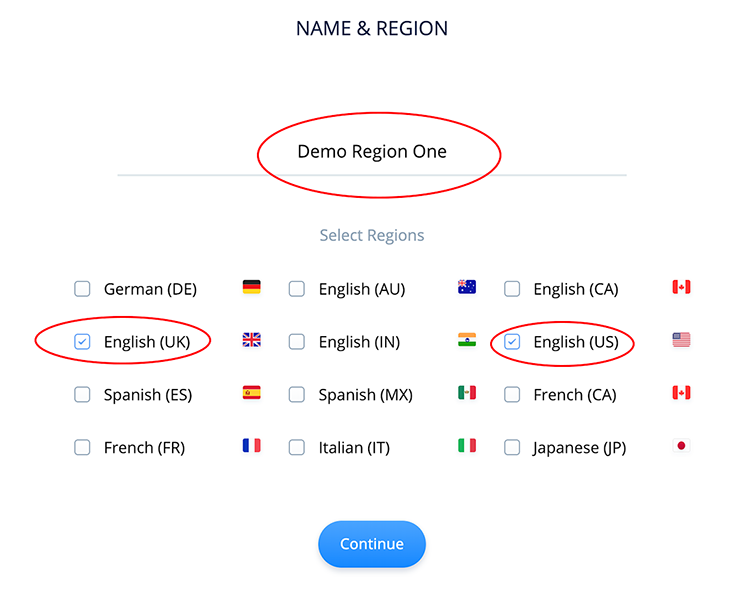
If you are going to follow along and reproduce the example skill, start a new Voiceflow project, and use whatever project / invocation name you prefer. Let’s imagine this project will be distributed to English (UK) and English (US) regions. Click the checkboxes as shown below.
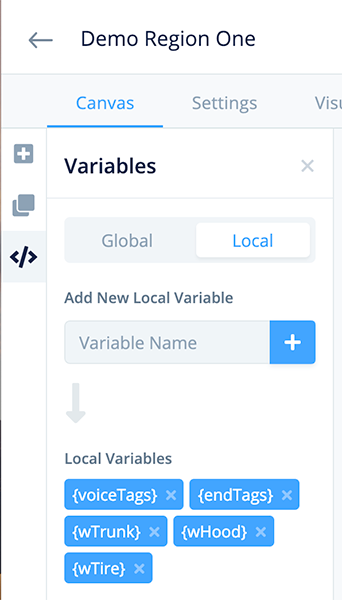
Configure Variables
We are going to add five variables for our tutorial. The variables could be either global or local, depending on your particular skill’s needs. However for this demo we can add them as local variables.
voiceTags     // This will store SSML tags for Polly voices.
endTags       // This will store the closing SSML tags for the
              // voices.
Using a matched pair of tags as shown above makes it easier if you decide to add prosody or other SSML tags for the voice. If a change is needed, changes can be done in one location for each voice, such as the SET blocks, rather than a bunch of SPEAK blocks throughout a large skill.
Also add the following three variables. These will store word alternatives for car parts.
wTrunk     // "trunk" versus "boot"
wHood      // "hood" versus "bonnet"
wTire      // "tire" versus "tyre"
The small “w” in front of the variable names is just to help indicate the variables are storing words. Use whatever nomenclature works best for you when naming and organizing your variables.
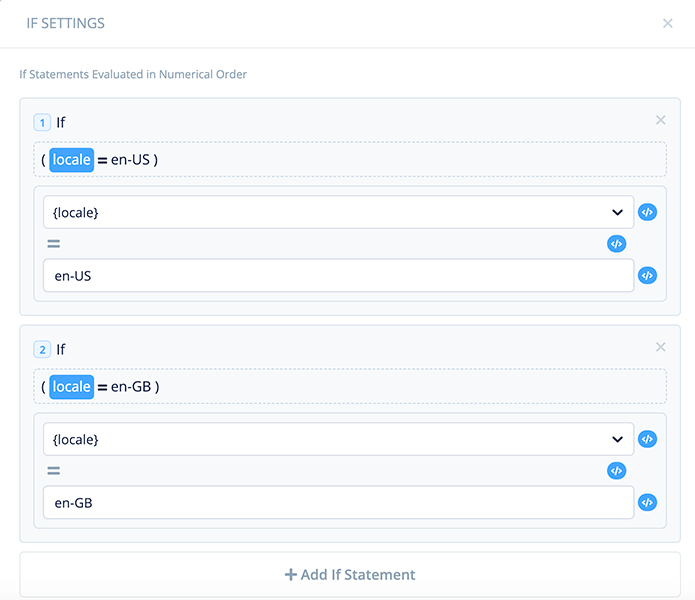
Configure the IF Block
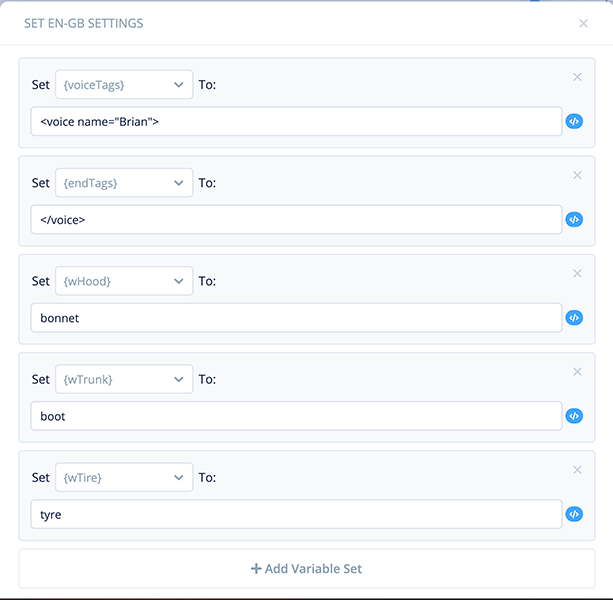
Add two IF statements as shown in the image below. To summarize, if the locale is en-US, the flow will exit via node 1. Likewise, if the locale is en-GB, the flow will exit via node 2.
NOTE: The IF block also has an Else exit node. An alternate approach would be to assume that if the value is not en-US, it must then be en-GB, and assign the Else node to en-GB. For clarity in this tutorial, we will use two distinct nodes, one for each region, and route the Else exit node in the same manner as node 1.
Configure the SET Block for en-US
Add the following five IF statements for the SET Block. This set block will be accessed if the user’s region is en-US.
First, assign the Alexa Polly voice SSML tag for Joanna to the voiceTags variable. Joanna is an en-US voice.
<voice name="Joanna">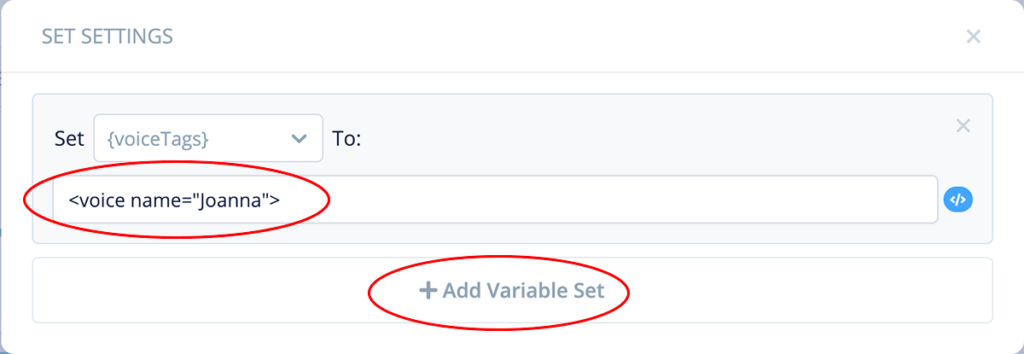
Second, click “+ Add Variable Set” and assign the endTags variable the closing voice SSML tag.
</voice>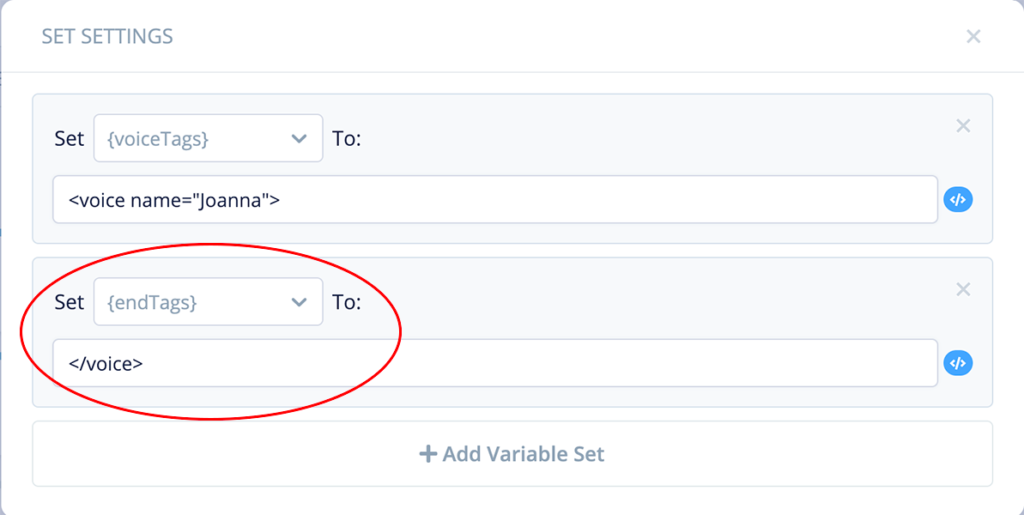
PRO TIP: The benefit of using a variable for the closing voice SSML tag, rather than just putting the SSML tag directly in the SPEAK blocks, is that it is easier if you wish to add some additional prosody, emphasis, or even break tags later. This will update the voice all throughout the skill without having to update each individual SPEAK block. The endTag variable would store the matching closing tags. This provides more flexibility and is an elegant way to add refinements to the voices.
Assign the word “hood” to the wHood variable.
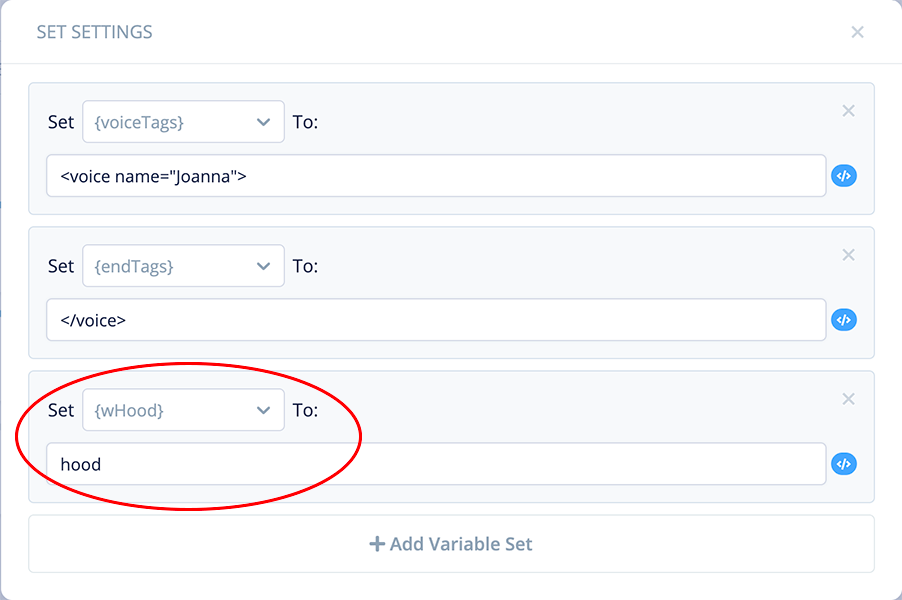
Assign the words “trunk” and “tire” to their respective variables.
You should now have five statements in your IF block for en-US, as shown above. Next, you can collapse it, rename it to “SET en-US”, and connect it to node 1 (and the Else exit node) of the IF statement.
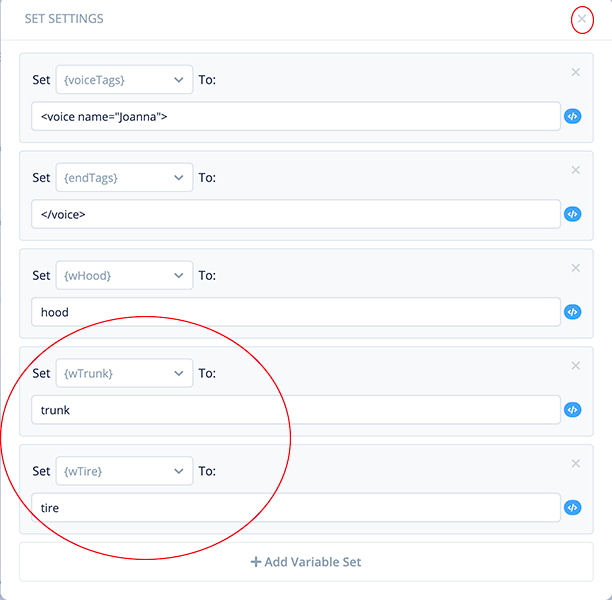
Configure the SET Block for en-GB
Rather than dragging out a second SET block from the left panel, it is easier to make a copy of the previous set block, and then edit it. To begin, make a copy of the previous SET block.
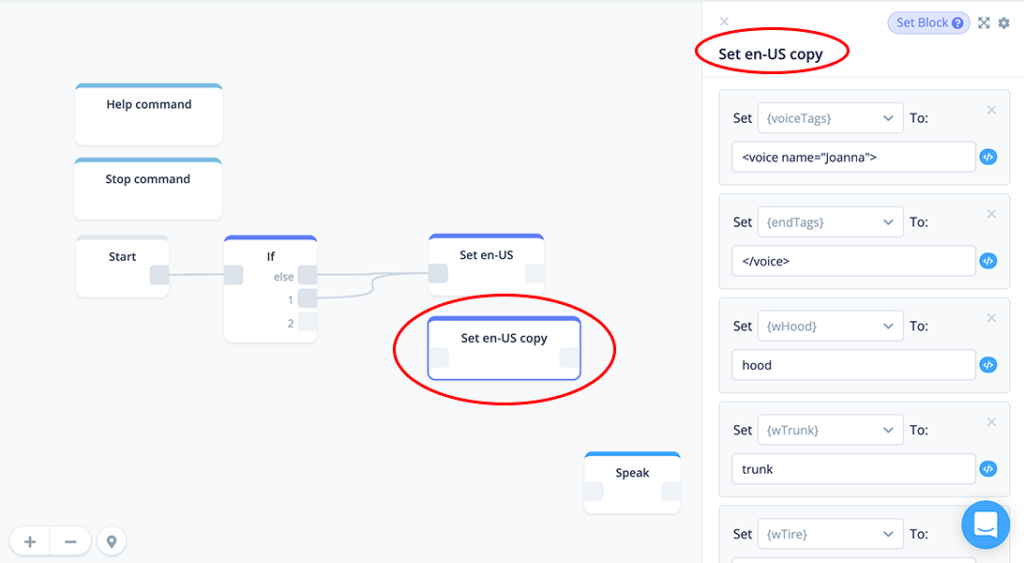
Second, rename the block to “Set en-GB”.
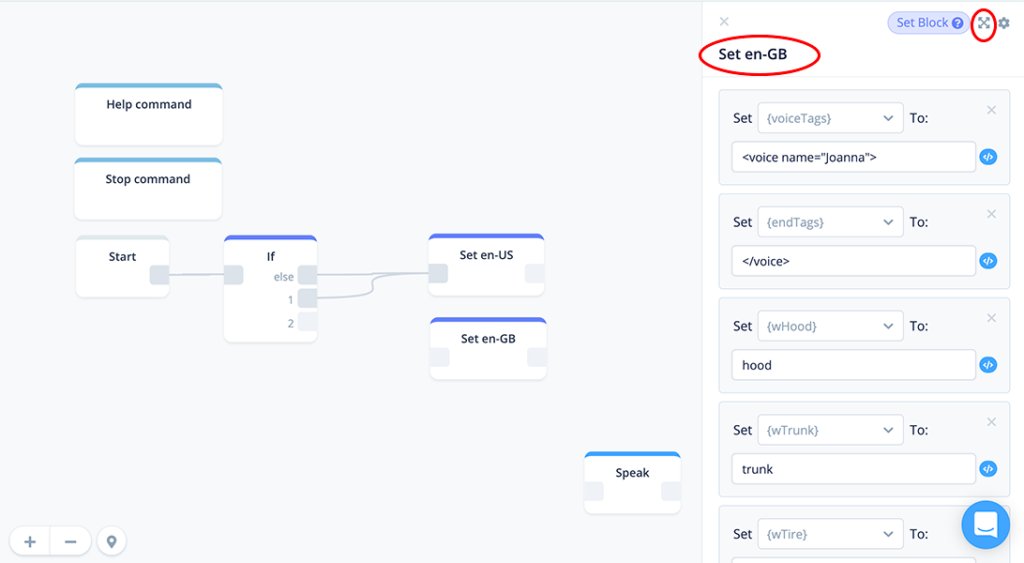
Third, expand the block and update the values to those which correspond with the en-GB region. “Brian” is an en-GB voice with a British accent.
<voice name="Brian">Replace “hood”, “trunk” and “tire” with “bonnet”, “boot” and “tyre.”
Finally, collapse the block and connect it to node 2 of the IF block.
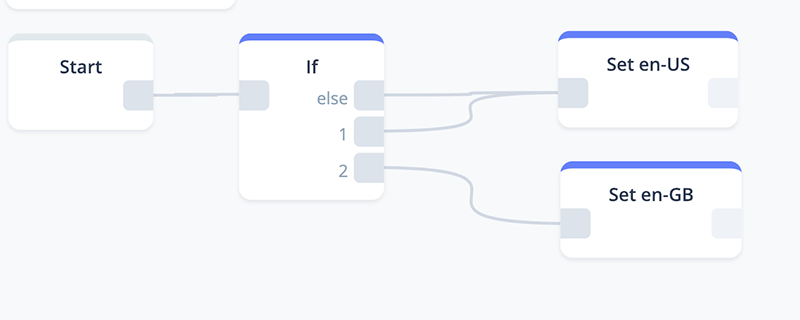
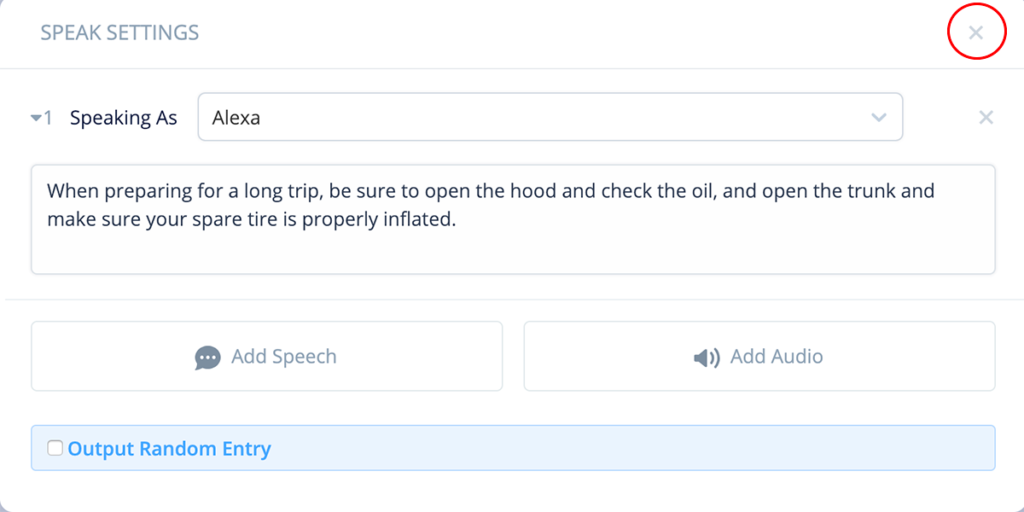
Configure the SPEAK Block
Position a SPEAK block on the canvas and connect to the two SET blocks as shown below.
Expand the SPEAK block and add the following “raw” text.
When preparing for a long trip, be sure to open the hood and check the oil, and open the trunk and make sure your spare tire is properly inflated.
In the next step we are going to add the variables for the voice tags, and substitute in variables for several words which are unique for each region.
More specifically, we are going to add the variables in the various positions as shown by the red circles in the image below. The voiceTags and endTags will be at the very beginning and end of the text. Likewise, we will substitute the variables wHood, wTrunk and wTire for their respective words.
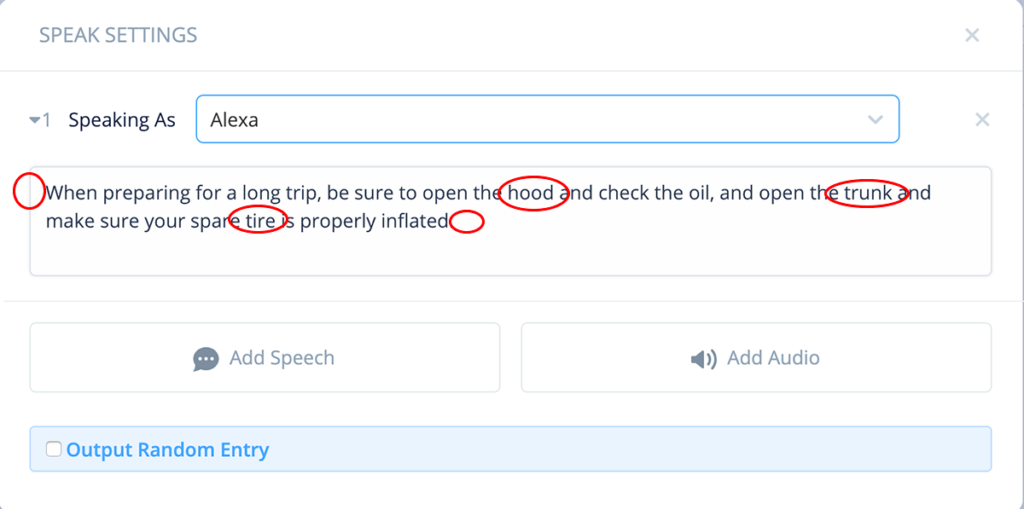
Add the variables as shown below.
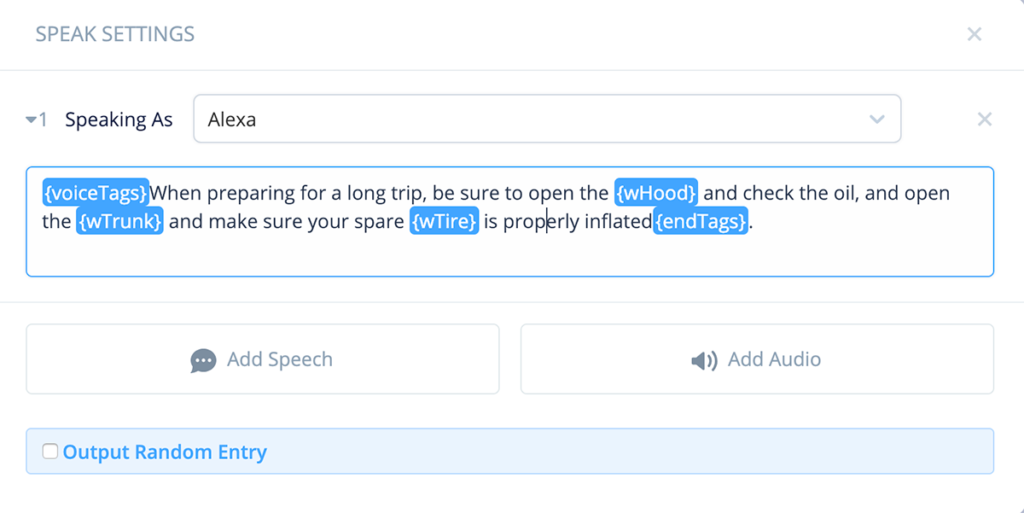
Once the SPEAK block is configured, collapse it. The canvas should now look something like this:
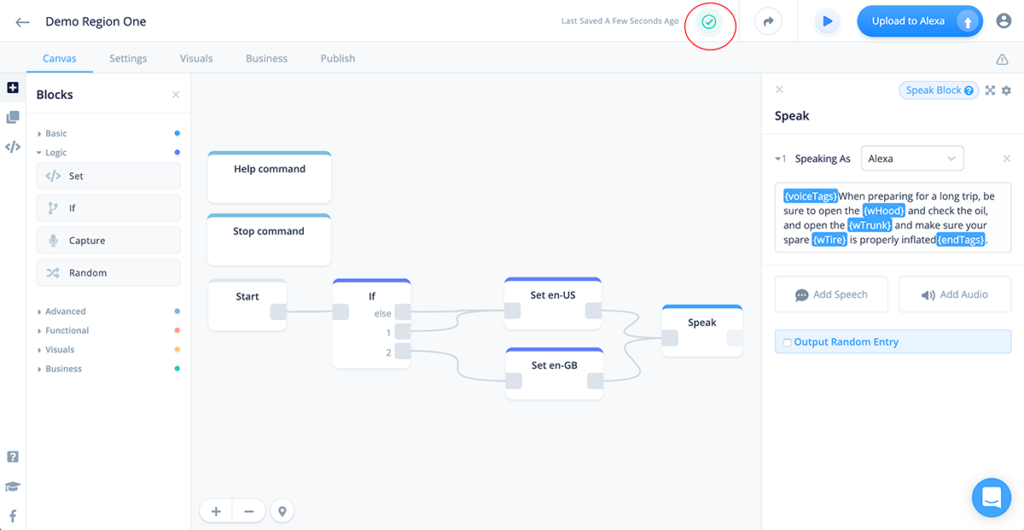
Congratulations, the demo skill is now ready for testing!
Part 2 – Test on the Alexa Developer Console
Test the en-US Configuration
Press Upload to Alexa to prepare the demo skill for testing, and then access the ADC (Alexa Developer Console) test tab.
Be sure the region selection is ENGLISH (US)
Run the test, using the invocation name you provided. The output should be similar to the following:
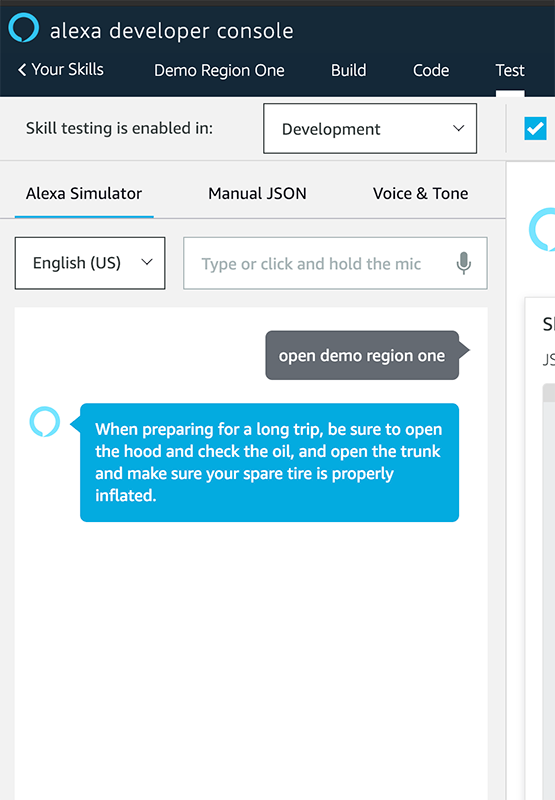
While listening, you should hear Joanna’s voice, using an en-US accent, and the US versions of the words for trunk, hood and tire. Audio sample:
If you view the JSON output in the testing pane, you can visually confirm that Joanna’s voice was used.
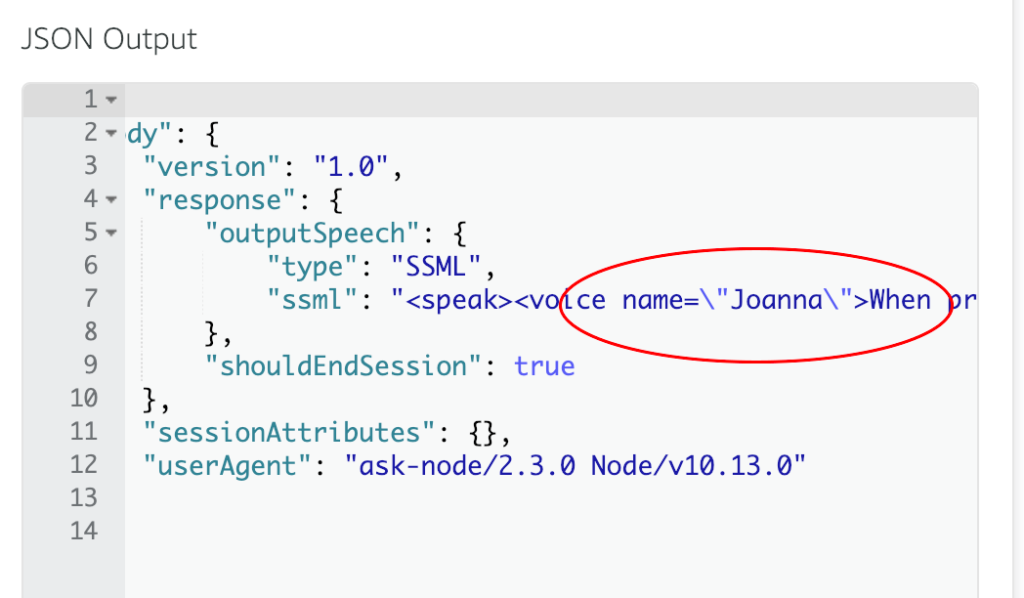
Testing is successful.
Test the en-GB Configuration
For this next test, change the region selection to ENGLISH (GB).
Run the test again. The output should be similar to the following. In the lower blue box, the alternative words appear in the spoken text.
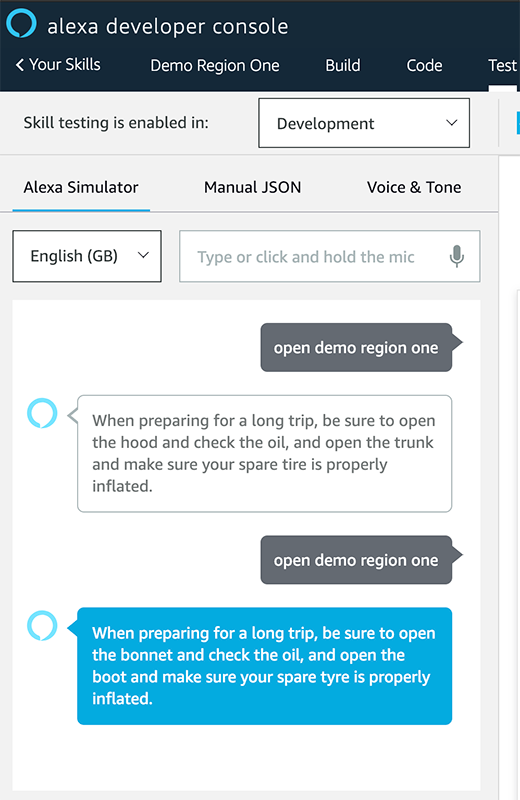
While listening, you should hear Brian’s voice, using a British accent, and the the words boot, bonnet and tyre. Audio sample:
If you view the JSON output in the testing pane, you can visually confirm that Brian’s voice was used.

Testing is successful. In consideration of both tests, the locale variable is successfully triggering use of different voices and spoken text.
Conclusion
This tutorial introduced you to the new locale variable which is available in Voiceflow. With this variable, it is possible to design and develop multi-region skills which take into consideration a user’s region and language preferences.
The benefit of using the locale variable is being able to provide tailored interactions for users among different regions. This will provide more engaging and enriched experiences when using your skill.
Thank you for reading, and happy skill building!
Credits
Header photo by freestocks.org on Unsplash